
| 일 | 월 | 화 | 수 | 목 | 금 | 토 |
|---|---|---|---|---|---|---|
| 1 | 2 | 3 | 4 | 5 | ||
| 6 | 7 | 8 | 9 | 10 | 11 | 12 |
| 13 | 14 | 15 | 16 | 17 | 18 | 19 |
| 20 | 21 | 22 | 23 | 24 | 25 | 26 |
| 27 | 28 | 29 | 30 |
- 코엑스
- 여행
- 자바
- 코딩테스트
- BFS
- 알고리즘
- bigdata engineering
- hadoop
- Data Engineer
- Trino
- 파이썬
- Data Engineering
- apache iceberg
- 개발
- 프로그래머스
- bigdata engineer
- Iceberg
- 코테
- 코딩
- java
- HIVE
- dfs
- 양평
- BigData
- 용인맛집
- 영어
- 백준
- 삼성역맛집
- 맛집
- 코엑스맛집
- Today
- Total
지구정복
[2021_팀. 하둡과 웹크롤러를 이용한 의류 브랜드 경쟁력 분석] 본문
깃헙주소: https://github.com/JiHooney/_Project-BA
1. 프로젝트 배경
BA Project (Brand Analysis)
패션 각 시즌마다 소비자들에게 인기가 많은 브랜드와 그렇지 못한 브랜드가 나뉜다. 한 시즌동안 소비자들에게 인기가 있었던 브랜드를 선정하기 위해 국내 남성패션 관련하여 가장 규모가 큰 카페인 'GOCD(Go Out Casually Dressed)'의 게시글들을 크롤링하여 한 시즌동안 가장 언급이 많았던 브랜드를 선정한다. 그리고 선정된 각각의 브랜드 관련 게시글을 분석하여 해당 브랜드가 타 브랜드에 비해 어떠한 경쟁력이 있었는 지를 분석한다.
2. 기술스택 및 역할
2.1 기술스택
-프로그래밍 언어 : Python3, R
-운영체제 : Window10, CentOS 7 Linux
-소프트웨어 : Oracle VirtualBox, Jupyter Notebook, Eclipse, Hadoop, zookeeper, Flume, hive, sqoop, MySQL,
MariaDB, RStudio
2.2 팀원소개 및 역할
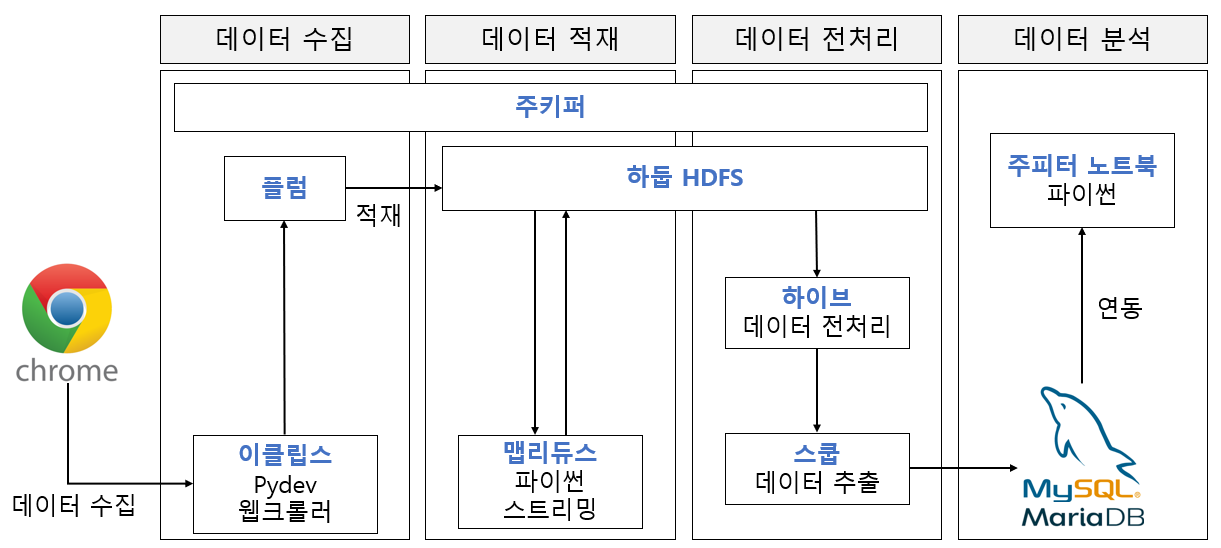
-나(본인) : 데이터 수집, 적재, 전처리 (데이터 엔지니어링 담당)
-친구 : 데이터 수집, 데이터 분석 (데이터 분석 담당)
3. 구현과정
3.1 하둡 에코시스템 구축
3.1.1 소프트웨어 및 하드웨어 아키텍처
-소프트웨어 아키텍처
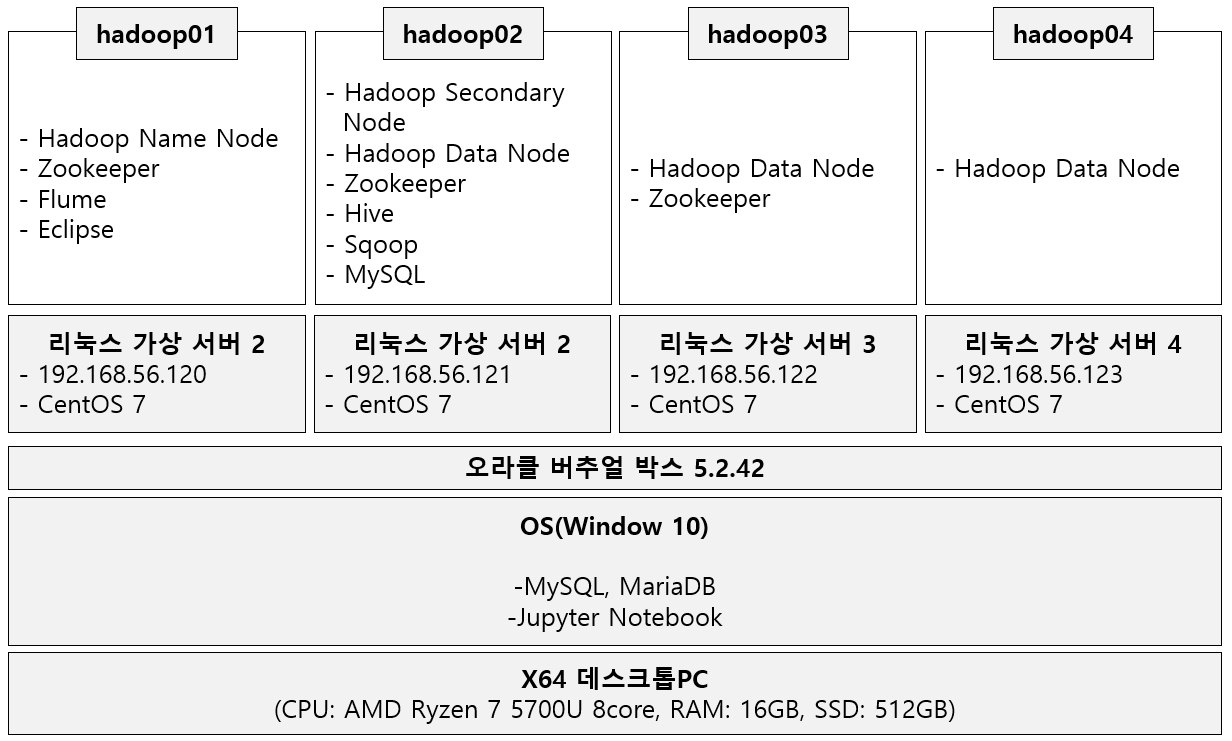
-하드웨어 아키텍처
3.1.2 하둡 에코시스템 설치과정
- 완전분산모드 하둡 설치하기 및 주키퍼 설치 : https://earthconquest.tistory.com/235?category=888284
[Hadoop] 서버 4대 완전분산모드 주키퍼, 하둡설치하기
매 단계별로 버추얼박스에서 스냅샷을 잘 찍어놓자. 오류나면 되돌려야 하니깐!! -JDK 8 설치하기 먼저 버추얼박스에 Hadoop1이란 리눅스 centos 7버전의 서버를 만든다. 그리고 해당 서버 설정-네트
earthconquest.tistory.com
- Flume 설치하기 : https://earthconquest.tistory.com/231?category=888284
[Flume] CentOS 7 리눅스에서 Flume 수동설치, 기본예제(spooldir source사용, HDFS싱크사용)
설치 전 pc환경 오라클 버추얼박스 이용해서 3개의 하둡서버중 Hadoop2란 서버에 flume설치예정 3개 하둡서버 생성과정은 아래 링크 참고 https://earthconquest.tistory.com/235?category=888284 1. 설치하기 먼..
earthconquest.tistory.com
- Hive 설치하기 : https://earthconquest.tistory.com/233?category=888284
[Hive] Hive 설치하기 (MySQL 설치도 같이) , Hive engine Tez로 사용하기
참고 : https://sparkdia.tistory.com/11 먼저 나의 환경정보는 다음과 같다. 오라클버추얼박스 5.6.2 CentOS 7 리눅스 가상서버 3대 (hadoop01, hadoop02, hadoop03) 이 중에서 나는 hadoop02 서버에 설치할 예정..
earthconquest.tistory.com
- Sqoop 설치하기 : https://earthconquest.tistory.com/241?category=888284
[Sqoop] Sqoop 설치 및 MySQL과 Import, Export하기
pc환경은 다음과 같다. -오라클버추얼박스 5.2.44 -CentOS 7 리눅스 서버 4대(주키퍼, 하둡, 하이브 설치상태) -하이브가 설치되어있는 서버 2에 설치예정 항상 설치전에는 버추얼박스에서 각 서버에
earthconquest.tistory.com
3.2 데이터 수집
3.2.1 웹크롤링
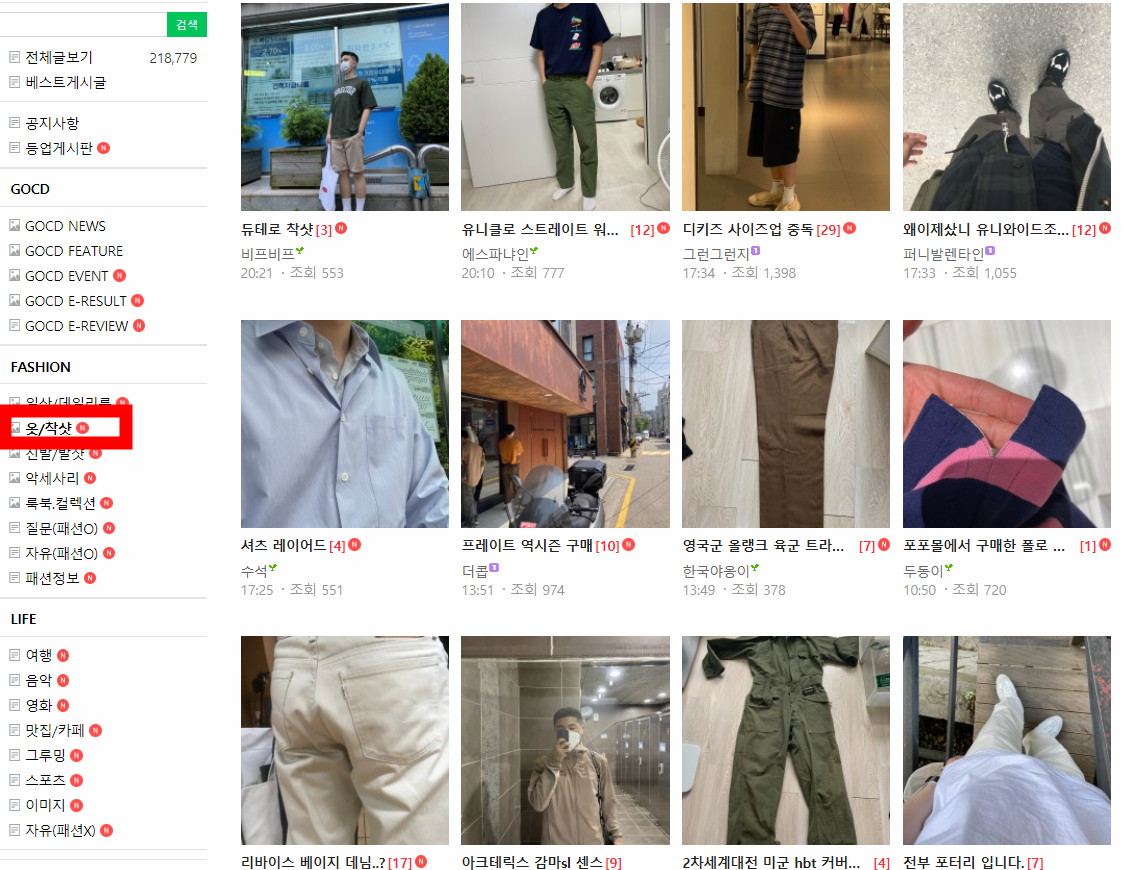
먼저 최근 시즌동안 해당 카페에서 언급이 많이된 브랜드를 찾기 위해서 '옷/착샷'이란 게시판의 제목과 날짜를
모두 크롤링해온다. 해당 게시판은 아래와 같다.
해당 크롤러 코드는 아래와 같다.
-BrandRank.py
import os
from selenium import webdriver
from bs4 import BeautifulSoup
from pandas import DataFrame
from selenium.webdriver.common.keys import Keys
from datetime import datetime
import time
import pyperclip
import re


#####로그인하기(우회해서)
driver = webdriver.Chrome('C:\\chromedriver_win32\chromedriver')

uid = '*******'
upw = '*******' #네이버 로그인 페이지로 이동

url = ('https://nid.naver.com/nidlogin.login')

driver.get(url)
time.sleep(2) #로딩 대기

#아이디 입력폼
tag_id = driver.find_element_by_name('id')
#패스워드 입력폼
tag_pw = driver.find_element_by_name('pw')

# id 입력
# 입력폼 클릭 -> paperclip에 선언한 uid 내용 복사 -> 붙여넣기
tag_id.click()
pyperclip.copy(uid)
tag_id.send_keys(Keys.CONTROL, 'v')
time.sleep(1)

# pw 입력
# 입력폼 클릭 -> paperclip에 선언한 upw 내용 복사 -> 붙여넣기
tag_pw.click()
pyperclip.copy(upw)
tag_pw.send_keys(Keys.CONTROL, 'v')
time.sleep(1)

#로그인 버튼 클릭
login_btn = driver.find_element_by_id('log.login')
login_btn.click()
time.sleep(2)


######네이버 카페 옷 착샷 페이지로 이동

#페이지이동 함수
def move_page( page ):
    key_url = 'https://cafe.naver.com/casuallydressed?iframe_url=/ArticleList.nhn%3Fsearch.clubid=19943558%26search.menuid=79%26search.boardtype=I%26search.totalCount=201%26search.page={}'.format(page)
    return key_url

data = []  #전체 게시글을 담을 리스트

##페이지 반복
for i in range( 1, 101 ):
    url = move_page( i )
    driver.get( url )

    #소스를 뽑아내기 위해 프레임 변경
    driver.switch_to.frame('cafe_main')

    search_url = driver.page_source
    soup = BeautifulSoup(search_url, 'html.parser')

    subj_locate = '#main-area > ul.article-album-sub > li:nth-child(n) > dl > dt > a.tit > span > span'
    subjects = soup.select(subj_locate)

    #print( subjects )

    #제목을 순회하면서 제목, 날짜를 긁어온다.
    for subject in subjects:
        d = []  #게시글 하나의 제목과 날짜를 임시로 담을 리스트

        ## 제목
        sub = subject.text.strip()
        d.append( sub )
        d.append( '|||' )

        ##날짜
        date_locate = '#main-area > ul.article-album-sub > li:nth-child(n) > dl > dd.date_num > span.date'
        date = soup.select(date_locate)
        date = date[0].getText().strip()

        if len(date) <= 5:  #오늘 글쓴 경우 시간만 나오므로 오늘 날짜로 변경해준다.
            date = datetime.today().strftime( "%Y.%m.%d." )

        d.append(date)

        data.append(d)  #최종적으로 d리스트에 있는 값들을 data리스트에 저장한다.
        print( d )

#기존 test.txt파일 존재 여부 확인
c = os.path.exists( 'brand.txt' )
if c:
    os.remove( 'brand.txt' )

#텍스트파일로 저장
with open( 'brand.txt', 'w', encoding='utf-8' ) as f:
    for line in data:
        for l in line:
            f.write( l )
        f.write( '\n' )
또한 인기가 많았던 브랜드와 관련된 게시글 제목, 내용, 날짜를 크롤링하기 위해 카페 검색창에 해당 브랜드
이름을 검색한 후 게시글을 크롤링한다.
아래는 예시로 '브라운야드'를 검색한 화면이다.

크롤러 코드는 아래와 같다.
-brand_keyword.py
import os
from selenium import webdriver
from bs4 import BeautifulSoup
from pandas import DataFrame
from selenium.webdriver.common.keys import Keys
import time
import pyperclip
import re

#####로그인하기(우회해서)
driver = webdriver.Chrome('C:\\chromedriver_win32\chromedriver')

uid = '*******'
upw = '*******' #네이버 로그인 페이지로 이동

url = ('https://nid.naver.com/nidlogin.login')

driver.get(url)
time.sleep(2) #로딩 대기

#아이디 입력폼
tag_id = driver.find_element_by_name('id')
#패스워드 입력폼
tag_pw = driver.find_element_by_name('pw')


# id 입력
# 입력폼 클릭 -> paperclip에 선언한 uid 내용 복사 -> 붙여넣기
tag_id.click()
pyperclip.copy(uid)
tag_id.send_keys(Keys.CONTROL, 'v')
time.sleep(1)

# pw 입력
# 입력폼 클릭 -> paperclip에 선언한 upw 내용 복사 -> 붙여넣기
tag_pw.click()
pyperclip.copy(upw)
tag_pw.send_keys(Keys.CONTROL, 'v')
time.sleep(1)


#로그인 버튼 클릭
login_btn = driver.find_element_by_id('log.login')
login_btn.click()
time.sleep(2)


######네이버 카페로 이동
driver.get('https://cafe.naver.com/casuallydressed')

#페이지 이동 함수 구축
#검색어 인코딩 및 문자치환하기
keyword = input()
keyword_ogn = keyword
keyword = keyword.encode('MS949')
keyword = str(keyword)
keyword = keyword.replace('\\x', '%')
keyword = keyword[2:-1]

#페이지이동 함수
def move_page(keyword,page):
    key_url = 'https://cafe.naver.com/casuallydressed?iframe_url=/ArticleSearchList.nhn%3Fsearch.clubid=19943558%26search.media=0%26search.searchdate=all%26search.defaultValue=1%26search.exact=%26search.include=%26userDisplay=15%26search.exclude=%26search.option=0%26search.sortBy=date%26search.searchBy=1%26search.includeAll=%26search.query={}%26search.viewtype=title%26search.page={}'.format(keyword,page)
    return key_url

data = []

# 크롤링 / 리눅스기준 한 페이지 긁어오는데 약 1분 10초
for page in range(1,14):
    url = move_page(keyword, page)
    driver.get(url)
         # 프레임 변경
    driver.switch_to.frame('cafe_main')

    n = 1

#     if page == 1 :
#         driver.find_element_by_xpath('//*[@id="currentSearchByTop"]').click()
#         driver.find_element_by_xpath('//*[@id="sl_general"]/li[2]/a').click()
#         driver.find_element_by_xpath('//*[@id="main-area"]/div[1]/div[1]/form/div[4]/button').click()

    search_url = driver.page_source
    soup = BeautifulSoup(search_url, 'html.parser')

    # 제목 추출
    subj_locate = '#main-area > div:nth-child(n) > table > tbody > tr:nth-child(n) > td.td_article > div.board-list > div > a.article'
    subjects = soup.select(subj_locate)

    for subject in subjects:
        d = []

        ##날짜
        date_locate = '#main-area > div:nth-child(7) > table > tbody > tr:nth-child({}) > td.td_date'.format(n)
        date = soup.select(date_locate)
        date = date[0].getText().strip()

        if len(date) <= 5:
            date = datetime.today().strftime( "%Y.%m.%d." )

        d.append(date)
        d.append( '|||' )


        ## 제목
        sub = subject.text.strip()
        d.append( sub )
        d.append( '|||' )

        try:
            ##내용
            content_link = subject.attrs['href']
            content_link = 'http://cafe.naver.com' + content_link
            driver.get(content_link)

            #프레임 변경
            driver.switch_to.default_content()
            time.sleep(1)
            driver.switch_to.frame('cafe_main')

            time.sleep(1)
            content = driver.find_element_by_xpath('/html/body/div/div/div/div[2]/div[2]/div[1]/div/div[1]/div/div').text
            content = content.replace('● 모든 게시물은 사진 + 글 첨부 필수 & 질문 게시글 삭제시 활동정지','').replace('● 모든 게시물은 사진 + 글 첨부 필수 https://cafe.naver.com/casuallydressed/44062 매뉴얼 확인 부탁드립니다.','').replace('\n','')
            d.append( content )

        except Exception as e:
            print( 'error 발생' )
            d.append( 'error' )


        driver.back()

        #data에 집어넣기
        print( date, " //// ", sub, " //// ", content )
        data.append( d )

        n += 1

#이미 파일이 존재하면 존재하는 파일삭제
c = os.path.exists( 'keyword1.txt' )
if c:
    os.remove( 'keyword1.txt' )
#텍스트파일로 저장
with open( 'keyword1.txt', 'w', encoding='utf-8' ) as f:
    for line in data:
        for l in line:
            f.write( l )
            f.write( '\n' )
3.3 데이터 적재
-Flume을 이용해 HDFS에 적재
플럼의 소스 타입은 spoolDir로 특정 디렉토리에 파일이 들어오면 플럼이 적재를 하도록한다.
싱크 타입은 hdfs로 spoolDir로 들어온 데이터를 hdfs로 적재시켜준다.
플럼 설정값은 아래와 같다.
agent1.sources = source1
agent1.sinks = sink1
agent1.channels = channel1

agent1.sources.source1.channels = channel1
agent1.sinks.sink1.channel = channel1

agent1.sources.source1.type = spooldir
agent1.sources.source1.spoolDir = /home/hadoop01/flume-working/

agent1.sinks.sink1.type = hdfs
agent1.sinks.sink1.hdfs.path = /user/hadoop01/input
agent1.sinks.hdfs-sink.rollSize = 268435456
agent1.sinks.sink1.hdfs.rollInteval = 0
agent1.sinks.sink1.hdfs.rollCount = 0
agent1.sinks.sink1.hdfs.filePrefix = web_result
agent1.sinks.sink1.hdfs.fileSuffix = .txt
agent1.sinks.sink1.hdfs.inUsePrefix = _
agent1.sinks.sink1.hdfs.fileType = DataStream

agent1.channels.channel1.type = file
이제 플럼을 실행시켜서 flume-working 디렉터리에 들어오는 파일을 HDFS로 옮긴다.
실행코드는 다음과 같다.
flume-ng agent -n agent1 \
-c $FLUME_HOME/conf \
-f spool-to-hdfs.properties \
-Dflume.root.logger=INFO, console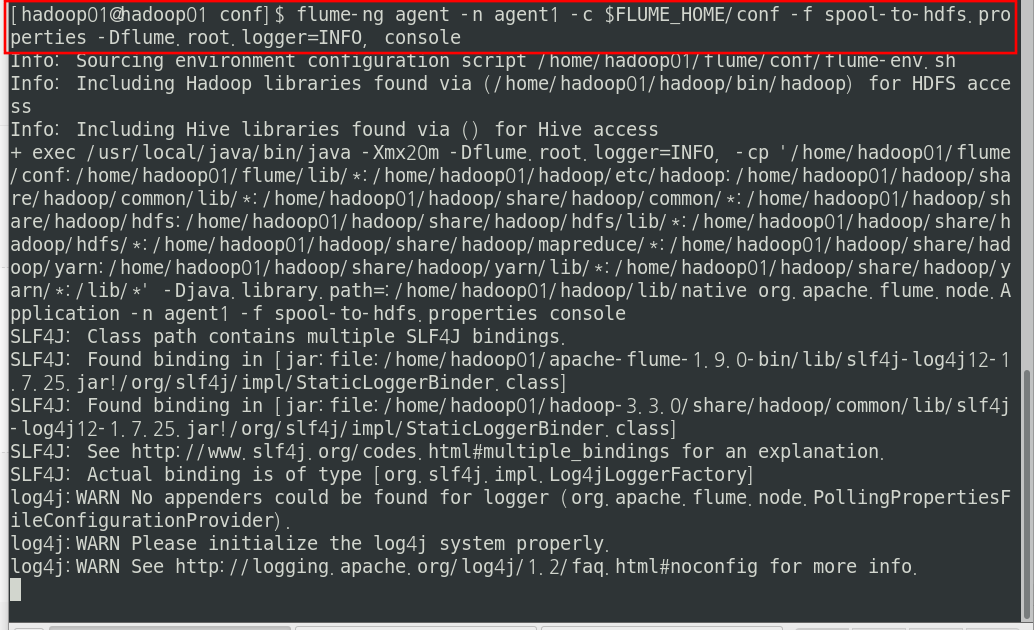
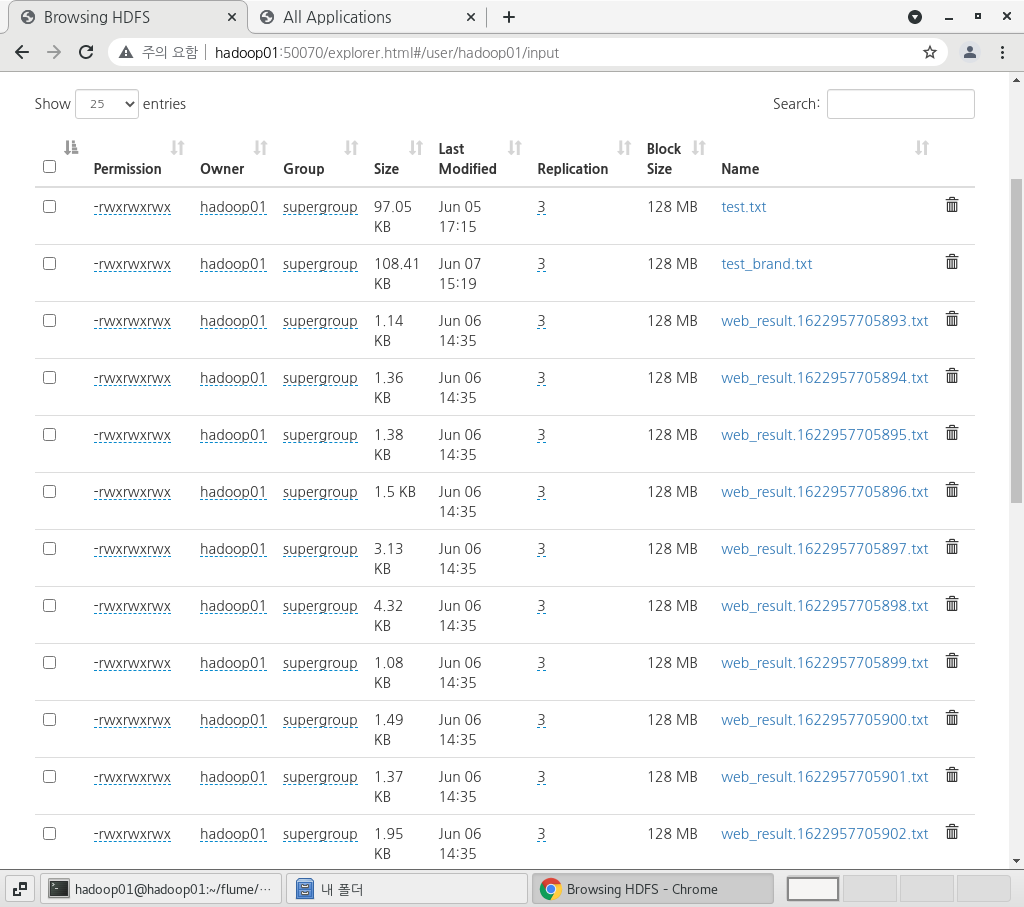
이제 HDFS 웹UI에 접속해서 적재가 잘 되었는 지 확인한다.
아래처럼 적재가 잘 된 것을 확인할 수 있다.
-하둡 파이썬 스트리밍을 이용해서 적재된 데이터 맵리듀스 실행하기
파이썬을 이용해서 매퍼와 리듀서를 작성하고 하둡 스트리밍을 이용해서 해당 매퍼와 리듀서를 실행한다.
매퍼에서는 시즌기간의 글들만 추출하고 한글 맞춤법 교정, 한글 형태소 분석을 실시한 뒤 리듀서가 처리하기
쉽도록 출력한다.
리듀서에서는 매퍼로부터 받은 데이터에서 똑같은 단어의 개수를 합쳐주어 word count를 진행한다.
소스코드는 아래와 같다.
-Mapper.py
#!/usr/bin/python3.6
# -*-coding:utf-8 -*

import sys  #시스템 패키지
sys.path.append( '/home/hadoop01/.local/lib/python3.6/site-packages')
import datetime #문자열을 날짜형식변환 패키지
from dateutil.relativedelta import relativedelta    #3개월 빼주는 패키지
import re   #정규식 패키지
from konlpy.tag import Okt    #형태소 분석 패키지
from hanspell import spell_checker  #한글 맞춤법 검사 패키지


#테스트하기 위해서 2페이지만 긁어온 파일 읽기
# f = open( '/home/hadoop01/eclipse-workspace/BA_project/_Project-BA/Python_webcrawler/src/test.txt', 'r')
# lines = f.readlines()

end_month = False
outVal = '1'  #(내용+형태소)의 값

for line in sys.stdin:
# for line in lines:
    line = line.strip() #문자열에서 뒤에 붙어있는 공백제거
    col = line.split( '|||' )   #'|||'를 기준으로 리스트로 나눔

   ###한 시즌(6개월)의 글만 추출하기 시작
    date = col[0][:-1]

    date_tmp = datetime.datetime.strptime( date, "%Y.%m.%d" )   #6개월전 월을 구하기 위한 변수

    now_month = str( date[5:7] )    #현재 월
    if not end_month:
        end_month = str( ( date_tmp - relativedelta(months=6) ) )[5:7]  #6개월 전의 월

    #월 비교
    if now_month != end_month:  #현재월과 6개월전의 월이 같으면 반복문 종료
        content = col[1] + col[2]   #글제목과 글내용을 하나로 합친다.

        ### 정규표현식으로 한글 외의 문자 제거 시작
        con = re.compile( '[가-힣]+' ).findall( content ) #한글만 남기면서 단어들로 분리
        content = ''
        for s in con: content = content + s + ' '   #형태소 분석을 위해 단어들 다시 문자열로 합친다.

        han_spell = spell_checker.check(content)
        if han_spell.result:
            content = han_spell.checked

        #형태소 객체생성
        okt = Okt()

        content = okt.pos(content)  #content에 형태소 분석한 결과 리스트를 집어넣는다.

        #매퍼 결과 출력(내용,형태소 | 개수)
        for i in content:
            output_key = i[0] + ',' + i[1]
            print ( '%s|%s' % ( output_key ,outVal ) )

    else:
        exit()
-Reducer.py
#!/usr/bin/env python3
# -*-coding:utf-8 -*

import sys

#테스트하기 위해서 2페이지만 긁어온 파일 읽기
# f = open( './test_reduce.txt', 'r')
# lines = f.readlines()

#입력키값 및 출력키값 변수 선언
input_key = None
input_value = 0
output_key = None
output_value = 0

tmp_list = []

n = 0 #행번호 출력을 위한 변수

#매퍼출력키값으로 하나의 리스트를 만듦
# for line in lines:
for line in sys.stdin:
    line = line.strip()     #문장 공백 제거
    tmp_list.append(line)

#while반복문은 tmp_list가 비워지면 반복중지
while tmp_list:
    #이 반복문은 동일한 키값을 찾아서 개수를 올리기위한 반복문
    for line in tmp_list:
        cols = line.split( '|' )
        input_key = cols[0]     #내용,형태소
        input_value = int( cols[1] )    #1

        #출력키와 입력키비교, 같으면 출력값 1증가, 그리고 다음 행으로 이동
        #다르면 출력키 존재여부확인, 존재하면 다음행이동, 존재하지않으면 출력키 입력키로 정의
        if output_key == input_key:
            output_value += input_value
            continue
        else:
            if output_key:
                continue
            output_key = input_key
            output_value = input_value

    remove_str = output_key+'|1'
    #remove_str과 같지 않은 요소들만 배열에 남겨서 출력했던 내용은 배열에서 삭제
    tmp_list = [ i for i in tmp_list if not i == remove_str ]

    n += 1
    output_key = str(n)+ ',' + output_key
    print( '%s,%d' %( output_key, output_value ) )  #출력결과: 행번호,내용,형태소,개수

    #다시 입출력 키값 초기화
    input_key = None
    input_value = 0
    output_key = None
    output_value = 0
하둡 스트리밍을 아래와 같은 명령어 실행한다.
이때 매퍼와 리듀서가 동시에 실행되면 안되므로 -mapper 'python3 BA_Mapper.py'처럼 따옴표를 적어서
명령어 파이프라인이 되도록 한다.
hdfs dfs -rm -r /user/hadoop01/BA_output | \
hadoop jar /home/hadoop01/hadoop/share/hadoop/tools/lib/hadoop-streaming-3.3.0.jar \
-mapper 'python3 BA_Mapper.py' \
-file /home/hadoop01/BA_Mapper.py \
-reducer 'python3 BA_Reducer.py' \
-file /home/hadoop01/BA_Reducer.py \
-input /user/hadoop01/input/test.txt \
-output BA_output
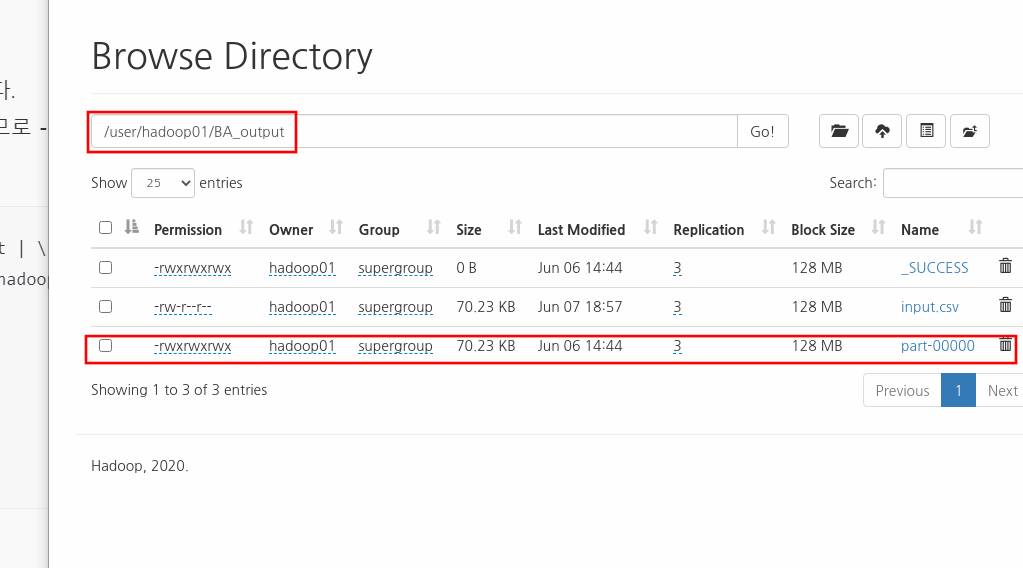
이제 output 디렉토리인 HDFS의 BA_output에 맵리듀스의 실행결과가 생겼는지 확인한다.
3.4 데이터 전처리
- Hive를 이용한 전처리( 타입변환, 불필요 형태소 제거, auto increment생성 )
하이브쿼리를 이용하여 임시테이블을 만들어준다.
drop table temp;

create table if not exists temp(
no int,
content string,
mor string,
cnt string
)
row format delimited
fields terminated by ','
lines terminated by '\n'
stored as textfile;

drop table temp2;

create table if not exists temp2(
content string,
mor string,
cnt int
)
row format delimited
fields terminated by ','
lines terminated by '\n'
stored as textfile;
temp임시테이블에 HDFS에 적재된 맵리듀스 결과 파일을 Insert시킨다.
load data inpath 'hdfs://hadoop02:8020/user/hadoop01/BA_output/input.csv'
into table temp;
temp 테이블을 확인해본다.
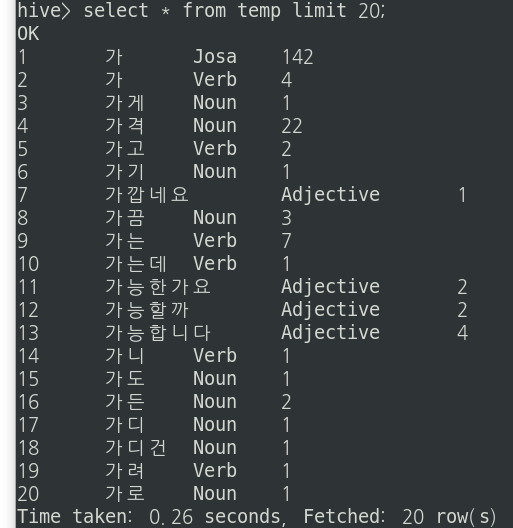
이때 temp 테이블에서 단어개수컬럼인 cnt를 int로 형변환시켜주고
데이터 분석간에 필요없는 형태소인 Josa, Suffix, Modifier, Determiner, Exclamation, Eomi, PreEomi 형태소를
제거해서 Noun, Verb , Adverb, Adjective 형태소만 남도록한다. 그리고 이 결과를 temp2테이블에 저장한다.
insert overwrite table temp2
select content, mor, cast(cnt as int) cnt
from temp
where mor in ( "Noun", "Verb", "Adverb", "Adjective" );
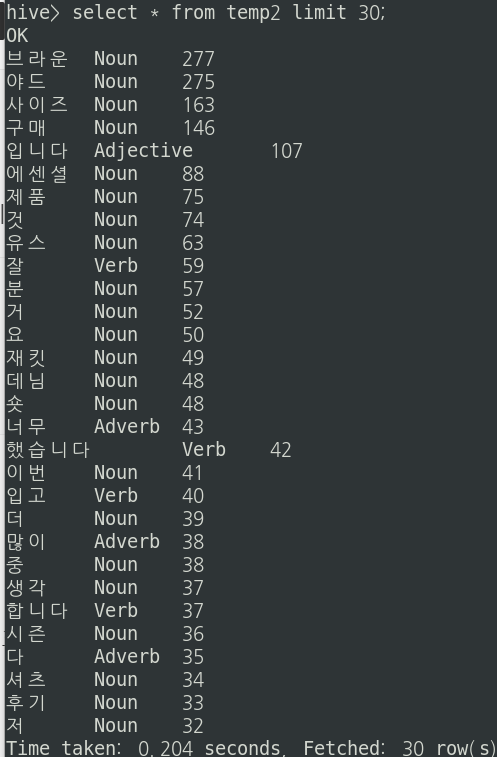
temp2테이블을 확인해본다. Noun, Verb , Adverb, Adjective 형태소만 남은 것을 확인할 수 있다.

이제 단어 카운트 수를 내림차순으로 바꿔준 뒤 다시 temp2에 Insert시켜준다.
insert overwrite table temp2
select content, mor, cnt
from temp2
order by cnt desc;
temp2테이블을 확인해본다.
이제 MySQL로 export해야하므로 각 행에 대한 행번호를 auto increment함수를 이용해서 만들어준다.
add jar /home/hadoop01/hive/lib/hive-contrib-3.1.2.jar;

create temporary function row_sequence as 'org.apache.hadoop.hive.contrib.udf.UDFRowSequence';
export시킬 최종 테이블을 만들어주고 데이터를 insert시킨다.
drop table wordCnt;

create table if not exists wordCnt(
no int,
content string,
mor string,
cnt int
)
row format delimited
fields terminated by ','
lines terminated by '\n'
stored as textfile;

insert overwrite table wordCnt
select row_sequence(), content, mor, cnt
from temp2;
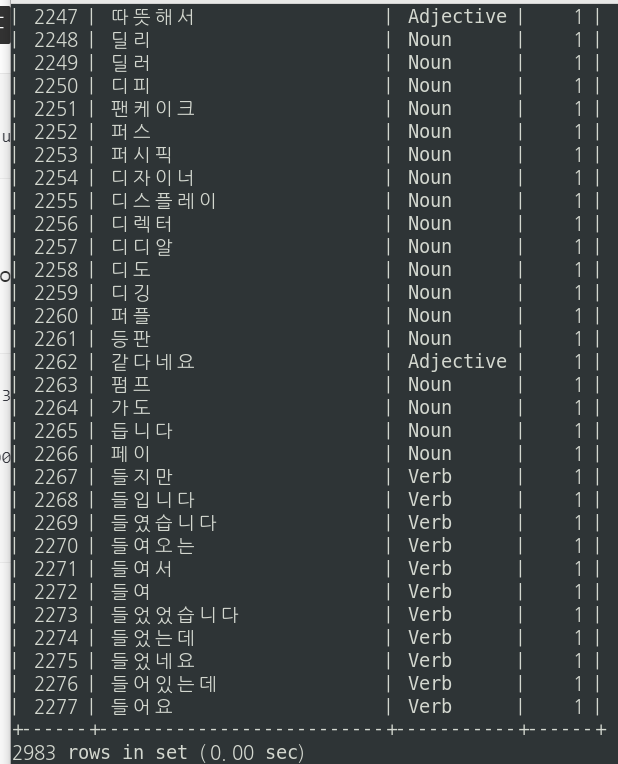
wordcnt 테이블을 확인해본다.
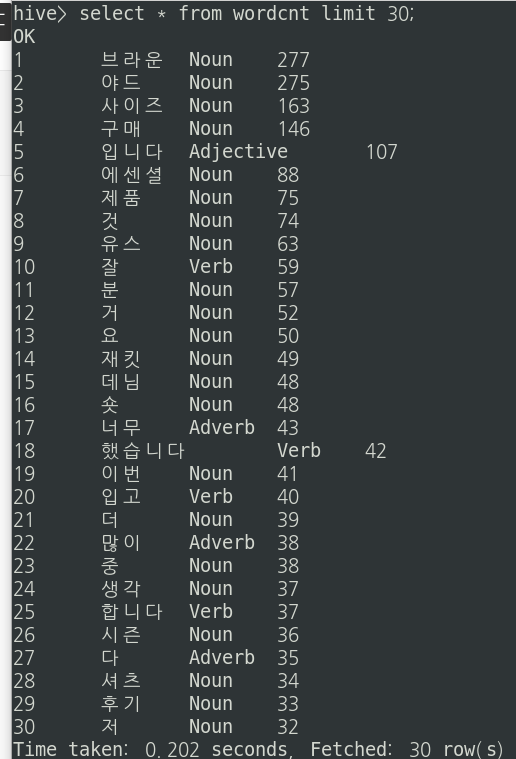
-Sqoop을 이용하여 Hive데이터 MySQL로 export하기
먼저 MySQL에서 DB를 만들고 똑같은 컬럼과 데이터 타입을 가지는 테이블을 만들어준다.
create table wordcnt(
no int,
content varchar(20),
mor varchar(10),
cnt int
);

alter table wordcnt convert to character set utf8;
스쿱을 실행하여 하이브 wordcnt테이블을 mysql wordcnt 테이블로 export시킨다.
명령어는 다음과 같다.
sqoop export --connect jdbc:mysql://hadoop02:3307/test \
--table wordcnt \
--export-dir /user/hive/warehouse/wordcnt/000000_0 \
--username hive \
--P
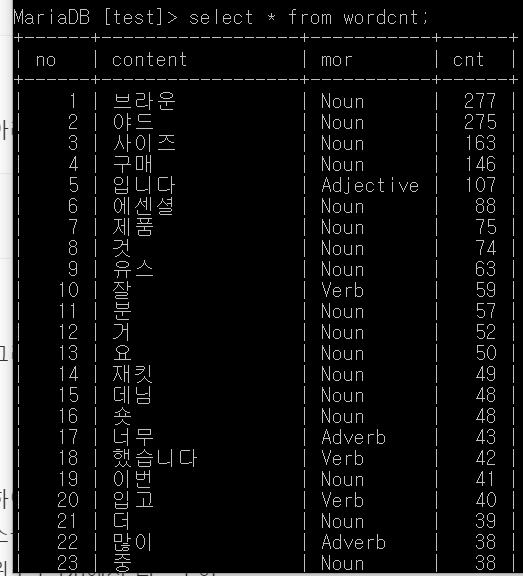
아래와 같이 MySQL의 wordcnt 테이블에 잘 export된 것을 확인할 수 있다.
-MySQL 덤프 및 리스토어
이제 mysql 덤프를 이용해서 윈도우 MariaDB로 리스토어 시켜준다.
명령어는 다음과 같다.
mysqldump -u root -p test brandcnt > /home/hadoop01/wordcnt.sql
윈도우에서도 똑같은 컬럼과 데이터타입을 갖는 테이블을 만들어 준다.
create database test;

use test;

create table wordcnt(
no int,
content varchar(20),
mor varchar(10),
cnt int);
아래와 같이 리스토어 시켜준다.
mysql -u root -p test -e "source c:\wordcnt.sql"
그리고 리스토어가 제대로 됐는 지 확인한다.
3.5 데이터 분석
워드클라우드
21년 1월~6월동안 가장 게시글이 많았던 브랜드는 다음 3개와 같음을 알 수 있다.
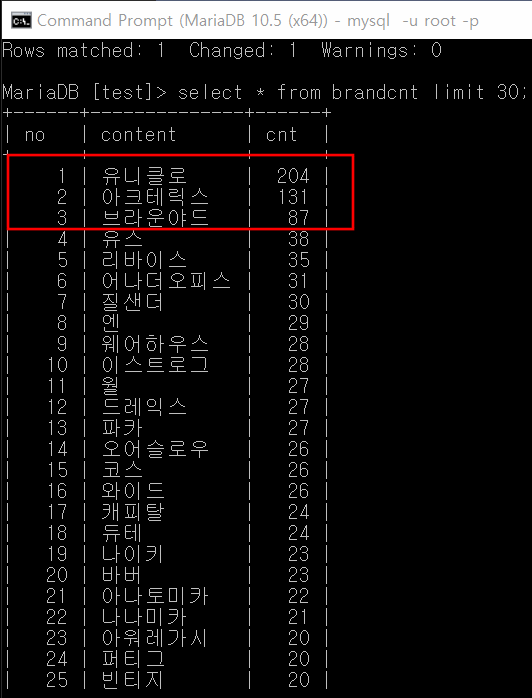
이제 이 3개의 각 브랜드에 대한 워드클라우드를 만들어본다.
DB에 있는 데이터를 R과 연동해서 R에서 워드클라우드를 만들어본다.
R과 연동하는 방법은 아래 게시글을 참고한다.
https://earthconquest.tistory.com/305
[R & MySQL] R과 MySQL 연동하기
-환경 윈도우10 MariaDB 10.5 R version 4.0.5 (2021-03-31) 1. 패키지 설치 install.packages("RMySQL") library(RMySQL) 2. 데이터베이스와 연동하기 user는 DB계정, password는 DB계정의 비밀번호, host는 I..
earthconquest.tistory.com
먼저 첫 번째 브랜드인 (유니00)에 대한 워드클라우드이다.
가장 많이 출현한 단어 순으로 할인, 팬츠, 사이즈, 재킷, 색상, 가격 임을 알 수 있다.

두 번째 브랜드인 (아크테00)에 대한 워드클라우드이다.
가장 많이 출현한 단어 순으로 가격, 베타, 핏, 등산, 아톰, 느낌, 재킷 임을 알 수 있다.
여기서 베타, 아톰은 해당 브랜드 옷 시리즈의 이름이다.

마지막 세 번째 브랜드인 (브라운00)에 대한 워드클라우드이다.
가장 많이 출현한 단어 순으로 디자인, 가격, 재킷, 데님, 셔츠, 에센셜, 핏, 느낌 임을 알 수 있다.

워드클라우드에 대한 R코드는 아래와 같다.
#####0. 데이터 준비하기 #####

install.packages("RMySQL")

#모든 객체 삭제
rm( list=ls() )

#db연동하기
library(RMySQL)

con <- dbConnect(
  MySQL(),
  user="root",
  password="123456",
  host="localhost",
  dbname = "test",
  client.flag=CLIENT_MULTI_RESULTS
)

#연동됐나 확인
con

#한글로 변환해서 데이터 가져오기기
dbSendQuery(con, "SET NAMES utf8;")
dbSendQuery(con, "SET CHARACTER SET utf8;")
dbSendQuery(con, "SET character_set_connection=utf8;")

#wordcnt1
sql <- "select * from wordcnt1"
word1 <- dbGetQuery( con, sql )
Encoding( word1[,2] ) <- 'UTF-8'
word1 <- select( word1, content, cnt)
head(word1)

#wordcnt2
sql <- "select * from wordcnt2"
word2 <- dbGetQuery( con, sql )
Encoding( word2[,2] ) <- 'UTF-8'
word2 <- select( word2, content, cnt)
head(word2)

#wordcnt3
sql <- "select * from wordcnt3"
word3 <- dbGetQuery( con, sql )
Encoding( word3[,2] ) <- 'UTF-8'
word3 <- select( word3, content, cnt)
head(word3)

#DB연결끊기
dbDisconnect( con )

#####1. 워드클라우드 생성 #####

install.packages('Rcpp')
install.packages('tidyverse')
install.packages('reshape2')
install.packages('wordcloud2')

library('tidyverse')
library('reshape2')
library('wordcloud2')

#폰트 설정하기
#font_import()
#y


#wordcloud
wordcloud2(word1 ,fontFamily="Malgun Gothic", size = 0.5, minRotation=0, maxRotation=0)
wordcloud2(word2 ,fontFamily="Malgun Gothic", size = 0.5, minRotation=0, maxRotation=0)
wordcloud2(word3 ,fontFamily="Malgun Gothic", size = 0.5, minRotation=0, maxRotation=0)
4. 프로젝트 결론
위에서 세 개 브랜드 워드클라우드에서 알 수 있듯이 2021년 상반기 시즌동안 가장 인기가 많았던 브랜드들의 핵심요소는 가격임을 알 수 있다. 특히 첫 번째 브랜드는 할인 행사를 많이하여 가장 많이 등장한 단어가 할인임을 알 수 있었고 이는 이번 시즌에서 소비자들의 선택을 받을 수 있었던 가장 큰 요인임을 알 수 있다.
다음으로 중요한 것은 첫 번째 브랜드의 사이즈, 두 번째 브랜드의 핏, 세 번째 브랜드의 디자인 단어가 가장 많이 등장한 것으로 보아 소비자들의 선택을 받을 수 있었던 핵심요소의 두 번째는 디자인임을 알 수 있다. 이는 세 개의 브랜드의 디자인이 해당 패션 시즌의 트렌드를 잘 이끌었고 주도한 것을 알 수 있다.
5. 보완사항
Oozie를 이용해서 스케줄링을 정의해서 위의 hive작업들을 자동화시킬 수 있다.
감성분석을 실시한다.
'프로젝트' 카테고리의 다른 글
| [2021_개인. 하둡 에코시스템 구축을 위한 파일럿 프로젝트] (0) | 2021.05.12 |
|---|---|
| [2021_팀. 랜선여행 웹 커뮤니티 프로젝트] (0) | 2021.04.20 |
| [2017_팀. 날씨데이터를 이용한 매출예측 웹서비스] (0) | 2021.04.09 |
| [미니프로젝트] Java Swing을 이용한 CRUD프로그램 만들기(축구선수 관리 프로그램) (0) | 2020.12.17 |


