
- 지구정복과정 (517)

- 데이터 엔지니어링 정복 (415)
- Elastic Stack (2)
- Hadoop Ecosystem (27)
- HTML-CSS-JavaScript-Spring-.. (43)
- JAVA & JSP (46)
- Python (28)
- SQL (14)
- Cloud(AWS, Ncloud) (8)
- Docker&Kubernetes (2)
- Linux (11)
- Git-GitHub (9)
- Algorithm (159)
- HDFS (4)
- Iceberg (6)
- Hive (5)
- Hue (1)
- Yarn (1)
- Spark (8)
- MapReduce (2)
- Airflow (2)
- Sqoop (2)
- Tez (0)
- Trino (2)
- Kafka (12)
- Zookeeper (2)
- Flume (2)
- Oozie (1)
- Hbase (3)
- Ranger (1)
- OpenSearch (1)
- Ansible & AWX (2)
- AD & LDAP (0)
- NiFi (3)
- Ambari (1)
- 데이터 애널리틱스 정복 (3)
- 프로젝트 (5)
- 자격증 정복 (33)
- 영어 정복 (7)
- 건강 정복 (5)
- 주식 정복 (가능 ?) (0)
- 이것저것 (38)
- 데이터 엔지니어링 정복 (415)
| 일 | 월 | 화 | 수 | 목 | 금 | 토 |
|---|---|---|---|---|---|---|
| 1 | 2 | 3 | ||||
| 4 | 5 | 6 | 7 | 8 | 9 | 10 |
| 11 | 12 | 13 | 14 | 15 | 16 | 17 |
| 18 | 19 | 20 | 21 | 22 | 23 | 24 |
| 25 | 26 | 27 | 28 | 29 | 30 | 31 |
- 코딩테스트
- Data Engineer
- 개발
- 삼성역맛집
- 코딩
- 여행
- Apache Kafka
- 코엑스
- 용인맛집
- 백준
- 프로그래머스
- hadoop
- HIVE
- bigdata engineer
- 자바
- Kafka
- Trino
- bigdata engineering
- Iceberg
- Data Engineering
- java
- BigData
- pyspark
- Spark
- 알고리즘
- 영어
- 코엑스맛집
- 코테
- 맛집
- apache iceberg
- Today
- Total
지구정복
[Linux] 02/08 | 리눅스( apache-tomcat 재설치, FTP서버 사용하기, 리눅스에 데이터베이스 설치 및 사용(MariaDB), 우편번호검색기, 게시판 ) 본문
[Linux] 02/08 | 리눅스( apache-tomcat 재설치, FTP서버 사용하기, 리눅스에 데이터베이스 설치 및 사용(MariaDB), 우편번호검색기, 게시판 )
noohhee 2021. 2. 8. 17:42복습 및 배울내용
- 현재 배우고 있는 것 - 리눅스 패키지(배포판) - CentOS
배포판종류
CentOS - 서버쪽 (무료)
=>RedHat - 서버쪽 (유료)
* 왜 회사에서는 유료를 주로 사용하나?
-> 문제가 발생했을 때 책임을 RedHat에서 질 수 있기 때문에
ubuntu - 개인용 (Windows, MacOS)
ubuntu.com
- CentOS를 배우는 것(개발용 서버세팅을 하기 위한 명령어랑 기본 세팅을 배운다.)
1. 기본명령어
2. 서버세팅
- Service(운영용서버 - System Admin이 해줌)
- 개발용 서버 세팅 (우리는 이걸 배워야함)
* 리눅스를 깊게 배우는 사람들은 보안, 임베디드 분야
- 우리가 배웠던 것
* 보안셋팅
SELinux
Firewall
* 서버실행여부 확인명령어
systemctl
ps
1. 서버세팅에서 원격관리
CUI
telnet (telnet server / telnet client)
ssh (ssh server / ssh client)
ssh server - openssh
openssh가 실행된상태 -> sshd(daemon)
ssh client - putty(window버전), ssh(linux, max버전)
GUI
vnc (vnc server / vnc client)
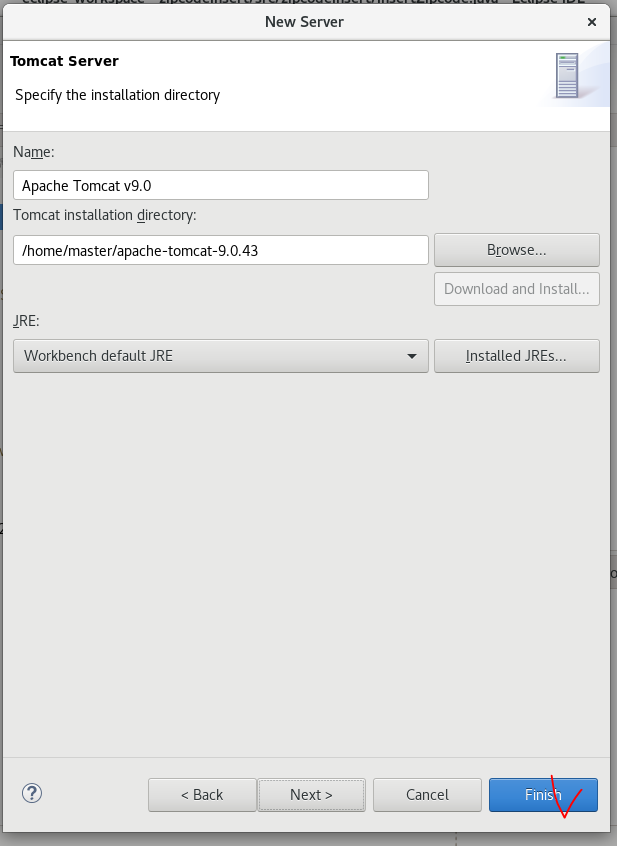
2. jsp용 WAS 설치 - Apache Tomcat
* 전제로 jdk 설치되있어야 한다.
* 설치는 Apache-tomcat 압축해제
1. 포트변경
2. document root - jsp저장 디렉터리 변경
FTP (File Transfer Protocol )
server - vsftpd
vsftpd.beasts.org
21 접속용 포트로 주로 쓰임
20 공유용 포트로 주로 쓰임
client - 파일질라
1. Linux
1. apache-tomcat 지웠다가 다시설치하기
먼저 서버 리눅스인 CentOS 켜주고 putty에서 접속한다.
[root@localhost ~]# rm apache-tomcat-9.0.43.tar.gz
[root@localhost ~]# wget downloads.apache.org/tomcat/tomcat-9/v9.0.43/bin/apache-tomcat-9.0.43.tar.gz
(url로 원격으로 아파치톰캣을 다운로드받는다)
2. FTP 서버 만들어서 실행하기
먼저 푸티에서 root로 로그인한다.
[root@localhost ~]# su - root
[root@localhost ~]# 123456
#방화벽 설정
[root@localhost ~]# cat /usr/lib/firewalld/services/ftp.xml
[root@localhost ~]# vi /usr/lib/firewalld/services/ftp.xml
yyp
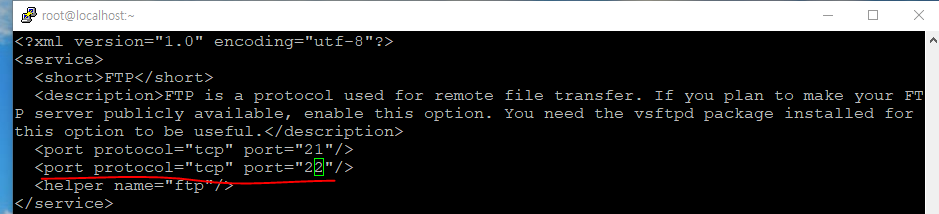
:wq
#파이어웰에 영구적으로 ftp.xml을 등록한다.
[root@localhost ~]# firewall-cmd --zone=public --add-service=ftp --permanent
#재실행
[root@localhost ~]# firewall-cmd --reload
#등록된 리스트 확인
[root@localhost ~]# firewall-cmd --zone=public --list-services
#vsftpd 설치여부 확인하기
[root@localhost ~]# rpm -qa | grep vsftpd
[root@localhost ~]# yum list vsftpd
마지막 메타 데이터 만료 확인 : 0:37:30 전에 2021년 02월 08일 (월) 오전 09시 48분 52초.
사용 가능한 패키지
vsftpd.x86_64 3.0.3-32.el8 appstream
#설치하기
[root@localhost ~]# yum install vsftpd
설치됨:
vsftpd-3.0.3-32.el8.x86_64
완료되었습니다!
#vsftpd 시작하고 실행여부 확인하기
[root@localhost ~]# systemctl start vsftpd
[root@localhost ~]# systemctl status vsftpd

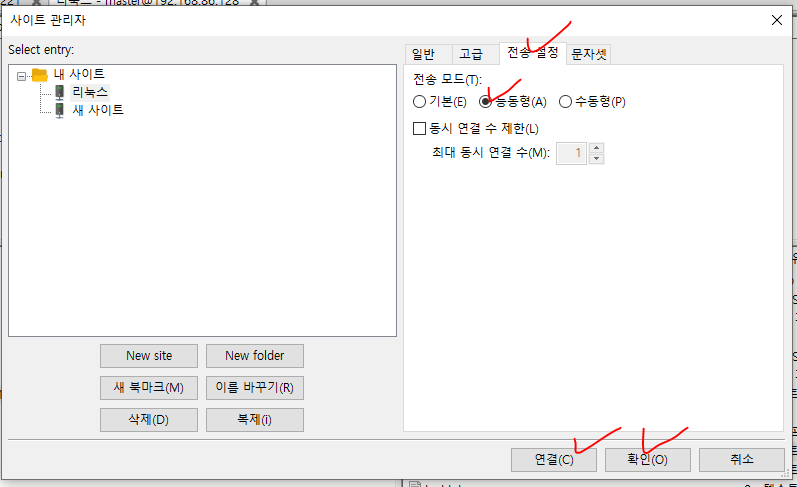
파일질라를 실행하고
새사이트를 만들어보자.
master 리눅스 서버의 ip주소를 호스트ip로 적어준다.
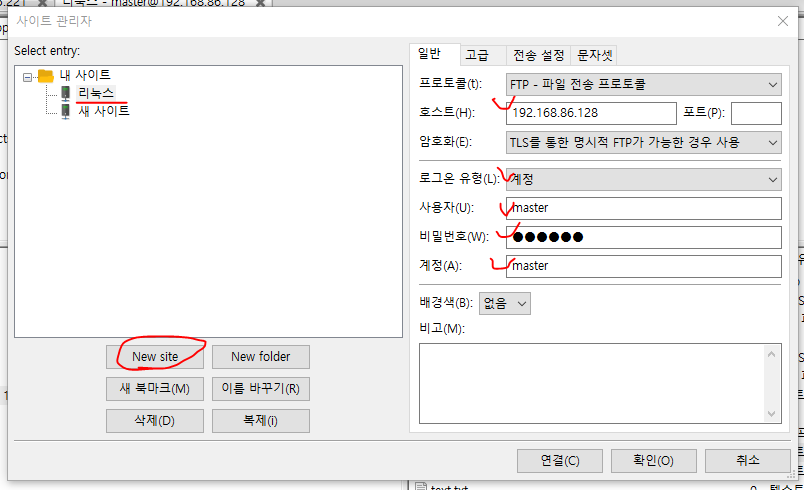
그러면 linux의 master 홈디렉터리가 뜨면서 파일 전송을 할 수 있다.
pc에서 리눅스서버로 파일을 전송한 뒤 확인하려면 master 계정으로 로그인한 뒤 ls 명령어를 쳐보면 된다.
하지만 현재 master로 파일질라 연결하면 root디렉터리도 갈 수 있으므로 이를 막아줘야 한다.
#vsftpd 의 설정내용 수정
[root@localhost ~]# vi /etc/vsftpd/vsftpd
:set nu
yyp
i

:wq
[root@localhost ~]# systemctl restart vsftpd
다시 파일질라를 킨 다음 상위폴더로 가려고하면 갈 수 없다.
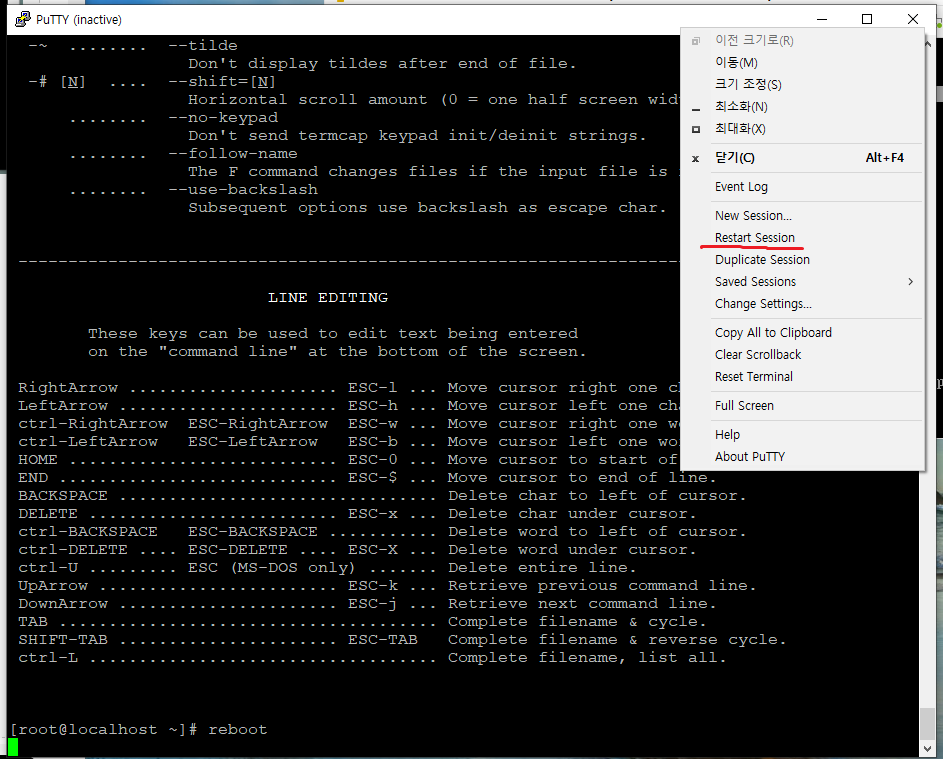
#서버 리눅스 리부팅시키기
[root@localhost ~]# reboot
서버리눅스 재부팅 완료되면 아래처럼 푸티도 Restart Session 한다.
#서버 리눅스가 리부팅되도 자동으로 켜지도록 등록하기
[root@localhost ~]# systemctl status vsftpd
● vsftpd.service - Vsftpd ftp daemon
Loaded: loaded (/usr/lib/systemd/system/vsftpd.service; enabled; vendor preset: disable>
Active: inactive (dead)
[root@localhost ~]# su - root
[root@localhost ~]# 123456
[root@localhost ~]# systemctl enable vsftpd
[root@localhost ~]# reboot
[master@localhost ~]$ systemctl status vsftpd
● vsftpd.service - Vsftpd ftp daemon
Loaded: loaded (/usr/lib/systemd/system/vsftpd.service; enabled; vendor preset: disable>
Active: active (running)
3. 리눅스 서버에 데이터베이스 올리기
#먼저 방화벽설정을 해준다.

[master@localhost ~]$ su - root
암호:
[root@localhost ~]# cd /usr/lib/firewalld/services/
[root@localhost services]# ls my*
mysql.xml

#mysql.xml을 maraidb.xml로 복사해서 새로 만든다.
[root@localhost services]# cp mysql.xml mariadb.xml
[root@localhost services]# vi mariadb.xml

<?xml version="1.0" encoding="utf-8"?>
<service>
  <short>MariaDB</short>
  <description>MariaDB Database Server</description>
  <port protocol="tcp" port="3306"/>
</service>
:wq

#mariadb.xml을 등록하고 리로드한다.
[root@localhost services]# firewall-cmd --zone=public --add-service=mariadb --permanent
success
[root@localhost services]# firewall-cmd --reload
success
[root@localhost services]# firewall-cmd --zone=public --list-services
cockpit dhcpv6-client ftp mariadb ssh tomcat

#mariadb를 yum으로 설치할 수 있는지 확인한다.
[root@localhost services]# yum list mariadb
[root@localhost services]# yum list | grep mariadb
mariadb.x86_64                                         3:10.3.27-3.module_el8.3.0+599+c587b2e7          appstream
mariadb-backup.x86_64                                  3:10.3.27-3.module_el8.3.0+599+c587b2e7          appstream
mariadb-common.x86_64                                  3:10.3.27-3.module_el8.3.0+599+c587b2e7          appstream
mariadb-connector-c.i686                               3.1.11-2.el8_3                                   appstream
mariadb-connector-c.x86_64                             3.1.11-2.el8_3                                   appstream
mariadb-connector-c-config.noarch                      3.1.11-2.el8_3                                   appstream
mariadb-connector-c-devel.i686                         3.1.11-2.el8_3                                   appstream
mariadb-connector-c-devel.x86_64                       3.1.11-2.el8_3                                   appstream
mariadb-connector-odbc.x86_64                          3.0.7-1.el8                                      appstream
mariadb-devel.x86_64                                   3:10.3.27-3.module_el8.3.0+599+c587b2e7          appstream
mariadb-embedded.x86_64                                3:10.3.27-3.module_el8.3.0+599+c587b2e7          appstream
mariadb-embedded-devel.x86_64                          3:10.3.27-3.module_el8.3.0+599+c587b2e7          appstream
mariadb-errmsg.x86_64                                  3:10.3.27-3.module_el8.3.0+599+c587b2e7          appstream
mariadb-gssapi-server.x86_64                           3:10.3.27-3.module_el8.3.0+599+c587b2e7          appstream
mariadb-java-client.noarch                             2.2.5-3.el8                                      appstream
mariadb-oqgraph-engine.x86_64                          3:10.3.27-3.module_el8.3.0+599+c587b2e7          appstream
mariadb-server.x86_64                                  3:10.3.27-3.module_el8.3.0+599+c587b2e7          appstream
mariadb-server-galera.x86_64                           3:10.3.27-3.module_el8.3.0+599+c587b2e7          appstream
mariadb-server-utils.x86_64                            3:10.3.27-3.module_el8.3.0+599+c587b2e7          appstream
mariadb-test.x86_64                                    3:10.3.27-3.module_el8.3.0+599+c587b2e7          appstream

#마리아 디비 설치하기
[root@localhost services]# yum install mariadb
[root@localhost services]# yum install mariadb-server

#마리아디비 실행하기
[root@localhost services]# cd
[root@localhost ~]# systemctl start mariadb
[root@localhost ~]# systemctl status mariadb
● mariadb.service - MariaDB 10.3 database server
   Loaded: loaded (/usr/lib/systemd/system/mariadb.service; disabled; vendor preset: disab>
   Active: active (running) since Mon 2021-02-08 11:26:20 KST; 1s ago
     Docs: man:mysqld(8)
           https://mariadb.com/kb/en/library/systemd/
  Process: 4898 ExecStartPost=/usr/libexec/mysql-check-upgrade (code=exited, status=0/SUCC>
  Process: 4763 ExecStartPre=/usr/libexec/mysql-prepare-db-dir mariadb.service (code=exite>
  Process: 4739 ExecStartPre=/usr/libexec/mysql-check-socket (code=exited, status=0/SUCCES>
 Main PID: 4866 (mysqld)
   Status: "Taking your SQL requests now..."
    Tasks: 30 (limit: 11087)
   Memory: 101.0M
   CGroup: /system.slice/mariadb.service
           └─4866 /usr/libexec/mysqld --basedir=/usr

[root@localhost ~]# mysql
Welcome to the MariaDB monitor.  Commands end with ; or \g.
Your MariaDB connection id is 8
Server version: 10.3.27-MariaDB MariaDB Server

Copyright (c) 2000, 2018, Oracle, MariaDB Corporation Ab and others.

Type 'help;' or '\h' for help. Type '\c' to clear the current input statement.

MariaDB [(none)]> show databases;
+--------------------+
| Database           |
+--------------------+
| information_schema |
| mysql              |
| performance_schema |
+--------------------+
3 rows in set (0.001 sec)

MariaDB [(none)]> exit

#마리아 디비 관리자 암호 만들기
[root@localhost ~]# mysqladmin -u root password '!123456'
[root@localhost ~]# mysql -u root -p
Enter password:
Welcome to the MariaDB monitor.  Commands end with ; or \g.
Your MariaDB connection id is 12
Server version: 10.3.27-MariaDB MariaDB Server

Copyright (c) 2000, 2018, Oracle, MariaDB Corporation Ab and others.

Type 'help;' or '\h' for help. Type '\c' to clear the current input statement.

[root@localhost ~]#exit


#ip로 db접속하기(리눅스에서 리눅스서버에 접속)
[root@localhost ~]# mysql -h 127.0.0.1 -u root -p
Enter password:
Welcome to the MariaDB monitor.  Commands end with ; or \g.
Your MariaDB connection id is 14
Server version: 10.3.27-MariaDB MariaDB Server

Copyright (c) 2000, 2018, Oracle, MariaDB Corporation Ab and others.

Type 'help;' or '\h' for help. Type '\c' to clear the current input statement.

MariaDB [(none)]> exit


#아래처럼 윈도우 ip로는 리눅스 서버에 접속할 수 없다.
[root@localhost ~]# mysql -h 192.168.86.128 -u root -p
Enter password:
ERROR 1130 (HY000): Host '192.168.86.128' is not allowed to connect to this MariaDB server

#윈도우ip로도 접속할 수 있도록 root의 모든 주소에 권한을 부여한다.
MariaDB [(none)]> grant all privileges on *.* to 'root'@'%' identified by '!123456';
Query OK, 0 rows affected (0.000 sec)

MariaDB [(none)]> select host, user, password from mysql.user;
+-----------------------+------+-------------------------------------------+
| host                  | user | password                                  |
+-----------------------+------+-------------------------------------------+
| localhost             | root | *B573D3EA036614123CB0B52313A6AD58E1F114C0 |
| localhost.localdomain | root |                                           |
| 127.0.0.1             | root |                                           |
| ::1                   | root |                                           |
| %                     | root | *B573D3EA036614123CB0B52313A6AD58E1F114C0 |
+-----------------------+------+-------------------------------------------+
5 rows in set (0.000 sec)

MariaDB [(none)]> eixt

#다시 접속하면 접속이 된다.
[root@localhost ~]# mysql -h 192.168.86.128 -u root -p
Enter password:
Welcome to the MariaDB monitor.  Commands end with ; or \g.
Your MariaDB connection id is 17
Server version: 10.3.27-MariaDB MariaDB Server

Copyright (c) 2000, 2018, Oracle, MariaDB Corporation Ab and others.

Type 'help;' or '\h' for help. Type '\c' to clear the current input statement.

#윈도우에서 마리아디비 cmd를 켜고 접속해보자.
C:\Program Files\MariaDB 10.5\bin>mysql -h 192.168.86.128 -u root -p
실습) project란 데이터베이스를 만들고 사용자와 암호는 project / 123456을 만들어보자.
create table project;
grant all privileges on project.* to 'project'@'%' identified by '123456';
한글설정하기
MariaDB [project]> ccreate table testtbl (col varchar(20));
MariaDB [project]> cdesc testtbl;
MariaDB [project]> exit

#한글설정하기
[root@localhost ~]# vi /etc/my.cnf.d/client.cnf
#
# These two groups are read by the client library
# Use it for options that affect all clients, but not the server
#


[client]
default-character-set=utf8            <- 여기
# This group is not read by mysql client library,
# If you use the same .cnf file for MySQL and MariaDB,
# use it for MariaDB-only client options
[client-mariadb]

[root@localhost ~]# vi /etc/my.cnf.d/mysql-clients.cnf
#
# These groups are read by MariaDB command-line tools
# Use it for options that affect only one utility
#

[mysql]
default-character-set=utf8            <- 여기
[mysql_upgrade]

[mysqladmin]

[mysqlbinlog]

[mysqlcheck]

[mysqldump]
default-character-set=utf8            <- 여기

[mysqlimport]

[mysqlshow]

[mysqlslap]


[root@localhost ~]# vi /etc/my.cnf.d/mariadb-server.cnf
#
# These groups are read by MariaDB server.
# Use it for options that only the server (but not clients) should see
#
# See the examples of server my.cnf files in /usr/share/mysql/
#

# this is read by the standalone daemon and embedded servers
[server]

# this is only for the mysqld standalone daemon
# Settings user and group are ignored when systemd is used.
# If you need to run mysqld under a different user or group,
# customize your systemd unit file for mysqld/mariadb according to the
# instructions in http://fedoraproject.org/wiki/Systemd
[mysqld]
datadir=/var/lib/mysql
socket=/var/lib/mysql/mysql.sock
log-error=/var/log/mariadb/mariadb.log
pid-file=/run/mariadb/mariadb.pid

            <- 여기
collation-server=utf8_general_ci
init-connect='SET NAMES utf8'
character-set-server=utf8
            <- 여기

#
# * Galera-related settings
#
[galera]
# Mandatory settings
#wsrep_on=ON
#wsrep_provider=
#wsrep_cluster_address=
#binlog_format=row
#default_storage_engine=InnoDB
#innodb_autoinc_lock_mode=2
#
# Allow server to accept connections on all interfaces.
#
#bind-address=0.0.0.0
#
# Optional setting
#wsrep_slave_threads=1
#innodb_flush_log_at_trx_commit=0

# this is only for embedded server
[embedded]

# This group is only read by MariaDB servers, not by MySQL.
# If you use the same .cnf file for MySQL and MariaDB,
# you can put MariaDB-only options here
[mariadb]

# This group is only read by MariaDB-10.3 servers.
# If you use the same .cnf file for MariaDB of different versions,
# use this group for options that older servers don't understand
[mariadb-10.3]


[root@localhost ~]# mysql -u root -p
Enter password:
Welcome to the MariaDB monitor.  Commands end with ; or \g.
Your MariaDB connection id is 9
Server version: 10.3.27-MariaDB MariaDB Server

Copyright (c) 2000, 2018, Oracle, MariaDB Corporation Ab and others.

Type 'help;' or '\h' for help. Type '\c' to clear the current input statement.

MariaDB [(none)]> show variables like 'c%';
+----------------------------------+------------------------------+
| Variable_name                    | Value                        |
+----------------------------------+------------------------------+
| character_set_client             | utf8                         |
| character_set_connection         | utf8                         |
| character_set_database           | utf8                         |
| character_set_filesystem         | binary                       |
| character_set_results            | utf8                         |
| character_set_server             | utf8                         |
| character_set_system             | utf8                         |
| character_sets_dir               | /usr/share/mariadb/charsets/ |
| check_constraint_checks          | ON                           |
| collation_connection             | utf8_general_ci              |
| collation_database               | utf8_general_ci              |
| collation_server                 | utf8_general_ci              |
| column_compression_threshold     | 100                          |
| column_compression_zlib_level    | 6                            |
| column_compression_zlib_strategy | DEFAULT_STRATEGY             |
| column_compression_zlib_wrap     | OFF                          |
| completion_type                  | NO_CHAIN                     |
| concurrent_insert                | AUTO                         |
| connect_timeout                  | 10                           |
| core_file                        | OFF                          |
+----------------------------------+------------------------------+
20 rows in set (0.001 sec)

MariaDB [project]> drop database project;
Query OK, 1 row affected (0.004 sec)

MariaDB [(none)]> create database project;
Query OK, 1 row affected (0.000 sec)

MariaDB [(none)]> use project
Database changed

MariaDB [project]> create table testtbl (col varchar(20));
Query OK, 0 rows affected (0.007 sec)

MariaDB [project]> insert into testtbl values ('한글');
Query OK, 1 row affected (0.003 sec)

MariaDB [project]> select * from testtbl;
+--------+
| col    |
+--------+
| 한글   |
+--------+
1 row in set (0.000 sec)
4. 우편번호 데이터 리눅스서버 데이터베이스에서 사용하기
먼저 아래 전국 우편번호 파일을 다운받고 리눅스 master 홈디렉터리에 넣는다.
그리고 MariaDB 라이브러리도 같이 넣어준다.
(넣는 방법은 ftp를 이용하든지 리눅스에서 웹브라우저 들어가서 이메일로 받아도 된다.)
리눅스 서버 터미널에서 먼저 zipcode 테이블을 만들어준다.
CREATE TABLE zipcode(
zipcode char(7) not null,
sido varchar(4) not null,
gugun varchar(17),
dong varchar(16) not null,
ri varchar(45),
bunji varchar(17),
seq int(5) unsigned not null,
constraint zipcode_pk primary key (seq)
);
리눅스에서 이클립스를 실행하고 아래처럼 csv 파일을 프로젝트 안에 넣어준다.
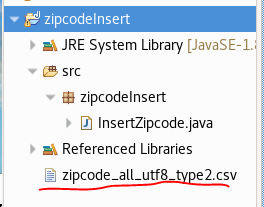
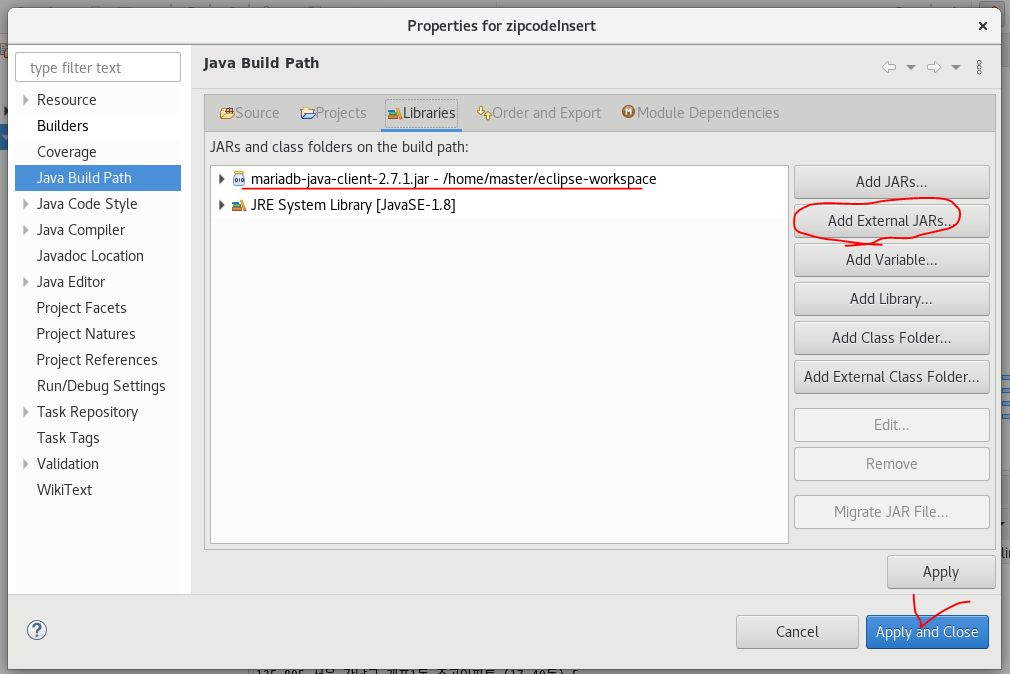
다음으로 mariaDB 라이브러리를 추가한다.
프로젝트 오른쪽클릭 - Bulid Path - Library
그리고 예전에 사용했던 코드를 가져와서 사용한다.
참고로 리눅스에서 이클립스 자동완성을 사용하려면 alt + /을 눌러주면 된다.
-InsertZipcode.java
package zipcodeInsert;

import java.io.BufferedReader;
import java.io.FileNotFoundException;
import java.io.FileReader;
import java.io.IOException;
import java.sql.Connection;
import java.sql.DriverManager;
import java.sql.PreparedStatement;
import java.sql.ResultSet;
import java.sql.SQLException;

public class InsertZipcode {

	public static void main(String[] args) {
		String url = "jdbc:mysql://localhost:3306/project";
		String user = "project";
		String password = "123456";

		BufferedReader bis = null;
		Connection conn = null;
		PreparedStatement pstmt1 = null;
		PreparedStatement pstmt2 = null;
		ResultSet rs = null;

		try {
			//zipcode 파일 불러오기
			bis = new BufferedReader(
					new FileReader("./zipcode_all_utf8_type2.csv"));

			//데이터베이스 접속
			Class.forName("org.mariadb.jdbc.Driver");
			conn = DriverManager.getConnection(url, user, password);

			//PreparedStatement로 insert문 미리 준비
			String insertSql = "insert into zipcode values(?,?,?,?,?,?,?)";
			pstmt1 = conn.prepareStatement(insertSql);

			//zipcode 파일 내용 읽기 + 데이터베이스에 데이터 집어넣기
			int sum = 0;
			String data = null;
			while( (data = bis.readLine()) != null ) {
				String[] datas = data.split(",");
				for(int i=1; i<=7; i++) {
					pstmt1.setString(i, datas[i-1]);
				}
				int result = pstmt1.executeUpdate();
				sum += result;
			}
			System.out.println("실행한 행의 개수: "+sum);

			//select문으로 제대로 입력되었는지 위에 5개 행만 출력
			String selectSql = "select * from zipcode limit 5";
			pstmt2 = conn.prepareStatement(selectSql);
			rs = pstmt2.executeQuery();
			int a = 1;
			while( a <= 5 ) {
				rs.next();
				System.out.printf("%s %s %s %s %s %s %s\n",
						rs.getString(1),
						rs.getString(2),
						rs.getString(3),
						rs.getString(4),
						rs.getString(5),
						rs.getString(6),
						rs.getString(7) );
				a++;
			}

		} catch (FileNotFoundException e) {
			// TODO Auto-generated catch block
			e.printStackTrace();
		} catch (ClassNotFoundException e) {
			// TODO Auto-generated catch block
			e.printStackTrace();
		} catch (SQLException e) {
			// TODO Auto-generated catch block
			e.printStackTrace();
		} catch (IOException e) {
			// TODO Auto-generated catch block
			e.printStackTrace();
		} finally {
			if(bis!=null) try {bis.close();} catch(IOException e) {}
			if(conn!=null) try {conn.close();} catch(SQLException e) {}
			if(pstmt1!=null) try {pstmt1.close();} catch(SQLException e) {}
			if(pstmt2!=null) try {pstmt2.close();} catch(SQLException e) {}
			if(rs!=null) try {rs.close();} catch(SQLException e) {}
		}

	}
}
-실행
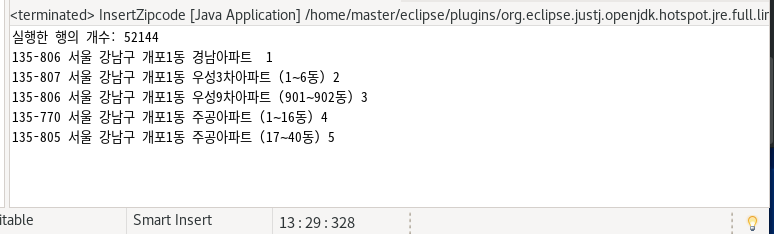
실제 데이터베이스에서도 제대로 들어갔는지 확인한다.

우편번호 검색기 만들기
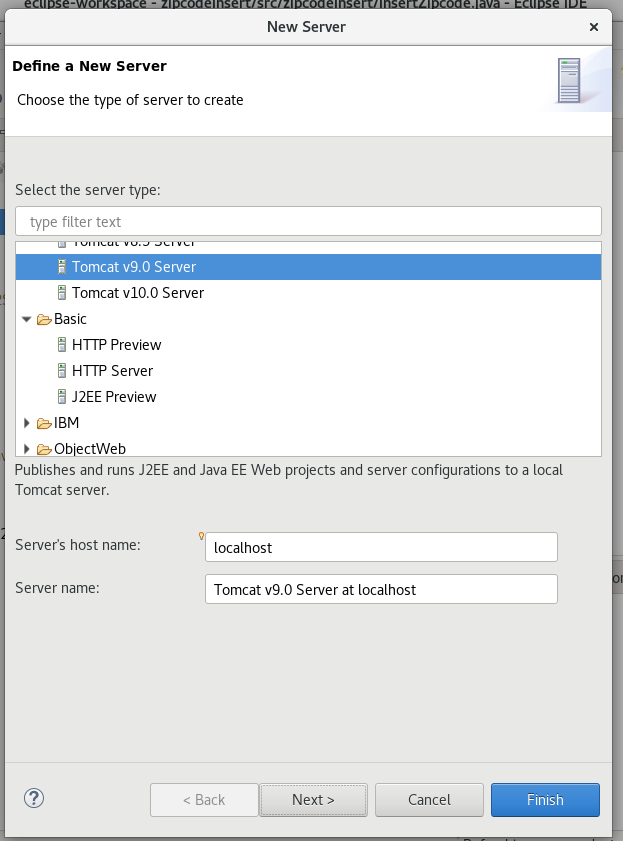
먼저 서버세팅을 해준다.
윈도우 이클립스에서 기존에 만들었던 우편번호 검색기를 war파일로 만든뒤 ftp를 이용해서 리눅스로 옮긴다.
리눅스 이클립스에서 export해서 방금 옮긴 war파일을 실행시키고 context.xml을 리눅스 마리아디비에 맞게 수정한 뒤 실행하면 된다.
실습) 윈도우에서 만든 spring게시판을 리눅스서버로 옮겨서 실행하기
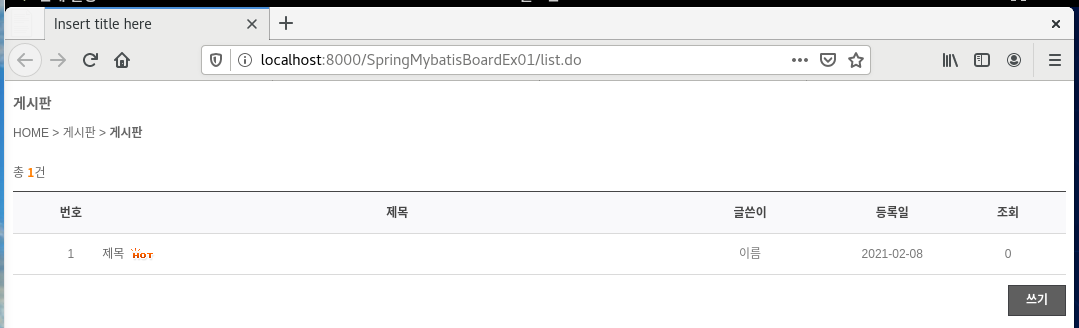
우편번호랑 똑같이 war파일 만들어서 리눅스 이클립스에서 가져온 다음에 root-context.xml에 데이터베이스 설정 수정해주고
리눅스 마리아디비 킨다음 dml적어서 board 테이블을 만들어준다.
create table board1 (
seq int not null primary key auto_increment,
subject varchar(150) not null,
writer varchar(12) not null,
mail varchar(50),
password varchar(12)	 not null,
content varchar(2000),
hit int not null,
wip varchar(15) not null,
wdate datetime not null
);

insert into board1 values (0, '제목', '이름', 'test@test.com', '1234', '내용', 0, '000.000.000.000', now() );


