
지구정복
[Node.js] 02/23 | PhantomJS 사용하기, Node.js로 Http 서버 만들기 (http모듈) 본문
[Node.js] 02/23 | PhantomJS 사용하기, Node.js로 Http 서버 만들기 (http모듈)
nooh._.jl 2021. 2. 23. 17:10복습 및 배울내용
python - 언어 개념이 쉬움

vs

node - html과 결합이 가능
스크래핑
	http client

	urllib, 더 발전한 것이 axios
		html, xml, json 데이터 가져오기
		striptags
		cheerio

	* PhantomJS / Selenium = ajax로 가져오는 내용을 추출
1. PhantomJS 사용하기
사용에 앞서 리눅스에서 설정을 해줘야 한다.
phantomjs 다운로드 파일 링크:
https://bitbucket.org/ariya/phantomjs/downloads/phantomjs-2.1.1-linux-x86_64.tar.bz2
#phantomjs사용할 패키지 만들기
[master@localhost ~]$ mkdir phantomex1
[master@localhost ~]$ cd phantomex1/
[master@localhost phantomex1]$ npm init -y

[master@localhost phantomex1]$ su - root
암호:

#설치할 폴더 설정
[root@localhost ~]# mkdir /usr/local/phantom
[root@localhost ~]# cd /usr/local/phantom/

#phantomjs 설치 및 각종 필요 파일 설치
[root@localhost phantom]# wget https://bitbucket.org/ariya/phantomjs/downloads/phantomjs-2.1.1-linux-x86_64.tar.bz2
[root@localhost phantom]# yum -y install bzip2
[root@localhost phantom]# yum -y install fontconfig

#phantomjs 압축풀기
[root@localhost phantom]# tar xvf phantomjs-2.1.1-linux-x86_64.tar.bz2

#
[root@localhost phantom]# ln -s /usr/local/phantom/phantomjs-2.1.1-linux-x86_64/bin/phantomjs /usr/bin/phantomjs

#예제들 확인
[root@localhost phantom]# ls ./phantomjs-2.1.1-linux-x86_64/examples/
arguments.js               injectme.js           page_events.js        rasterize.js              simpleserver.js
child_process-examples.js  loadspeed.js          pagecallback.js       render_multi_url.js       sleepsort.js
colorwheel.js              loadurlwithoutcss.js  phantomwebintro.js    responsive-screenshot.js  stdin-stdout-stderr.js
countdown.js               modernizr.js          post.js               run-jasmine.js            universe.js
detectsniff.js             module.js             postjson.js           run-jasmine2.js           unrandomize.js
echoToFile.js              netlog.js             postserver.js         run-qunit.js              useragent.js
features.js                netsniff.js           printenv.js           scandir.js                version.js
fibo.js                    openurlwithproxy.js   printheaderfooter.js  server.js                 waitfor.js
hello.js                   outputEncoding.js     printmargins.js       serverkeepalive.js        walk_through_frames.js

[root@localhost phantom]# cat ./phantomjs-2.1.1-linux-x86_64/examples/hello.js
"use strict";
console.log('Hello, world!');
phantom.exit();

#팬텀js명령어 사용하기
[root@localhost phantom]# phantomjs --version

#phantomjs로 예제파일 실행하기
[root@localhost phantom]# phantomjs /usr/local/phantom//phantomjs-2.1.1-linux-x86_64/examples/hello.js
Hello, world!

#master 계정에서 사용하기
[root@localhost phantom]# exit
[master@localhost phantomex1]$ phantomjs --version

[master@localhost phantomex1]$ pwd
/home/master/phantomex1
[master@localhost phantomex1]$ ls
package.json
[master@localhost phantomex1]$ npm install phantomjs
이제 비주얼 스튜디오 코드에서 사용해보자.
phantomjs를 이용해서 구글 사이트를 킨다음 스크린캡처 기능을 사용해보자.
이때 주의할 점이 phantom은 ECMAScript6가 아직 적용이 안되어서 ECMAScript5 문법을 사용해야 한다.
따라서 변수를 선언할 때도 var를 사용해야 한다.
"use strict"
var page = require( 'webpage' ).create();

page.open( 'https://www.google.com', function() {
    setTimeout( function() {
        page.render( './google.png' );
        phantom.exit();
    }, 200 );
});
터미널에서 실행시키는 명령어는 다음과 같다.
[master@localhost phantomex1]$ phantomjs phantom1.js실행시키면 다음과 같이 0.2초 뒤에 구글 사이트를 캡처할 수 있다

어제 미세먼지 사이트 크롤링도 phantomjs를 이용해서 데이터를 가져올 수 있다.
"use strict"
var page = require( 'webpage' ).create();

page.open( 'http://cleanair.seoul.go.kr/airquality/localAvg', function( status ) {
    if( status == 'success' ) {
        setTimeout( function() {
            var html = page.evaluate( function() {
                return document.getElementById( 'localAvg-table' ).innerHTML;
            });
            console.log ( html );
            phantom.exit();
        }, 200 );
    }
})

2. Node.js로 Http 서버 만들기 (http / htp2 모듈)
1. 설치 및 기본사용
jsp의 경우 tomcat이 설치되어야지 웹서버를 통해서 jsp파일을 실행시킬 수 있지만
node.js의 경우 http 라이브러리를 이용하면 웹서버를 이용할 수 있다.
먼저 패키지를 만든다.
[master@localhost phantomex1]$ cd
[master@localhost ~]$ mkdir httpex1
[master@localhost ~]$ cd httpex1/
[master@localhost httpex1]$ npm init -y
node.js에서 웹 서버를 만들어보자.
"use strict"
const http = require( 'http' );

//server 실행 8080포트에서 요청을 확인(듣는다.)
http.createServer( ( req, res ) => {
    //console.log( req );
    res.end( 'Hello Node Server' );
}).listen( 8080, () => {
    console.log( '8080포트에서 요청 대기중 ...' );
});
리눅스 웹브라우저에서 http://localhost:8080 에 들어가면 hello node server가 보인다.

아래와 같이 html문서로 작성할 수 있다.
"use strict"
const http = require( 'http' );

//server 실행 8080포트에서 요청을 확인(듣는다.)
http.createServer( ( req, res ) => {
    //console.log( req );
    res.end( '<html><head></head><body><h2>Hello Node Server!</h2></body></html>' );
}).listen( 8080, () => {
    console.log( '8080포트에서 요청 대기중 ...' );
});
백탭을 이용해서 html문서를 정리해서 작성할 수 있다.
"use strict"
const http = require( 'http' );

//server 실행 8080포트에서 요청을 확인(듣는다.)
http.createServer( ( req, res ) => {
    //console.log( req );
    const html =
        `<html>
        <head>
        </head>
        <body>
            <h2>Hello Node Server!</h2>
        </body>
        </html>`;
        res.end( html );
}).listen( 8080, () => {
    console.log( '8080포트에서 요청 대기중 ...' );
});
각 이벤트를 나눠서 처리할 수 있다.
"use strict"
const http = require( 'http' );

//server 실행 8080포트에서 요청을 확인(듣는다.)
const server = http.createServer( ( req, res ) => {
    const html =
        `<html>
        <head>
        </head>
        <body>
            <h2>Hello Node Server~!</h2>
        </body>
        </html>`;
        res.end( html );
});
server.listen( 8080 );
server.on( 'listening', () => {
    console.log( '8080포트에서 요청 대기중 ...' );
})
server.on( 'error', err => {
    console.error( err.message );
})
매번 js안에서 html문서를 작성할 수 없으니 외부 html문서를 만들고 불러와보자.
-template1.html
<!DOCTYPE html>
<html>
<head>
<meta charset="utf-8" />
</head>
<body>
    <h1>Node.js 웹 서버</h1>
</body>
</html>
-httpex3.js
"use strict"
const http = require( 'http' );
const fs = require( 'fs' );

const server = http.createServer( ( req, res ) => {
    const filename = './template1.html';
    fs.readFile( filename, (err, data) => {
        if( !err ) {
            res.write( data );
            res.end();
        } else {
            console.error( err.message );
        }
    })
});
server.listen( 8080 );
server.on( 'listening', () => {
    console.log( '8080포트에서 요청 대기중 ...' );
})
server.on( 'error', err => {
    console.error( err.message );
})
클라이언트가 요청한 페이지 보여주기
먼저 요청에 관련된 메서드와 url, header를 출력해보자.
"use strict"
const http = require( 'http' );

const server = http.createServer( ( req, res ) => {
    console.log( req.method );
    console.log( req.url );
    console.log( req.headers );
    res.end();
}).listen( 8080, () => {
    console.log( '8080포트에서 요청 대기중 ...' );
});
localhost:8080을 실행하면 터미널에 아래와 같이 출력된다.

윈도우 브라우저에서 이를 확인할 수 있다.
먼저 방화벽 설정을 해줘야 한다.
[master@localhost httpex1]$ su - root
암호:
[root@localhost ~]# cd /usr/lib/firewalld/services/
[root@localhost services]# vi http.xml

#http 수정
<?xml version="1.0" encoding="utf-8"?>
<service>
  <short>WWW (HTTP)</short>
  <description>HTTP is the protocol used to serve Web pages. If you plan to make your Web server publicly available, enable this option. This option is not required for viewing pages locally or developing Web pages.</description>
  <port protocol="tcp" port="80"/>
  <port protocol="tcp" port="8080"/>
</service>

:wq

[root@localhost services]# firewall-cmd --zone=public --add-service=http --permanent
success
[root@localhost services]# firewall-cmd --reload
success

#ip주소확인
[root@localhost services]# ifconfig
이제 윈도우 브라우저에서 리눅스서버 ip:8080을 치고 들어간다.

그러면 비주얼스튜디오코드 터미널창에 윈도우 브라우저에서 접속한 정보가 출력된다.

리눅스 브라우저에서 localhost:8080으로 접속하면 아래와 같은 결과가 나온다.

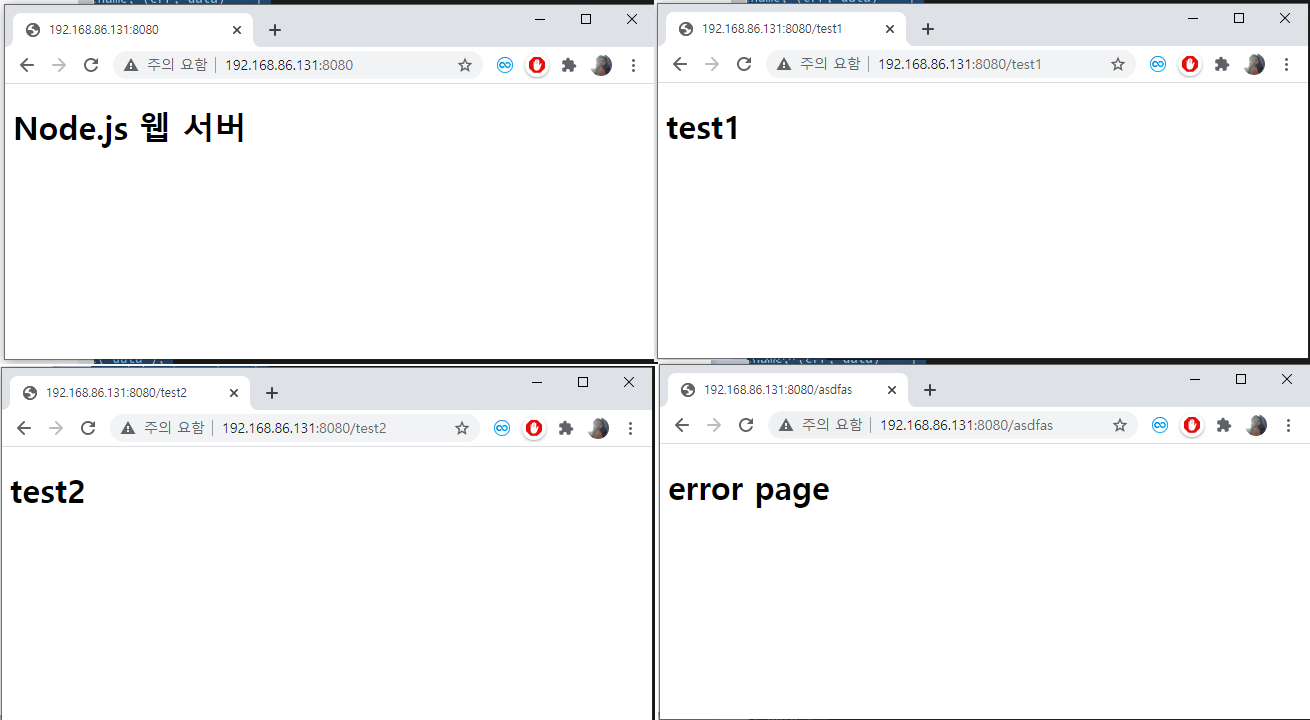
2. 컨트롤러 형식으로 웹페이지 구현하기
컨트롤러 형식으로 웹페이지를 구현할 수 있다.
"use strict"
const http = require( 'http' );

const server = http.createServer( ( req, res ) => {
    console.log( req.url );
    if( req.url == '/' ) {
        res.end( 'page /' );
    } else if( req.url == '/test1' ) {
        res.end( 'page /test1' );
    } else if( req.url == '/test2' ) {
        res.end( 'page /test2' );
    } else {
        res.end( 'page /etc' );
    }
}).listen( 8080, () => {
    console.log( '8080포트에서 요청 대기중 ...' );
});
이를 통해 사이트간의 이동을 구현할 수 있다.
이를 위해 먼저 사용될 디렉터리와 html파일을 만들어준다.
[root@localhost services]# exit
logout
[master@localhost httpex1]$ pwd
/home/master/httpex1

#사이트 만들 디렉터리와 파일 생성하기
[master@localhost httpex1]$ mkdir public_html
[master@localhost httpex1]$ mkdir -p public_html/site
[master@localhost httpex1]$ touch public_html/index.html
[master@localhost httpex1]$ touch public_html/error.html
[master@localhost httpex1]$ touch public_html/site/test1.html
[master@localhost httpex1]$ touch public_html/site/test2.html
비주얼코드에서 디렉터리목록 새로고침하면 위에서만든 디렉터리가 생긴다.

아래와 같이 간단하게 코드를 작성한다.
-index.html
<!DOCTYPE html>
<html>
<head>
<meta charset="utf-8" />
</head>
<body>
    <h1>Node.js 웹 서버</h1>
</body>
</html>
-test1.html
<!DOCTYPE html>
<html>
<head>
<meta charset="utf-8" />
</head>
<body>
    <h1>test1</h1>
</body>
</html>
-test2.html
<!DOCTYPE html>
<html>
<head>
<meta charset="utf-8" />
</head>
<body>
    <h1>test2</h1>
</body>
</html>
-error.html
<!DOCTYPE html>
<html>
<head>
<meta charset="utf-8" />
</head>
<body>
    <h1>error page</h1>
</body>
</html>
-httpex6.js
"use strict"
const http = require( 'http' );
const fs = require( 'fs' );

const server = http.createServer( ( req, res ) => {
    let filename = '';
    if( req.url == '/' ) {
        filename = './public_html/index.html';
        fs.readFile( filename, (err, data) => {
            if( !err ) {
                res.write( data );
                res.end();
            }
        })
    } else if( req.url == '/test1' ) {
        filename = './public_html/site/test1.html';
        fs.readFile( filename, (err, data) => {
            if( !err ) {
                res.write( data );
                res.end();
            }
        })
    } else if( req.url == '/test2' ) {
        filename = './public_html/site/test2.html';
        fs.readFile( filename, (err, data) => {
            if( !err ) {
                res.write( data );
                res.end();
            }
        })
    } else {
        filename = './public_html/error.html';
        fs.readFile( filename, (err, data) => {
            if( !err ) {
                res.write( data );
                res.end();
            }
        })
    }
}).listen( 8080, () => {
    console.log( '8080포트에서 요청 대기중 ...' );
});
위 코드를 간단하게 작성해보자.
"use strict"
const http = require( 'http' );
const fs = require( 'fs' );

const server = http.createServer( ( req, res ) => {
    if( req.url == '/' ) {
        fs.createReadStream( './public_html/index.html' ).pipe( res );
    } else if( req.url == '/test1' ) {
        fs.createReadStream( './public_html/site/test1.html' ).pipe( res );
    } else if( req.url == '/test2' ) {
        fs.createReadStream( './public_html/site/test2.html' ).pipe( res );
    } else {
        fs.createReadStream( './public_html/error.html' ).pipe( res );
    }
}).listen( 8080, () => {
    console.log( '8080포트에서 요청 대기중 ...' );
});
3. post와 get방식으로 페이지간 데이터 처리
페이간의 데이터 처리를 위한 post와 get방식을 처리할 수 있다.
"use strict"
const http = require( 'http' );
const fs = require( 'fs' );

const server = http.createServer( ( req, res ) => {
    if( req.url == '/' ) {
        if( req.method.toLowerCase() == 'post' ) {
            res.end( 'post' );
        } else {    //get일 경우
            res.end( 'get' );
        }
    } else {
        res.end( 'error' );
    }
}).listen( 8080, () => {
    console.log( '8080포트에서 요청 대기중 ...' );
});
이를 이용해서 아래처럼 만들어보자.
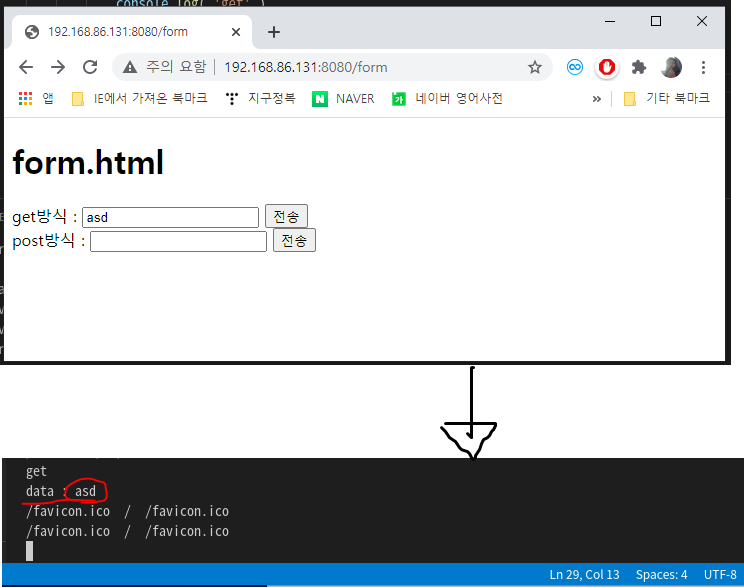
/form -> form.html
/form_ok -> get방식 - form_ok.html
-> post방식 - form_ok.html
을 보여지도록 만들어보자.
-form.html
<!DOCTYPE html>
<html>
<head>
<meta charset="utf-8" />
</head>
<body>

<h1>form.html</h1>
<form action="./form_ok" method="get">
    get방식 : <input type="text" name="data1" />
    <input type="submit" value="전송" />
</form>

<form action="./form_ok" method="post">
    post방식 : <input type="text" name="data2" />
    <input type="submit" value="전송" />
</form>

</body>
</html>
-form_ok.html
<!DOCTYPE html>
<html>
<head>
<meta charset="utf-8" />
</head>
<body>
    <h1>form_ok.html</h1>
</body>
</html>
-httpex8.js
"use strict"
const http = require( 'http' );
const fs = require( 'fs' );
const url = require( 'url' );

const server = http.createServer( ( req, res ) => {

    //querystring(= 페이지간 데이터)가 있다면 아래와 같이 처리한다.
    let parsed = url.parse( req.url, true );
    console.log( parsed.pathname, ' / ', req.url );

    if( parsed.pathname == '/form' ) {
        fs.createReadStream( './public_html/form.html' ).pipe( res );
    } else if( parsed.pathname == '/form_ok' ) {
        if( req.method.toLowerCase() == 'post' ) {
            console.log( 'post' )
            fs.createReadStream( './public_html/form_ok.html' ).pipe( res );
        } else {
            console.log( 'get' )
            fs.createReadStream( './public_html/form_ok.html' ).pipe( res );
        }
    } else {
        fs.createReadStream( './public_html/error.html' ).pipe( res );
    }
}).listen( 8080, () => {
    console.log( '8080포트에서 요청 대기중 ...' );
});
먼저 post방식은 html 헤더안에 데이터가 담겨서 가기 때문에 form_ok.html로 넘어간다.
get방식의 경우 url.parse를 통해서 url의 데이터부분인 ?전까지만을 잘라야 된다.


이제 get이나 post방식으로 넘겨진 데이터를 사용하는 처리를 작성해보자.
먼저 데이터를 전송중일 때의 처리는 아래 processing이 쓰여져 있는 구문이다.
그리고 데이터 전송이 완료되었을 때의 부분은 end가 써져있는 구문이다.
"use strict"
const http = require( 'http' );
const fs = require( 'fs' );
const url = require( 'url' );

const server = http.createServer( ( req, res ) => {

    //querystring(= 페이지간 데이터)가 있다면 아래와 같이 처리한다.
    let parsed = url.parse( req.url, true );
    console.log( parsed.pathname, ' / ', req.url );

    if( parsed.pathname == '/form' ) {
        fs.createReadStream( './public_html/form.html' ).pipe( res );
    } else if( parsed.pathname == '/form_ok' ) {
        if( req.method.toLowerCase() == 'post' ) {
            console.log( 'post' )
            //fs.createReadStream( './public_html/form_ok.html' ).pipe( res );

            //on은 이벤트를 의미(~가 발생하면) chuck(청크=조각)
            req.on( 'data', chuck => {
                console.log( 'processing' );
            });
            req.on( 'end', () => {
                console.log( 'end' );
            });

        } else {
            console.log( 'get' )
            //fs.createReadStream( './public_html/form_ok.html' ).pipe( res );

            req.on( 'data', chuck => {
                console.log( 'processing' );
            });
            req.on( 'end', () => {
                console.log( 'end' );
            });

        }
    } else {
        fs.createReadStream( './public_html/error.html' ).pipe( res );
    }
}).listen( 8080, () => {
    console.log( '8080포트에서 요청 대기중 ...' );
});
이제 end 구문 아래에 form_ok.html 페이지로 넘어가도록 해보자.
"use strict"
const http = require( 'http' );
const fs = require( 'fs' );
const url = require( 'url' );

const server = http.createServer( ( req, res ) => {
    let parsed = url.parse( req.url, true );
    console.log( parsed.pathname, ' / ', req.url );

    if( parsed.pathname == '/form' ) {
        fs.createReadStream( './public_html/form.html' ).pipe( res );
    } else if( parsed.pathname == '/form_ok' ) {

        if( req.method.toLowerCase() == 'post' ) {
            console.log( 'post' )
            req.on( 'end', () => {
                console.log( 'end' );
            });
        } else {
            console.log( 'get' )
            req.on( 'end', () => {
                console.log( 'end' );
            });
        }
        fs.createReadStream( './public_html/form_ok.html' ).pipe( res );
    } else {
        fs.createReadStream( './public_html/error.html' ).pipe( res );
    }
}).listen( 8080, () => {
    console.log( '8080포트에서 요청 대기중 ...' );
});
이제 넘어오는 데이터를 처리해보자.
get방식의 경우 req.url가 넘어오므로 여기서 데이터부분만 잘라내서 사용할 수 있다.
"use strict"
const http = require( 'http' );
const fs = require( 'fs' );
const url = require( 'url' );
const querystring = require( 'querystring' );

const server = http.createServer( ( req, res ) => {
    let parsed = url.parse( req.url, true );
    console.log( parsed.pathname, ' / ', req.url );

    if( parsed.pathname == '/form' ) {
        fs.createReadStream( './public_html/form.html' ).pipe( res );
    } else if( parsed.pathname == '/form_ok' ) {

        if( req.method.toLowerCase() == 'post' ) {
            console.log( 'post' )
            req.on( 'end', () => {
                console.log( 'end' );
            });
        } else {
            console.log( 'get' )
            req.on( 'end', () => {
                //get방식으로 전달받은 데이터 처리
                let query = parsed.query;
                console.log( 'data :', query.data1 );
            });
        }
        fs.createReadStream( './public_html/form_ok.html' ).pipe( res );
    } else {
        fs.createReadStream( './public_html/error.html' ).pipe( res );
    }
}).listen( 8080, () => {
    console.log( '8080포트에서 요청 대기중 ...' );
});
post방식인 경우 넘어오는 데이터를 누적했다가 출력해야한다.
"use strict"
const http = require( 'http' );
const fs = require( 'fs' );
const url = require( 'url' );
const querystring = require( 'querystring' );

const server = http.createServer( ( req, res ) => {
    let parsed = url.parse( req.url, true );
    console.log( parsed.pathname, ' / ', req.url );

    if( parsed.pathname == '/form' ) {
        fs.createReadStream( './public_html/form.html' ).pipe( res );
    } else if( parsed.pathname == '/form_ok' ) {

        if( req.method.toLowerCase() == 'post' ) {
            let data = '';
            console.log( 'post' )
            req.on( 'data', (chuck) => {
                data += chuck;
            });
            req.on( 'end', () => {
                console.log( 'end', data );
                const query = querystring.parse( data );
                console.log( query.data );
            });
        } else {
            console.log( 'get' )
            req.on( 'end', () => {
                //get방식으로 전달받은 데이터 처리
                let query = parsed.query;
                console.log( 'data :', query.data1 );
            });
        }
        fs.createReadStream( './public_html/form_ok.html' ).pipe( res );
    } else {
        fs.createReadStream( './public_html/error.html' ).pipe( res );
    }
}).listen( 8080, () => {
    console.log( '8080포트에서 요청 대기중 ...' );
});
만일post방식에서 넘어오는 데이터 변수의 이름이 data2라면 마지막 출력할 때 query.data2 로 바꿔주면 된다.

실습) 구구단 페이지 만들기 (get방식을 이용할 것)
아래 결과처럼 나오도록 만들어보자.

내코드
-gugudan1.html
<!DOCTYPE html>
<html>
<head>
<meta charset="utf-8" />
</head>
<body>
<form action="./gugudan1_ok" method="get">
    단수 입력 <input type="text" name="dansu" />
    <input type="submit" value="구구단 출력" />
</form>
</body>
</html>
-gugudan1_ok.html (비워져있음)
-httpex10.js (html만드는 구문은 백탭(``)으로 묶여있음)
"use strict"
const http = require( 'http' );
const fs = require( 'fs' );
const url = require( 'url' );
const querystring = require( 'querystring' );

const server = http.createServer( ( req, res ) => {
    let parsed = url.parse( req.url, true );
    console.log( parsed.pathname, ' / ', req.url );

    if( parsed.pathname == '/gugudan1' ) {
        fs.createReadStream( './public_html/gugudan1.html' ).pipe( res );
    } else if( parsed.pathname == '/gugudan1_ok' ) {

        if( req.method.toLowerCase() == 'get' ) {
            req.on( 'end', () => {
                let query = parsed.query;
                let dansu = Number( query.dansu );
                console.log( 'dansu :', dansu );
                console.log( typeof dansu );
                let outF = fs.createWriteStream( './public_html/gugudan1_ok.html', { flags: 'w' } );
                let html = `
                <!DOCTYPE html>
                <html>
                <head>
                <meta charset="utf-8" />
                </head>
                <body>
                <table border="1">
                    <tr align="center">`;
                for(let i=1; i<10; i++) {
                    html += `<td>${ dansu } X ${ i } = ${ dansu*i }</td>`;
                };
                html += `
                    </tr>
                </table>
                </body>
                </html>`
                outF.write( html );
            });
        }

        fs.createReadStream( './public_html/gugudan1_ok.html' ).pipe( res );
    } else {
        fs.createReadStream( './public_html/error.html' ).pipe( res );
    }
}).listen( 8080, () => {
    console.log( '8080포트에서 요청 대기중 ...' );
});
강사님코드
-gugudan1.html
<!DOCTYPE html>
<html>
<head>
<meta charset="utf-8" />
</head>
<body>
<form action="./gugudan1_ok" method="get">
    단수 입력 <input type="text" name="dansu" />
    <input type="submit" value="구구단 출력" />
</form>
</body>
</html>
-gugudan_ok.html
<!DOCTYPE html>
<html>
<head>
<meta charset="utf-8" />
</head>
<body>
gugudan_ok.html <br>
${ gugudanString }
</body>
</html>
-httpex10_1.js (gugudanString 만드는 구문은 백탭(``)으로 묶여있음)
"use strict"
const http = require( 'http' );
const fs = require( 'fs' );
const url = require( 'url' );
const querystring = require( 'querystring' );

const server = http.createServer( ( req, res ) => {
    let parseUrl = url.parse( req.url, true );
    console.log( parseUrl.pathname, ' / ', req.url );

    if( parseUrl.pathname == '/gugudan1' ) {
        fs.createReadStream( './public_html/gugudan1.html' ).pipe( res );
    } else if( parseUrl.pathname == '/gugudan1_ok' ) {
        if( req.method.toLocaleLowerCase() == 'get' ) {

            let query = parseUrl.query;
            console.log( query.dansu );

            let gugudanString =
            `<table border="1">
                <tr align="center">`
            for(let i=1; i<10; i++) {
                gugudanString += `<td>${ query.dansu } X ${ i } = ${ query.dansu*i }</td>`
            }
            gugudanString += `
                </tr>
            </table>`

            const data = fs.readFileSync( './public_html/gugudan_ok.html' );

            //template 문자열화 시키기
            const tpldata = eval( '`' + data.toString().replace( /`/g, '\\`' ) + '`' );
            res.end( tpldata );
        } else {

        }

    } else {
        fs.createReadStream( './public_html/error.html' ).pipe( res );
    }
}).listen( 8080, () => {
    console.log( '8080포트에서 요청 대기중 ...' );
});
실습) 구구단 페이지 만들기 (post방식을 이용할 것)
이번에는 위의 구구단 실습을 post방식으로 만들어보자.
-gugudan1.html
<!DOCTYPE html>
<html>
<head>
<meta charset="utf-8" />
</head>
<body>
<form action="./gugudan_ok" method="post">
    단수 입력 <input type="text" name="dansu" />
    <input type="submit" value="구구단 출력" />
</form>
</body>
</html>
-gugudan1_ok.html
<!DOCTYPE html>
<html>
<head>
<meta charset="utf-8" />
</head>
<body>
gugudan_ok.html <br>
${ gugudanString }
</body>
</html>
-httpex10_2.js (html만드는 구문은 백탭(``)으로 묶여있음)
"use strict"
const http = require( 'http' );
const fs = require( 'fs' );
const url = require( 'url' );
const querystring = require( 'querystring' );

const server = http.createServer( ( req, res ) => {
    let parseUrl = url.parse( req.url, true );

    if( parseUrl.pathname == '/gugudan' ) {
        fs.createReadStream( './public_html/gugudan.html' ).pipe( res );
    } else if( parseUrl.pathname == '/gugudan_ok' ) {
        if( req.method.toLocaleLowerCase() == 'get' ) {

            let query = parseUrl.query;
            console.log( query.dansu );

            let gugudanString =
            `<table border="1">
                <tr align="center">`
            for(let i=1; i<10; i++) {
                gugudanString += `<td>${ query.dansu } X ${ i } = ${ query.dansu*i }</td>`
            }
            gugudanString += `
                </tr>
            </table>`

            const data = fs.readFileSync( './public_html/gugudan_ok.html' );

            //template 문자열화 시키기
            const tpldata = eval( '`' + data.toString().replace( /`/g, '\\`' ) + '`' );
            res.end( tpldata );

        //post 방식일 때
        } else if( req.method.toLocaleLowerCase() == 'post' ) {
            let data = '';
            let gugudanString = '';

            req.on( 'data', (chuck) => {
                data += chuck;
            });
            req.on( 'end', () => {
                const query = querystring.parse( data );
                console.log( query.dansu );
                gugudanString =
                `<table border="1">
                    <tr align="center">`
                for(let i=1; i<10; i++) {
                    gugudanString += `<td>${ query.dansu } X ${ i } = ${ query.dansu*i }</td>`
                }
                gugudanString += `
                    </tr>
                </table>`

                const file = fs.readFileSync( './public_html/gugudan_ok.html' );

                //template 문자열화 시키기
                const tpldata = eval( '`' + file.toString().replace( /`/g, '\\`' ) + '`' );
                res.end( tpldata );
            })
        }

    } else {
        fs.createReadStream( './public_html/error.html' ).pipe( res );
    }
}).listen( 8080, () => {
    console.log( '8080포트에서 요청 대기중 ...' );
});


