
지구정복
[Node.js] 02/22 | Node.js promise 사용(select, insert, 우편번호검색기), url 사용, queryString 사용, urllib 사용(네이버 뉴스 크롤링), stringtags 사용, axios 사용, cheerio 사용(미세먼지 사이트 크롤링) 본문
[Node.js] 02/22 | Node.js promise 사용(select, insert, 우편번호검색기), url 사용, queryString 사용, urllib 사용(네이버 뉴스 크롤링), stringtags 사용, axios 사용, cheerio 사용(미세먼지 사이트 크롤링)
nooh._.jl 2021. 2. 22. 19:18복습 및 배울내용 정리
node.js는 jdk와 비슷하다.
jdk	- java 실행기		- 메모리나 cpu사용량이 무겁다.
node.js	- js(ECMAScript)실행기	- 상대적으로 가볍다
	문법은 ECMAScript
	ECMAScript 자체 라이브러리	- 대표적으로 String
	node.js 내장 라이브러리	- File System
	외부(third party) 라이브러리	- MariaDB

*.js
npm
-패키지
-라이브러리 관리
	전역 - 모든 프로젝트에서 사용가능
		npm -g install
	지역 - 자체만 사용가능
		npm install

- 자바스크립트 코드 검사해주는 언어(ms사에서 만듬)
typescript *.ts를 컴파일하면 *.js가 된다.
- typescript 코딩할 때 쓰는 편집기는 보통
비주얼스튜디오코드, webstorm을 사용한다.

- 동기식과 비동기식
비동기식 처리하는 방법
1. callback
어떤 처리결과를 콜백함수를 넘기고 콜백함수에서 처리결과를 조작하는 구조

2. promise 나중에 async/await구조로 변경가능
순차적으로 처리하는 것처럼 또는 if-else구문처럼 .then을 붙여서 하나씩 처리해나가는 구조

- node.js를 통해 배우는 데이터 라이브러리
파일
	path, file system
데이터베이스
	데이터베이스 드라이버
1. Node.js의 비동기식 처리 (promise 사용)
1. promise사용
promise구문은 if-else구문처럼 특정 처리구문의 결과를 구분해서 각 결과에 따라 코딩할 수 있다.
각 결과에 대한 처리구문은 .then을 이용한다.
비동기방식을 동기방식처럼 개발자가 만들 수 있다.
promise는 3가지 상태가 존재한다.
- pending : fullfilled 또는 reject가 되기 전 상태로 대기상태이다.
new Promise() 메소드로 호출할 수 있고 이때 콜백함수의 인자로 resolve, reject에 접근할 수 있다.
new Promise( function (resolve, reject) { 처리내용 });
- fulfilled : pending상태에서 resolve로 넘어가면 fulfilled 상태가 된다.
- rejuected : pending상태에서 exception이 발생하면 rejected 상태가 된다.
이제 아래의 예제를 살펴보면서 확인하자.
"use strict"
const mariadb = require( 'mariadb' );

mariadb.createConnection({
    host: 'localhost',
    user: 'root',
    password: '!123456',
    database: 'project'
}).then( conn => {  //connection이 되면
    console.log( 'success' );
    conn.end();
}).catch( err => {  //error가 발생하면
    console.log( err.message );
}).finally( () => { //최종 처리
    console.log( 'end' );

})
쿼리를 사용
"use strict"
const mariadb = require( 'mariadb' );
mariadb.createConnection({
host: 'localhost',
user: 'root',
password: '!123456',
database: 'project'
}).then( conn => {
console.log( 'success' );
//query사용
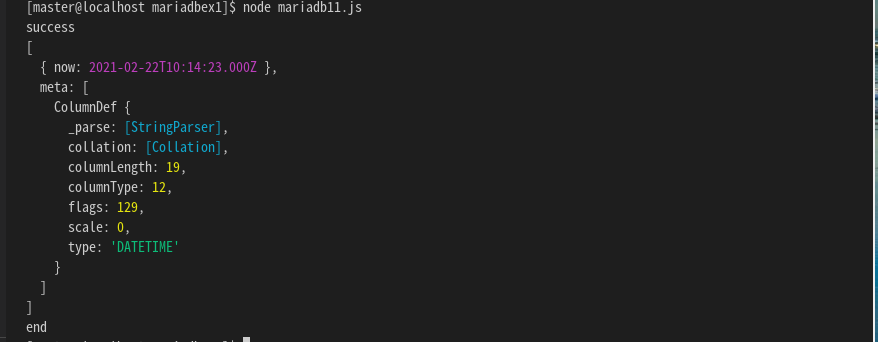
conn.query( 'select now() as now' )
.then( result => {
console.log( result );
}).catch( err1 => {
console.log( err.message );
}).finally( () => {
console.log( 'end' );
conn.end();
})
}).catch( err => {
console.log( err.message );
})
insert문 사용
"use strict"
const mariadb = require( 'mariadb' );

mariadb.createConnection({
    host: 'localhost',
    user: 'root',
    password: '!123456',
    database: 'project'
}).then( conn => {
    console.log( 'success' );
    //insert문 사용
    conn.query( 'insert into test values(?)', ['aaa'] )
    .then( result => {
        console.log( result );
    }).catch( err1 => {
        console.log( err.message );
    }).finally( () => {
        console.log( 'end' );
        conn.end();
    })
}).catch( err => {
    console.log( err.message );
})

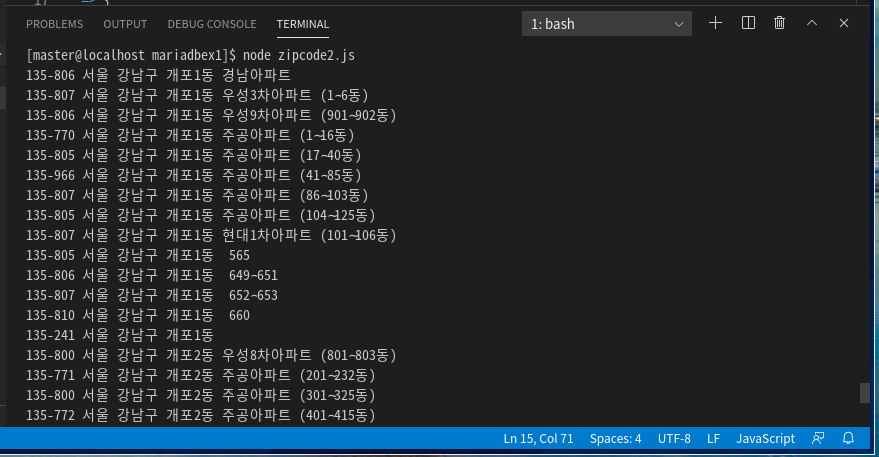
실습) promise를 이용하여 우편번호 검색기 만들기
"use strict"
const mariadb = require( 'mariadb' );

const strDong = '개포';

mariadb.createConnection({
    host: 'localhost',
    user: 'root',
    password: '!123456',
    database: 'project'
}).then( conn => {
    conn.query( "select * from zipcode where dong like ?", [ strDong+'%' ] )
    .then( results => {
        results.forEach( result => {
            console.log( result.zipcode, result.sido, result.gugun, result.dong, result.ri, result.bunji )
        })
    }).catch( err1 => {
        console.log( err.message );
    }).finally( () => {
        console.log( 'end' );
        conn.end();
    })
}).catch( err => {
    console.log( err.message );
})
이때 주의할 점으로 js 문서가 UTF-8인지 확인하자.
2. Node.js의 url 사용하기
먼저 networkex01라는 패키지를 npm을 이용해서 만든다
[master@localhost ~]$ mkdir networkex01
[master@localhost ~]$ cd networkex01/
[master@localhost networkex01]$ npm init -y
특정 url 정보 분석하기
"use strict"
const url = require( 'url' );
const strUrl = 'http://idols.com/hot/q?group=bts&name=jj&since='

const parseUrl = url.parse( strUrl );
console.log( parseUrl );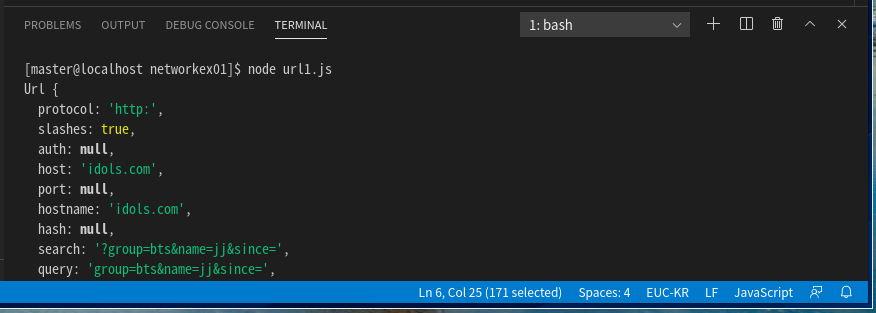
데이터를 하나씩 분해해서 출력하면 다음과 같다.
"use strict"
const url = require( 'url' );
const strUrl = 'http://idols.com/hot/q?group=bts&name=jj&since='

const parseUrl = url.parse( strUrl );
//console.log( parseUrl );
console.log( parseUrl.hostname );
console.log( parseUrl.protocol );
console.log( parseUrl.query );
위는 구형문법이고 신형문법을 사용해보자.
"use strict"

const { URL } = require( 'url' );
const myUrl = new URL( 'http://idols.com/hot/q?group=bts&name=jj&since=' );
console.log( myUrl );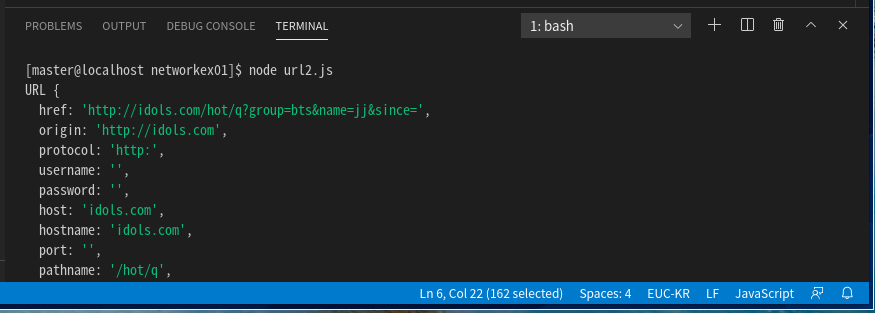
url 정보중 searchParams부분만 분리해서 처리하기
"use strict"

const { URL } = require( 'url' );
const myUrl = new URL( 'http://idols.com/hot/q?group=bts&name=jj&since=' );
//console.log( myUrl );
console.log( myUrl.searchParams );
console.log( myUrl.searchParams.get( 'group' ) );
3. Node.js의 queryString 사용하기
특정 url의 쿼리부분을 분석해주는 라이브러리이다.
특정 url의 쿼리부분인 문자열을 querystring.parse()메서드를 통해 json화해서 출력할 수 있다.
"use strict"

const querystring = require( 'querystring' );
const strQuery = 'group=bts&name=jj&since=';
const parseQuery = querystring.parse( strQuery );

console.log( parseQuery );
group과 name만 출력하기
"use strict"

const querystring = require( 'querystring' );
const strQuery = 'group=bts&name=jj&since=';
const parseQuery = querystring.parse( strQuery );

console.log( parseQuery.group );
console.log( parseQuery.name );
json화 시킨 데이터를 다시 문자열로 변환하기
"use strict"

const querystring = require( 'querystring' );
const strQuery = 'group=bts&name=jj&since=';
const parseQuery = querystring.parse( strQuery );

console.log( parseQuery.group );
console.log( parseQuery.name );

const strQuery2 = querystring.stringify( parseQuery );
console.log( strQuery2 );
json데이터를 직접만들고 문자열로 변환해보자.
"use strict"

const querystring = require( 'querystring' );
const strQuery = 'group=bts&name=jj&since=';
const parseQuery = querystring.parse( strQuery );

console.log( parseQuery.group );
console.log( parseQuery.name );

const strQuery2 = querystring.stringify( parseQuery );
console.log( strQuery2 );

// 한글은 자동인코딩된다.
const queryObj = {
    name : 'IU',
    best : '좋은날'
}
const strQuery3 = querystring.stringify( queryObj );
console.log( strQuery3 );
4. Node.js의 urllib 사용하기
먼저 urllib라이브러리를 다운받는다.
[master@localhost ~]$ mkdir urllibex1
[master@localhost ~]$ cd urllibex1/
[master@localhost urllibex1]$ npm install urllib
네이버 페이지에 연결을 해보자.
"use strict"

const urllib = require( 'urllib' );

urllib.request( 'https://www.naver.com', (err, data, res) => {
    if( !err ) {
        console.log( 'success' );
    } else {
        console.log( err.message );
    }
});
statusCode를 통해 페이지 접속이 잘 되었는지 확인할 수 있다.
만일 400이 나오면 페이지를 찾을 수 없는 것이다.
"use strict"

const urllib = require( 'urllib' );

urllib.request( 'https://www.naver.com', (err, data, res) => {
    if( !err ) {
        console.log( 'success', res.statusCode );
    } else {
        console.log( err.message );
    }
});
아래와 같이 페이지 여부에 따라 처리할 수도 있다. 또한 페이지의 모든 html 정보를 출력해보자.
"use strict"

const urllib = require( 'urllib' );

urllib.request( 'https://www.naver.com', (err, data, res) => {
    if( !err ) {
        if( res.statusCode == 200 ) {
            console.log( data.toString() );
        } else {
            console.error( 'page eroor' );
        }

    } else {
        console.log( err.message );
    }
});
비동기처리 방법중 콜백구조로 사용한 것이다.
promise방법으로 특정 url 정보를 출력해보자.
"use strict"
const urllib = require( 'urllib' )

urllib.request( 'https://www.naver.com' )
.then( result => {
    console.log( result.res.statusCode )
    //console.log( result.data.toString() );
}).catch( err => {
    console.error( err.message );
})
요청시 옵션설정
네이버에서 'covid19'를 검색하고 해당 url을 가져온다.
https://search.naver.com/search.naver?where=nexearch&sm=top_hty&fbm=1&ie=utf8&query=covid19
"use strict"
const urllib = require( 'urllib' );

//https://search.naver.com/search.naver?where=nexearch&sm=top_hty&fbm=1&ie=utf8&query=covid19
urllib.request( 'https://search.naver.com/search.naver', {
    method: 'get',
    data: {
        where : 'nexearch',
        sm : 'top_hty',
        fbm : '1',
        ie : 'utf8',
        query : 'covid19'
    }
}).then( result => {
    console.log( result.data.toString() );
}).catch( err => {
    console.error( err.message );
})
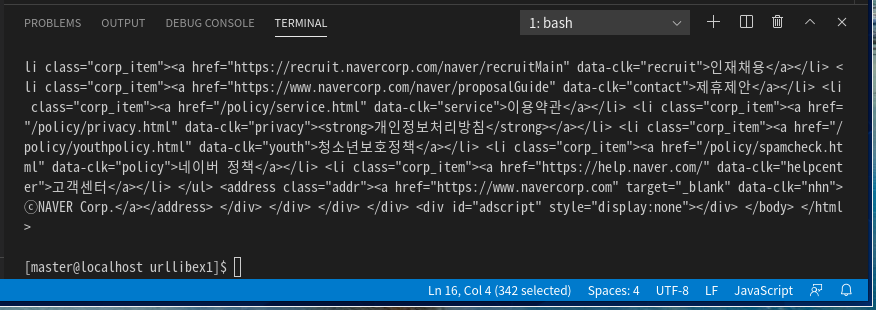
실습) 네이버 뉴스에서 헤드라인 뉴스 리스트 5개만 크롤링해보기
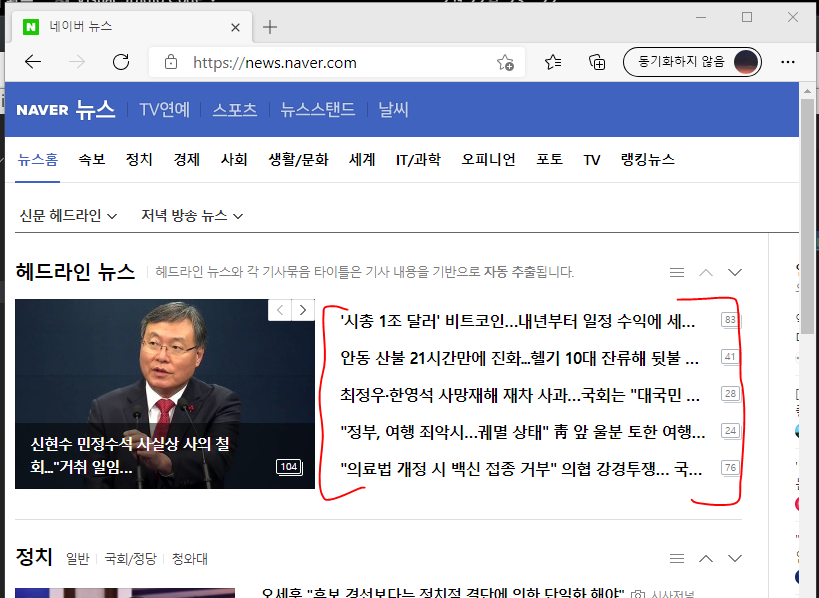
약간의 노가다 방식이다...
"use strict"
const urllib = require( 'urllib' );
let html = '';

urllib.request( 'https://news.naver.com/' )
.then( result => {
    //기사 부분만 추출
    html = result.data.toString().trim();
    let start = html.indexOf( '<ul class="hdline_article_list">', 1 );
    let end = html.indexOf( '<div class="btn_move">' );
    html = html.substring(start, end)

    //첫 번째 기사
    let html_1 = html.substring( html.indexOf( "')\">" )+6, html.indexOf( '</a>' )-1 );
    console.log( html_1 );
    let html_tmp = html.substring( html.indexOf( '</a>' )-1, end )

    //두 번째 기사
    let html_2 = html.substring( html.indexOf( "')\">" )+6, html.indexOf( '</a>' )-1 );
    console.log( html_2 );
    html_tmp = html.substring( html.indexOf( '</a>' )-1, end )

    // 반복...
}).catch( err => {
    console.error( err.message );
})
5. striptags 사용하기
striptags는 html문서의 html태그들을 모두 없애주는 라이브러리이다.
먼저 리눅스에서 striptags를 다운받는다.
[master@localhost urllibex1]$ npm install striptags
"use strict"

const st = require( 'striptags' );
const html =
    '<a href="https://example.com">' +
        'lorem ipsum <strong>dolor</strong> <em>sit</em> amet' +
    '</a>';

console.log( st( html ) );
또는 특정 태그만 남기고 모두 삭제시키고 싶으면 아래와 같이 사용한다.
"use strict"

const st = require( 'striptags' );
const html =
    '<a href="https://example.com">' +
        'lorem ipsum <strong>dolor</strong> <em>sit</em> amet' +
    '</a>';

//console.log( st( html ) );
console.log( st( html , '<strong>' ) );
console.log( st( html , ['a'] ) );
6. axios 사용하기
axios라이브러리도 특정 url에 대한 정보를 받아와서 출력해주는 기능이 있다.
먼저 axios 라이브러리를 설치한다.
[master@localhost urllibex1]$ npm install axios"use strict"
const axios = require( 'axios' );
axios({
url: 'https://www.naver.com',
method: 'get'
}).then( response => {
console.log( response.status );
}).catch( err => {
console.error( err.message );
})
웹에 있는 이미지 url을 통해서 다운로드받기
"use strict"
const axios = require( 'axios' );
const fs = require( 'fs' );

axios({
    url: 'http://bit.ly/2mTM3nY',
    method: 'get',
    //문자열 타입은 arraybuffer, document, json, text, stream 등의 형태도 가능하다.
    responseType: 'stream'
}).then( response => {
    response.data.pipe( fs.createWriteStream( './banner.jpg' ) );
    console.log( 'success' );
}).catch( err => {
    console.error( err.message );
})
특정 url에 인자 전달하기
"use strict"
const axios = require( 'axios' );

axios({
    url: 'https://search.naver.com/search.naver',
    method: 'get',
    params: {
        where : 'nexearch',
        sm : 'top_hty',
        fbm : '1',
        ie : 'utf8',
        query : 'covid19'
    },
    responseEncoding: 'utf-8'
}).then( response => {
    console.log( 'success' );
    console.log( response.data );
}).catch( err => {
    console.error( err.message );
})
데이터 전송방식을 아래와 같이 작성할 수 있다.
"use strict"
const axios = require( 'axios' );

//axios.post( 'https:/www.naver.com', {

axios.get( 'https:/www.naver.com', {
    //넘길 데이터

}).then( response => {
    console.log( 'success' );
    console.log( response.data );
}).catch( err => {
    console.error( err.message );
})
7. cheerio 사용하기(미세먼지 사이트 크롤링하기)
먼저 설치를 해준다.
[master@localhost urllibex1]$ npm install cheerio
"use strict"
const cheerio = require( 'cheerio' );

console.log( cheerio.version );
//console.log( cheerio );

const html =
    `<ul id="fruits">
        <li class="apple">Apple</li>
        <li class="orange">Orange</li>
        <li class="pear">pear</li>
    </ul>`;
console.log( html );

const $ = cheerio.load( html );
//html 전체 출력
console.log( $.html() );

//html태그 지우고 내용만 출력
console.log( $.text() )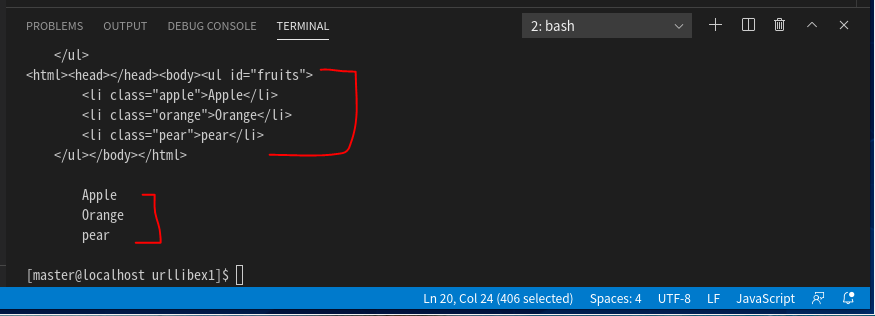
특정 태그만 가져오기
이때 $( 'li' ).html() 하면 첫 번째 li태그만 출력해준다.
따라서 모든 li태그를 가져오려면 반복문을 이용해야 한다.
이때 주의할점은 화살표함수를 지원하지 않는다.
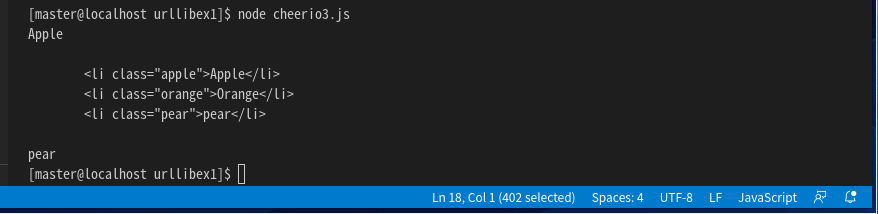
"use strict"
const cheerio = require( 'cheerio' );

console.log( cheerio.version );
//console.log( cheerio );

const html =
    `<ul id="fruits">
        <li class="apple">Apple</li>
        <li class="orange">Orange</li>
        <li class="pear">pear</li>
    </ul>`;
//console.log( html );

const $ = cheerio.load( html );

console.log( $('li').html() );

$( 'li' ).each( function( index)  {
    console.log( $(this).html() );
})
아래와 같이 load를 한 번에 사용할 수 있다.
"use strict"
const $ = require( 'cheerio' );

const html =
    `<ul id="fruits">
        <li class="apple">Apple</li>
        <li class="orange">Orange</li>
        <li class="pear">pear</li>
    </ul>`;

console.log( $( 'li', 'ul', html ).html() );
클래스명, id값, 속성값을 통해 데이터 가져오기
"use strict"
const cheerio = require( 'cheerio' );

const html =
    `<ul id="fruits">
        <li class="apple">Apple</li>
        <li class="orange">Orange</li>
        <li class="pear">pear</li>
    </ul>`;

const $ = cheerio.load( html );

console.log( $( '.apple' ).html() )
console.log( $( '#fruits' ).html() )

//ul태그의 .pear클래스를 찾아서 class값을 가져오기
console.log( $( 'ul .pear' ).attr( 'class' ) );
속성값을 아래와 같은 형식으로 데이터를 가져올 수 있다.
"use strict"
const cheerio = require( 'cheerio' );

const html =
    `<ul id="fruits">
        <li class="apple">Apple</li>
        <li class="orange">Orange</li>
        <li class="pear">pear</li>
    </ul>`;

const $ = cheerio.load( html );

// console.log( $( '.apple' ).html() )
// console.log( $( '#fruits' ).html() )

// //ul태그의 .pear클래스를 찾아서 class값을 가져오기
// console.log( $( 'ul .pear' ).attr( 'class' ) );

console.log( $( 'li[class=orange]' ).html() );

실습) 미세먼지 사이트 -> 대기질실시간정보의 표데이터를 node.js로 받아와서 테이블형식으로 출력하기
(phantomjs와 cheerio 를 이용)
cleanair.seoul.go.kr/airquality/localAvg
서울특별시 대기환경정보 - 대기오염물질 측정값
도시대기(자치구별) 측정소 선택 강남구 강동구 강북구 강서구 관악구 광진구 구로구 금천구 노원구 도봉구 동대문구 동작구 마포구 서대문구 서초구 성동구 성북구 송파구 양천구 영등포구 용
cleanair.seoul.go.kr
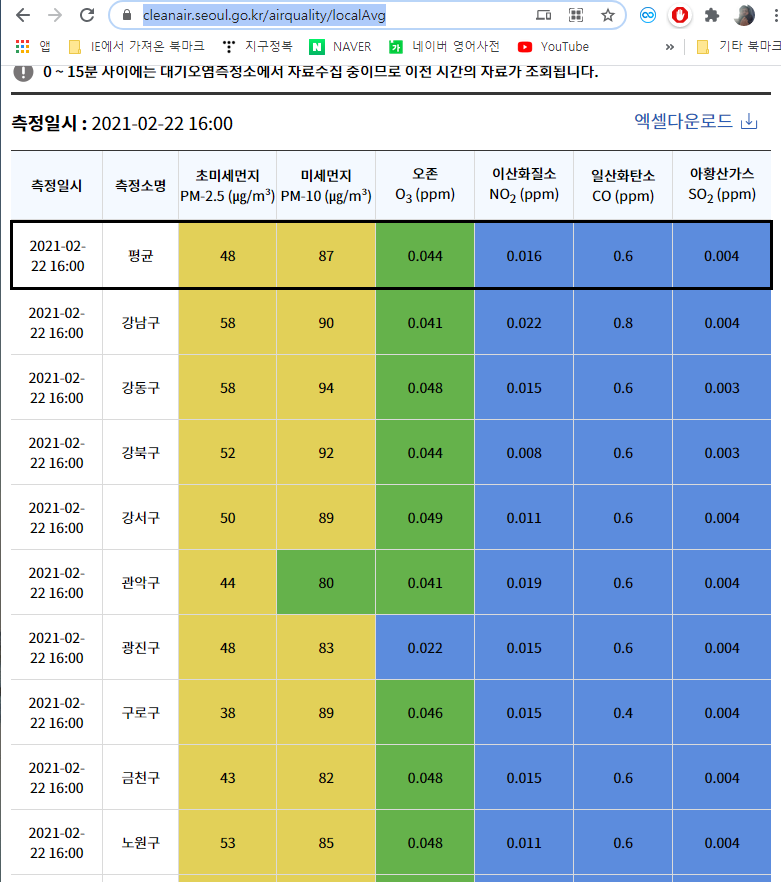
미세먼지 사이트에서 데이터를 가져오려면 시간 차이를 주어야한다.
미세먼지 사이트는 ajax를 이용해서 시간차를 두고 미세먼지 데이터를 가져온 뒤
html로 만들어서 보여주기 때문이다.
만약 시간차를 두지 않고 가져오게되면 table의 tbody 내용이 없는 채로 긁어오게 된다.
시간차를 두기 위해서 setTimeout() 메서드를 이용하자.
먼저 phantomjs를 이용해서 데이터를 가져온 뒤 새로운 html 파일로 만든다.
새로 만들어진 파일은 urllibex1에 저장된다.
-phantomex1/phantom2.js
"use strict"
var page = require( 'webpage' ).create();
var fs = require( 'fs' );

var html = '<html><head></head><body><table>';
page.open( 'http://cleanair.seoul.go.kr/airquality/localAvg', function( status ) {
    if( status == 'success' ) {
        setTimeout( function( ) {
            html += page.evaluate( function() {
                return document.getElementById( 'localAvg-table' ).innerHTML;
            });
            html += '</table></body></html>'
        }, 200 );
    }
})
setTimeout( function() {
    console.log( html );
    fs.write( '/home/master/urllibex1/air_html.html', html, 'w' )
    phantom.exit();
}, 3000 )
다음 비주얼스튜디오코드에서 작업디렉터리를 urllibex1로 바꿔준다.
-urllibex1/air1.js
"use strict"
const cheerio = require( 'cheerio' );
const fs = require( 'fs' );
const http = require( 'http' );
const url = require( 'url' );

let html = fs.readFileSync( './air_html.html' ).toString();
const $ = cheerio.load( html );

//미세먼지 테이블 html 생성
let outF = fs.createWriteStream( './table.html', {flags: 'w'} );
let result = `
<!DOCTYPE html>
<html>
<head>
<meta charset="utf-8" />
</head>
<body>
<table border="1">
    <thead>
        <tr>`;

$( 'th' ).each( function( index ) {
    result += `<th>` + $(this).text() + `</th>`;
})
result += `
        </tr>
    </thead>
    <tbody>`;

let i = 0;
$( 'td' ).each( function( index2 ) {
    if( i == 0 ) {
        result += `<tr align="center"><td>` + $(this).html() + `</td>`;
        i++;
    } else if( i == 7 ) {
        result += `<td>` + $(this).html() + `</td></tr>`;
        i = 0;
    } else {
        result += `<td>` + $(this).html() + `</td>`;
        i++;
    }
})
result += `
    </tbody>
</table>
</body>
</html>`

outF.write( result );

//위에서 만든 table.html 웹서버에서 실행되도록하기
const server = http.createServer( (req, res) => {
    let parse = url.parse( req.url, true );

    if( parse.pathname == '/table' ) {
        fs.createReadStream( './table.html' ).pipe( res );
    } else {
        fs.createReadStream( './error.html' ).pipe( res );
    }
}).listen( 8080, () => {
    console.log( '8080포트에서 요청 대기중 ...' );
})
실행결과
데이터베이스에 저장하는 건 힘드니깐 나중에...


