
지구정복
[JavaScript-jQuery] 1/13 | jQuery(각종 메서드, 우편번호검색기) 본문
[JavaScript-jQuery] 1/13 | jQuery(각종 메서드, 우편번호검색기)
eeaarrtthh 2021. 1. 13. 17:54복습, 배울내용
Ajax
	* proxy
		=> ajax에서 가져오지 못하는 데이터를 가져올 수 있다.

	* OpenAPI
	* 크롤링(스크래핑)
		=> 사이트 기본데이터

프로젝트는 현재 있는 사이트에 새로운 기능을 추가하기

dom
	접근 / 추가수정삭제 / 이벤트 /
	=> 프레임워크 : jQuery
	www.jQuery.com
		zipping
			개발자버전
			서비스버전
		* CDN
	jQuery는 $ 특수기호 사용
	$( document ).ready( function() {
	});
1. jQuery (각종 메서드)
원래는 $라는 기호대신 jQuery를 사용했는데 너무 귀찮아서 $를 사용한다. 또한 document.ready는 생략가능하다.
<%@ page language="java" contentType="text/html; charset=UTF-8"
    pageEncoding="UTF-8"%>
<!DOCTYPE html>
<html>
<head>
<meta charset="UTF-8">
<title>Insert title here</title>

<script src="https://ajax.googleapis.com/ajax/libs/jquery/3.5.1/jquery.min.js"></script>

<script type="text/javascript">
	/*
	jQuery( document ).ready( function () {
		console.log( 'Hello jQuery' );
	});
	 */

	 // document.ready는 생략하는하다.
	 $( function() {
		console.log( "Hello jQuery" );
	 });
</script>

</head>
<body>


</body>
</html>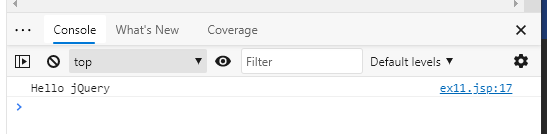
jQuery는 여러개 쓰일 수 있다. 하지만 보통 1개만 사용한다.
<%@ page language="java" contentType="text/html; charset=UTF-8"
    pageEncoding="UTF-8"%>
<!DOCTYPE html>
<html>
<head>
<meta charset="UTF-8">
<title>Insert title here</title>

<script src="https://ajax.googleapis.com/ajax/libs/jquery/3.5.1/jquery.min.js"></script>

<script type="text/javascript">
	/*
	jQuery( document ).ready( function () {
		console.log( 'Hello jQuery' );
	});
	 */

	 // jQuery는 여러개 쓰일 수 있다.
	 $( function() {
		console.log( "Hello jQuery 1" );
	 });
	 $( function() {
		console.log( "Hello jQuery 2" );
	});
	 $( function() {
		console.log( "Hello jQuery 3" );
	});

</script>

</head>
<body>


</body>
</html>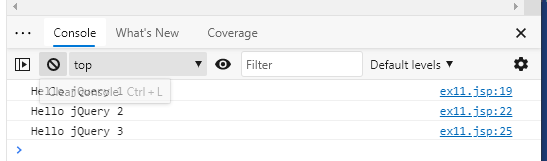
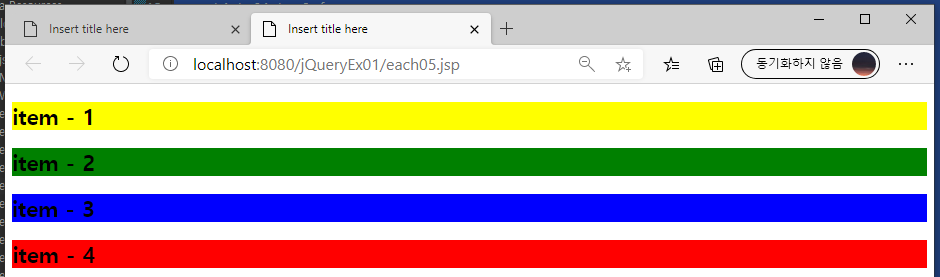
each를 통해서 각 태그마다 특정 css를 적용시킬 수 있다.
<%@ page language="java" contentType="text/html; charset=UTF-8"
    pageEncoding="UTF-8"%>
<!DOCTYPE html>
<html>
<head>
<meta charset="UTF-8">
<title>Insert title here</title>

<style type="text/css">
	.high-light-1 {
		background-color: yellow;
	}
	.high-light-2 {
		background-color: green;
	}
	.high-light-3 {
		background-color: blue;
	}
	.high-light-4 {
		background-color: red;
	}
</style>

<script src="https://ajax.googleapis.com/ajax/libs/jquery/3.5.1/jquery.min.js"></script>

<script type="text/javascript">
	$( document ).ready( function() {
		$( 'h2' ).each( function( index, item ) {
			$( this ).addClass( 'high-light-' + (index+1) );
		});
	});
</script>

</head>
<body>

<h2>item - 1</h2>
<h2>item - 2</h2>
<h2>item - 3</h2>
<h2>item - 4</h2>

</body>
</html>
객체 추가하기
<%@ page language="java" contentType="text/html; charset=UTF-8"
pageEncoding="UTF-8"%>
<!DOCTYPE html>
<html>
<head>
<meta charset="UTF-8">
<title>Insert title here</title>
<script src="https://ajax.googleapis.com/ajax/libs/jquery/3.5.1/jquery.min.js"></script>
<script type="text/javascript">
$( document ).ready( function() {
// 객체선언
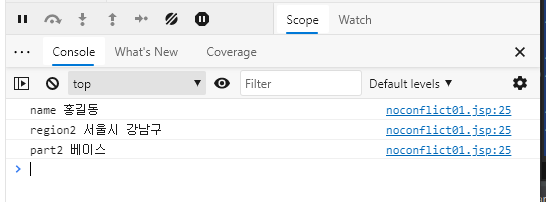
let object = { name: '홍길동' };
console.log( object );
//객체추가하기
object.region1 = '서울시 종로구';
object.part1 = '리더';
console.log( object );
//객체확장하기 = 객체추가하기, 객체 여러개 추가하기
$.extend( object,
{region2: '서울시 강남구', part2: '베이스'},
{region3: '서울시 서초구', part2: '기타'}
);
console.log( object );
//extend로 들어간 데이터를 출력
$.each( object, function( key, value ) {
console.log( key, value );
});
});
</script>
</head>
<body>
</body>
</html>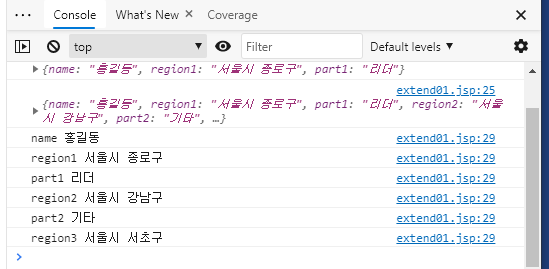
$ 충돌방지
$ 기호는 다른 언어에서도 똑같은 기호를 사용할 수 있으므로 다른곳에서 사용하지 못하다록 막는것
$.noConflict()를 작성하면된다.
<%@ page language="java" contentType="text/html; charset=UTF-8"
    pageEncoding="UTF-8"%>
<!DOCTYPE html>
<html>
<head>
<meta charset="UTF-8">
<title>Insert title here</title>

<script src="https://ajax.googleapis.com/ajax/libs/jquery/3.5.1/jquery.min.js"></script>
<script type="text/javascript">
	//아래 코드를 작성해준다.
	$.noConflict()
	$( document ).ready( function() {
		//충돌방지
		//$ 기호는 다른 언어에서도 똑같은 기호를 사용할 수 있으므로
		//다른곳에서는 사용하지 못하다록 막는것

		console.log( 'Hello jQuery' );
	});
</script>

</head>
<body>

</body>
</html>
또한 $ 사용으로 충돌일날 경우 jQuery의 $를 다른 기호로 바꿔서 사용할 수 있다. J로 바꿔서 사용해보자.
<%@ page language="java" contentType="text/html; charset=UTF-8"
    pageEncoding="UTF-8"%>
<!DOCTYPE html>
<html>
<head>
<meta charset="UTF-8">
<title>Insert title here</title>

<script src="https://ajax.googleapis.com/ajax/libs/jquery/3.5.1/jquery.min.js"></script>
<script type="text/javascript">
	//아래 코드를 작성해준다.
	$.noConflict()

	const J = jQuery;
	J( document ).ready( function() {
		//충돌방지
		//$ 기호는 다른 언어에서도 똑같은 기호를 사용할 수 있으므로
		//다른곳에서는 사용하지 못하다록 막는것

		let object = { name: '홍길동' };
		J.extend( object,
			{region2: '서울시 강남구', part2: '베이스'}
		);

		J.each( object, function( key, value ) {
			console.log( key, value )
		});
	});
</script>

</head>
<body>

</body>
</html>
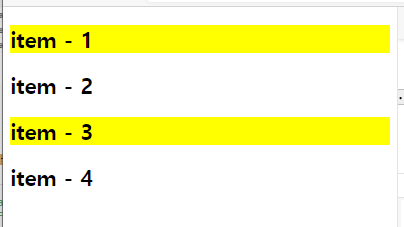
filter 사용하기
필터의 역할은 검색한 부분을 한 번 걸러서 영역을 줄여준다.
h2태그 중에서 짝수 h2태그만 골라서 사용하기
<%@ page language="java" contentType="text/html; charset=UTF-8"
    pageEncoding="UTF-8"%>
<!DOCTYPE html>
<html>
<head>
<meta charset="UTF-8">
<title>Insert title here</title>

<script src="https://ajax.googleapis.com/ajax/libs/jquery/3.5.1/jquery.min.js"></script>
<script type="text/javascript">
	$( document ).ready( function() {
		//$( 'h2:even' ).css( 'background-color', 'yellow' );
		$( 'h2' ).filter( ':even' ).css( 'background-color', 'yellow' );
	});
</script>

</head>
<body>

<h2>item - 1</h2>
<h2>item - 2</h2>
<h2>item - 3</h2>
<h2>item - 4</h2>

</body>
</html>
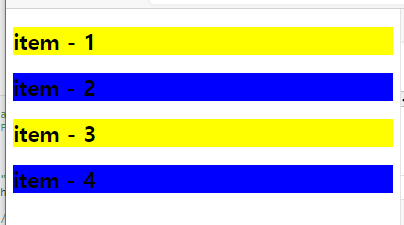
변수를 이용해보자.
<%@ page language="java" contentType="text/html; charset=UTF-8"
    pageEncoding="UTF-8"%>
<!DOCTYPE html>
<html>
<head>
<meta charset="UTF-8">
<title>Insert title here</title>

<script src="https://ajax.googleapis.com/ajax/libs/jquery/3.5.1/jquery.min.js"></script>
<script type="text/javascript">
	$( document ).ready( function() {
		//$( 'h2:even' ).css( 'background-color', 'yellow' );
		//$( 'h2' ).filter( ':even' ).css( 'background-color', 'yellow' );

		const h2 = $( 'h2' );
		console.log( h2 );

		h2.filter( ':even' ).css( 'background-color', 'yellow' );
		h2.filter( ':odd' ).css( 'background-color', 'blue' );

		});
</script>

</head>
<body>

<h2>item - 1</h2>
<h2>item - 2</h2>
<h2>item - 3</h2>
<h2>item - 4</h2>

</body>
</html>
h2 태그를 필터를 걸쳐서 함수와 같이 사용할 수 있다. 또한 필터에 조건을 추가할 수 있다.
<%@ page language="java" contentType="text/html; charset=UTF-8"
    pageEncoding="UTF-8"%>
<!DOCTYPE html>
<html>
<head>
<meta charset="UTF-8">
<title>Insert title here</title>

<script src="https://ajax.googleapis.com/ajax/libs/jquery/3.5.1/jquery.min.js"></script>
<script type="text/javascript">
	$( document ).ready( function() {
		$( 'h2' ).filter( function( index, item ) {
			console.log( index, item.innerHTML );
			return index%2 == 0;
		}).css( 'background-color', 'yellow' );
	});
</script>

</head>
<body>

<h2>item - 1</h2>
<h2>item - 2</h2>
<h2>item - 3</h2>
<h2>item - 4</h2>

</body>
</html>

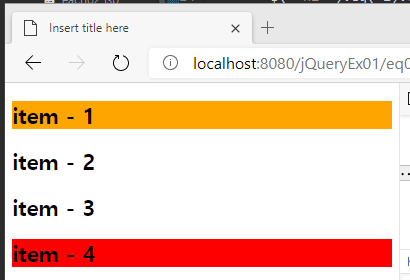
end 사용하기
필터로 줄어든 영역을 한번 없애고 다시 설정하는 것
<%@ page language="java" contentType="text/html; charset=UTF-8"
    pageEncoding="UTF-8"%>
<!DOCTYPE html>
<html>
<head>
<meta charset="UTF-8">
<title>Insert title here</title>

<script src="https://ajax.googleapis.com/ajax/libs/jquery/3.5.1/jquery.min.js"></script>
<script type="text/javascript">
	$( document ).ready( function() {
		//$( 'h2' ).css( 'background-color', 'orange' ).filter( ':even' ).css( 'color', 'red' ).filter( ':odd' ).css( 'color', 'blue' );

		/* $( 'h2' ).css( 'background-color', 'orange' );
		$( 'h2' ).filter( ':even' ).css( 'color', 'red' );
		$( 'h2' ).filter( ':odd' ).css( 'color', 'blue' ) */

		//필터 가운데 end()를 집어넣어 영역을 한 단계 전으로 초기화시킨다.
		$( 'h2' ).css( 'background-color', 'orange' ).filter( ':even' ).css( 'color', 'red' ).end().filter( ':odd' ).css( 'color', 'blue' );

	});
</script>

</head>
<body>

<h2>item - 1</h2>
<h2>item - 2</h2>
<h2>item - 3</h2>
<h2>item - 4</h2>

</body>
</html>

eq 사용하기
eq는 선택된 태그중에서 인덱스값으로 순서를 선택할 수 있다. 0부터 시작하고 -1을 주면 가장 마지막 태그가 선택된다. 인덱스값이 태그의 개수를 넘어가면 선택이 안된다.
<%@ page language="java" contentType="text/html; charset=UTF-8"
    pageEncoding="UTF-8"%>
<!DOCTYPE html>
<html>
<head>
<meta charset="UTF-8">
<title>Insert title here</title>


<script src="https://ajax.googleapis.com/ajax/libs/jquery/3.5.1/jquery.min.js"></script>
<script type="text/javascript">
	$( document ).ready( function() {
		$( 'h2' ).eq(3).css( 'background-color', 'orange' );
		$( 'h2' ).eq(-1).css( 'background-color', 'red' );
	});
</script>

</head>
<body>

<h2>item - 1</h2>
<h2>item - 2</h2>
<h2>item - 3</h2>
<h2>item - 4</h2>

</body>
</html>
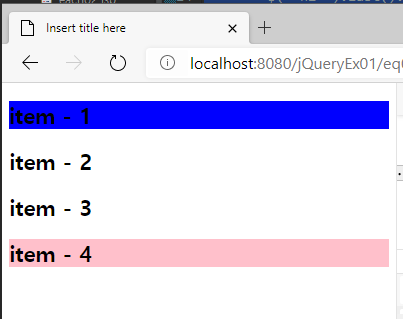
first / last 사용하기
<%@ page language="java" contentType="text/html; charset=UTF-8"
    pageEncoding="UTF-8"%>
<!DOCTYPE html>
<html>
<head>
<meta charset="UTF-8">
<title>Insert title here</title>


<script src="https://ajax.googleapis.com/ajax/libs/jquery/3.5.1/jquery.min.js"></script>
<script type="text/javascript">
	$( document ).ready( function() {
		$( 'h2' ).first().css( 'background-color', 'blue' );
		$( 'h2' ).last().css( 'background-color', 'pink' );
	});
</script>

</head>
<body>

<h2>item - 1</h2>
<h2>item - 2</h2>
<h2>item - 3</h2>
<h2>item - 4</h2>

</body>
</html>
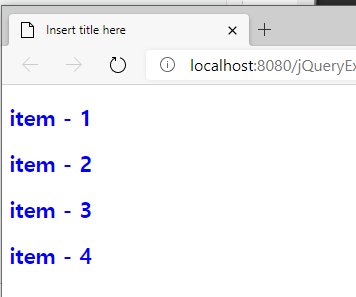
add 사용하기
기존에 선택한 것에서 추가해서 선택할 때 사용한다.
<%@ page language="java" contentType="text/html; charset=UTF-8"
    pageEncoding="UTF-8"%>
<!DOCTYPE html>
<html>
<head>
<meta charset="UTF-8">
<title>Insert title here</title>


<script src="https://ajax.googleapis.com/ajax/libs/jquery/3.5.1/jquery.min.js"></script>
<script type="text/javascript">
	$( document ).ready( function() {
		//$( 'h2:even' ).css( 'color', 'red' );
		//$( 'h2:even, h2:odd' ).css( 'color', 'red' );

		$( 'h2:even' ).css( 'color', 'red' ).add( 'h2:odd' ).css( 'color', 'blue' );
	});
</script>

</head>
<body>

<h2>item - 1</h2>
<h2>item - 2</h2>
<h2>item - 3</h2>
<h2>item - 4</h2>

</body>
</html>
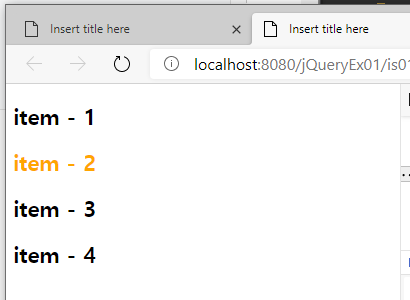
is 사용하기
선택된 태그를 특정 조건에 맞게 검사하기
<%@ page language="java" contentType="text/html; charset=UTF-8"
    pageEncoding="UTF-8"%>
<!DOCTYPE html>
<html>
<head>
<meta charset="UTF-8">
<title>Insert title here</title>


<script src="https://ajax.googleapis.com/ajax/libs/jquery/3.5.1/jquery.min.js"></script>
<script type="text/javascript">
	$( document ).ready( function() {
		$( 'h2' ).each( function() {
			if( $( this ).is( '.select' ) ) {
				$( this ).css( 'color', 'orange' );
			}
		});
	});
</script>

</head>
<body>

<h2>item - 1</h2>
<h2 class="select">item - 2</h2>
<h2>item - 3</h2>
<h2>item - 4</h2>

</body>
</html>
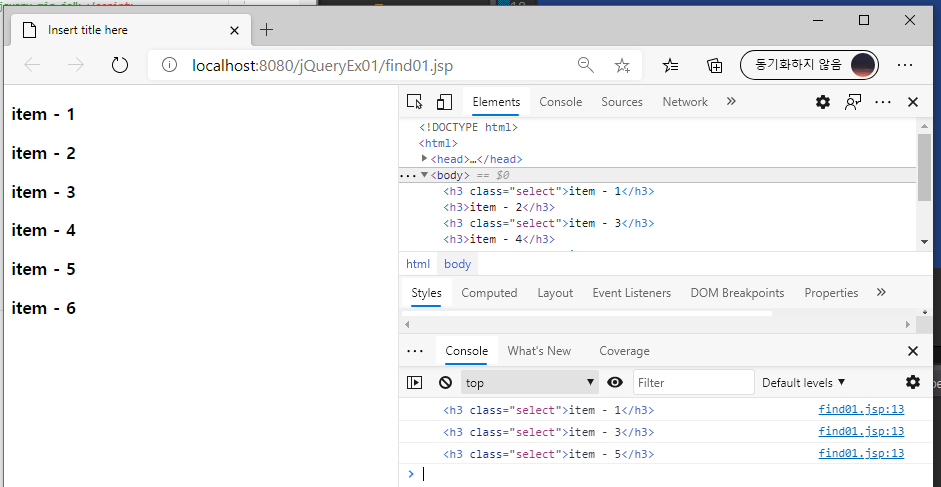
find 사용하기
특정 html 태그를 찾아서 선택할 수 있다.
class가 select인 h3만 찾아보자.
<%@ page language="java" contentType="text/html; charset=UTF-8"
    pageEncoding="UTF-8"%>
<!DOCTYPE html>
<html>
<head>
<meta charset="UTF-8">
<title>Insert title here</title>


<script src="https://ajax.googleapis.com/ajax/libs/jquery/3.5.1/jquery.min.js"></script>
<script type="text/javascript">
	$( document ).ready( function() {
		$( document ).find( '.select' ).each( function() {
			console.log( this );
		});
	});
</script>

</head>
<body>

<h3 class="select">item - 1</h3>
<h3>item - 2</h3>
<h3 class="select">item - 3</h3>
<h3>item - 4</h3>
<h3 class="select">item - 5</h3>
<h3>item - 6</h3>


</body>
</html>
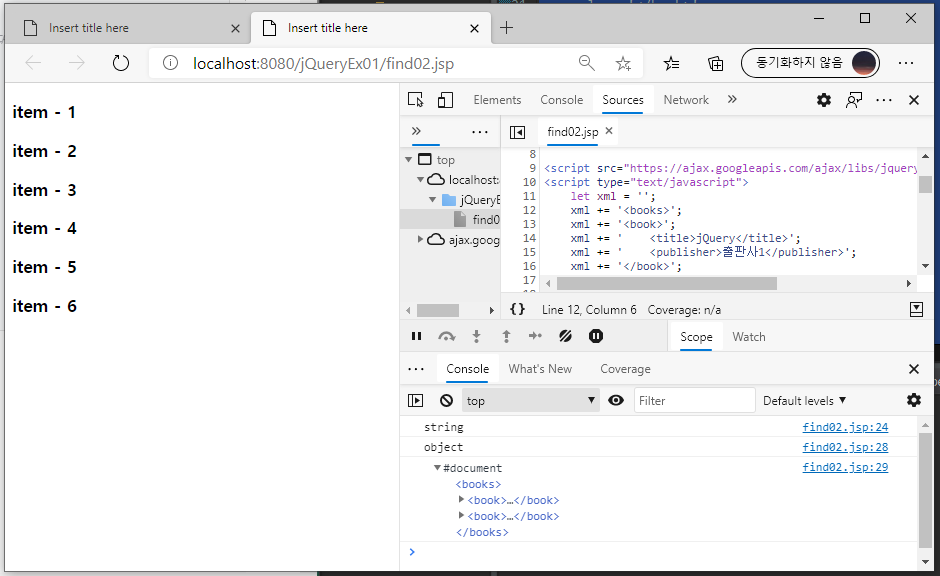
이번에는 xml문서에서 find를 이용해 특정 태그를 찾아보자.
먼저 xml문서를 만들어보자.
<%@ page language="java" contentType="text/html; charset=UTF-8"
    pageEncoding="UTF-8"%>
<!DOCTYPE html>
<html>
<head>
<meta charset="UTF-8">
<title>Insert title here</title>


<script src="https://ajax.googleapis.com/ajax/libs/jquery/3.5.1/jquery.min.js"></script>
<script type="text/javascript">
	let xml = '';
	xml += '<books>';
	xml += '<book>';
	xml += '	<title>jQuery</title>';
	xml += '	<publisher>출판사1</publisher>';
	xml += '</book>';
	xml += '<book>';
	xml += '	<title>JSP</title>';
	xml += '	<publisher>출판사2</publisher>';
	xml += '</book>';
	xml += '</books>';

	$( document ).ready( function() {
		console.log( typeof xml );

		//위에 xml은 현재 string인데 이를 xml문서로 바꿔준다.
		//string => xml
		const xmlDoc =  $.parseXML( xml );
		console.log( typeof xmlDoc );
		console.log( xmlDoc );
	});
</script>

</head>
<body>

<h3 class="select">item - 1</h3>
<h3>item - 2</h3>
<h3 class="select">item - 3</h3>
<h3>item - 4</h3>
<h3 class="select">item - 5</h3>
<h3>item - 6</h3>


</body>
</html>
이제 find로 특정 태그를 찾아보자.
<%@ page language="java" contentType="text/html; charset=UTF-8"
    pageEncoding="UTF-8"%>
<!DOCTYPE html>
<html>
<head>
<meta charset="UTF-8">
<title>Insert title here</title>


<script src="https://ajax.googleapis.com/ajax/libs/jquery/3.5.1/jquery.min.js"></script>
<script type="text/javascript">
	let xml = '';
	xml += '<books>';
	xml += '<book>';
	xml += '	<title>jQuery</title>';
	xml += '	<publisher>출판사1</publisher>';
	xml += '</book>';
	xml += '<book>';
	xml += '	<title>JSP</title>';
	xml += '	<publisher>출판사2</publisher>';
	xml += '</book>';
	xml += '</books>';

	$( document ).ready( function() {
		console.log( typeof xml );

		//위에 xml은 현재 string인데 이를 xml문서로 바꿔준다.
		//string => xml
		const xmlDoc =  $.parseXML( xml );
		console.log( typeof xmlDoc );
		console.log( xmlDoc );

		$( xmlDoc ).find( 'title' ).each( function() {
			console.log( this );
			console.log( $(this).html() );
		});
	});
</script>

</head>
<body>

<h3 class="select">item - 1</h3>
<h3>item - 2</h3>
<h3 class="select">item - 3</h3>
<h3>item - 4</h3>
<h3 class="select">item - 5</h3>
<h3>item - 6</h3>


</body>
</html>
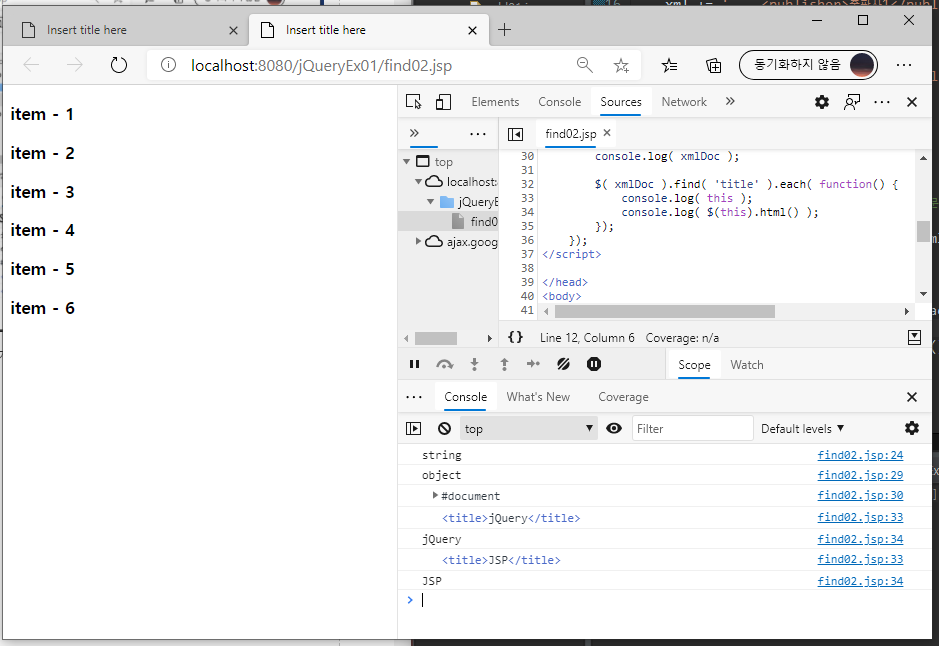
위 방법은 Ajax에서 xml데이터를 가져오는 것보다 쉽게 가져올 수 있다.
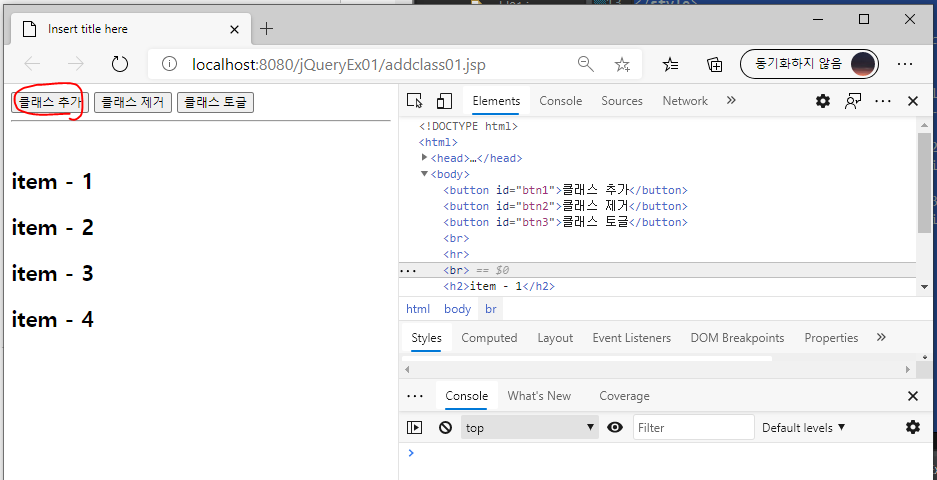
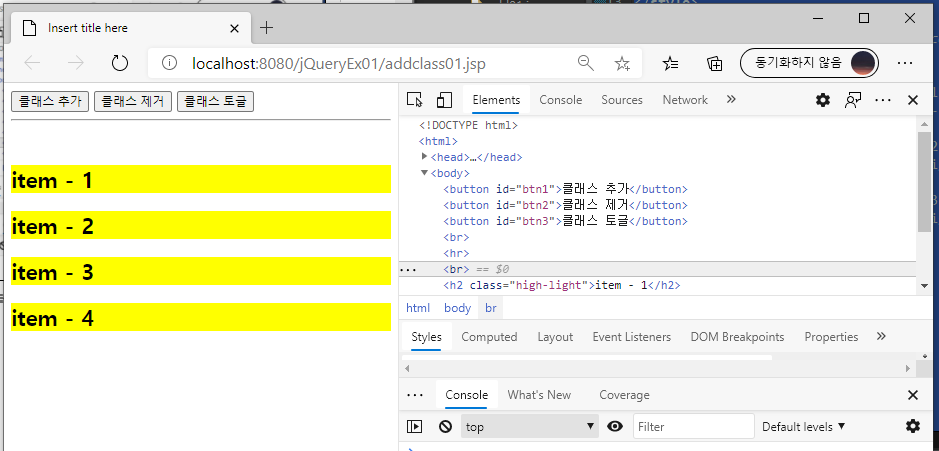
addclass 사용하기
선택된 태그의 클래스를 추가하거나 제거, 토글기능을 만들 수 있다.
<%@ page language="java" contentType="text/html; charset=UTF-8"
    pageEncoding="UTF-8"%>
<!DOCTYPE html>
<html>
<head>
<meta charset="UTF-8">
<title>Insert title here</title>

<style type="text/css">
	.high-light {
		background-color: yellow;
	}
</style>

<script src="https://ajax.googleapis.com/ajax/libs/jquery/3.5.1/jquery.min.js"></script>
<script type="text/javascript">
	$( document ).ready( function() {
		document.getElementById( 'btn1' ).onclick = function() {
			$( 'h2' ).addClass( 'high-light' );
		};
		document.getElementById( 'btn2' ).onclick = function() {
			$( 'h2' ).removeClass( 'high-light' );
		};
		document.getElementById( 'btn3' ).onclick = function() {
			$( 'h2' ).toggleClass( 'high-light' );
		};
	});
</script>

</head>
<body>

<button id="btn1">클래스 추가</button>
<button id="btn2">클래스 제거</button>
<button id="btn3">클래스 토글</button>
<br><hr><br>
<h2>item - 1</h2>
<h2>item - 2</h2>
<h2>item - 3</h2>
<h2>item - 4</h2>

</body>
</html>
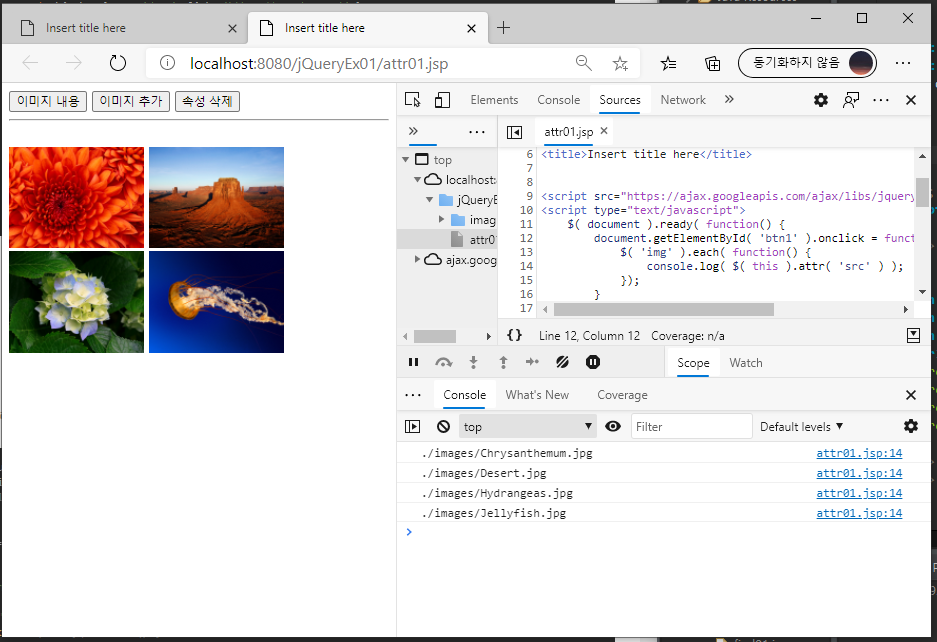
태그의 속성 추가하고 삭제하기
이미지 태그의 속성값 가져오기
<%@ page language="java" contentType="text/html; charset=UTF-8"
pageEncoding="UTF-8"%>
<!DOCTYPE html>
<html>
<head>
<meta charset="UTF-8">
<title>Insert title here</title>
<script src="https://ajax.googleapis.com/ajax/libs/jquery/3.5.1/jquery.min.js"></script>
<script type="text/javascript">
$( document ).ready( function() {
document.getElementById( 'btn1' ).onclick = function() {
$( 'img' ).each( function() {
console.log( $( this ).attr( 'src' ) );
});
}
});
</script>
</head>
<body>
<button id="btn1">이미지 내용</button>
<button id="btn2">이미지 추가</button>
<button id="btn3">속성 삭제</button>
<br><hr><br>
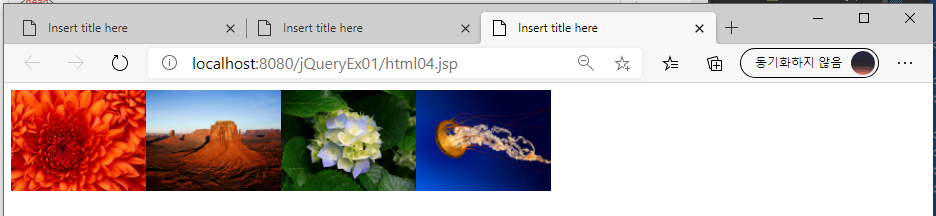
<img src="./images/Chrysanthemum.jpg" width="150"/>
<img src="./images/Desert.jpg" width="150"/>
<img src="./images/Hydrangeas.jpg" width="150"/>
<img src="./images/Jellyfish.jpg" width="150"/>
</body>
</html>
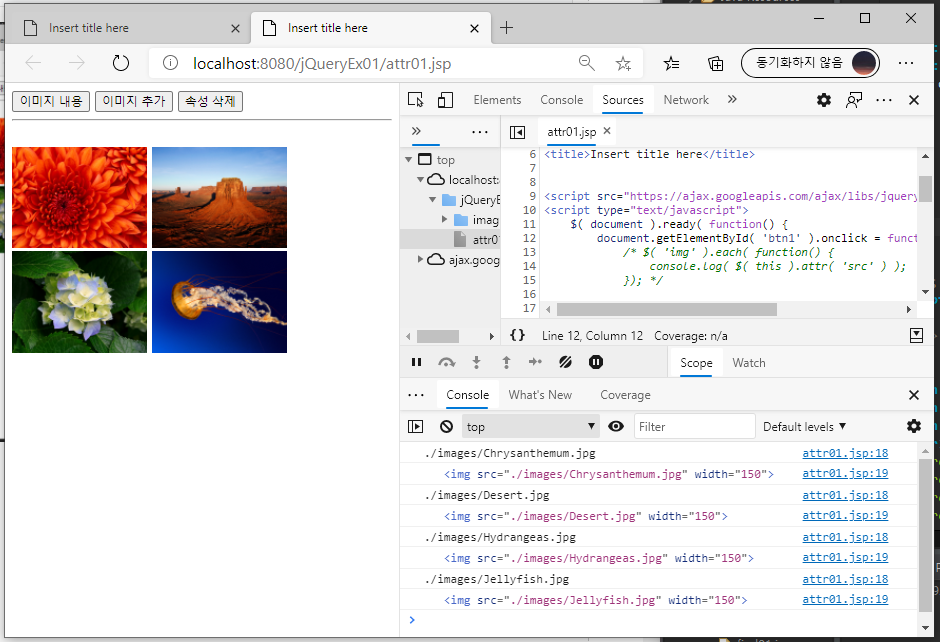
아래와 같은 방법으로도 가져올 수 있다.
<%@ page language="java" contentType="text/html; charset=UTF-8"
    pageEncoding="UTF-8"%>
<!DOCTYPE html>
<html>
<head>
<meta charset="UTF-8">
<title>Insert title here</title>


<script src="https://ajax.googleapis.com/ajax/libs/jquery/3.5.1/jquery.min.js"></script>
<script type="text/javascript">
	$( document ).ready( function() {
		document.getElementById( 'btn1' ).onclick = function() {
			/* $( 'img' ).each( function() {
				console.log( $( this ).attr( 'src' ) );
			}); */

			$( 'img' ).attr( 'src', function( index, item ) {
				console.log( item );
				console.log( this );
			});
		}
	});
</script>

</head>
<body>

<button id="btn1">이미지 내용</button>
<button id="btn2">이미지 추가</button>
<button id="btn3">속성 삭제</button>
<br><hr><br>
<img src="./images/Chrysanthemum.jpg" width="150"/>
<img src="./images/Desert.jpg" width="150"/>
<img src="./images/Hydrangeas.jpg" width="150"/>
<img src="./images/Jellyfish.jpg" width="150"/>

</body>
</html>
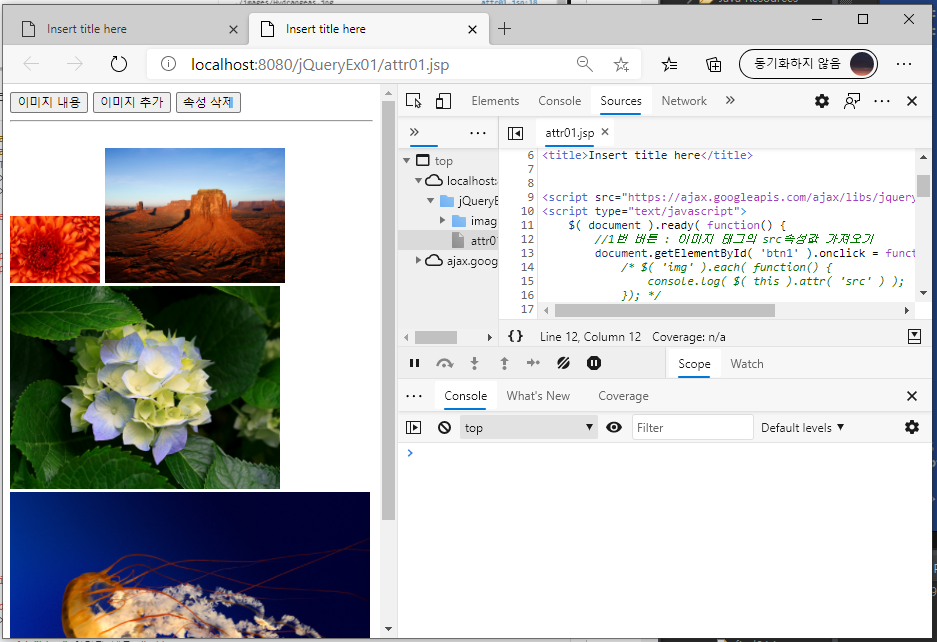
이번에는 이미지태그에 특정 속성을 추가해보자.
<%@ page language="java" contentType="text/html; charset=UTF-8"
    pageEncoding="UTF-8"%>
<!DOCTYPE html>
<html>
<head>
<meta charset="UTF-8">
<title>Insert title here</title>


<script src="https://ajax.googleapis.com/ajax/libs/jquery/3.5.1/jquery.min.js"></script>
<script type="text/javascript">
	$( document ).ready( function() {
		//1번 버튼 : 이미지 태그의 src속성값 가져오기
		document.getElementById( 'btn1' ).onclick = function() {
			/* $( 'img' ).each( function() {
				console.log( $( this ).attr( 'src' ) );
			}); */

			$( 'img' ).attr( 'src', function( index, item ) {
				console.log( item );
				console.log( this );
			});
		}
		//2번 버튼 : 이미지 태그의 속성추가하기
		document.getElementById( 'btn2' ).onclick = function() {
			/* $( 'img' ).attr( 'height', 100 )
			$( 'img' ).attr( 'width', 100 ); */

			$( 'img' ).attr( 'width', function( index ) {
				return (index+1) * 100;
			});
		}

	});
</script>

</head>
<body>

<button id="btn1">이미지 내용</button>
<button id="btn2">이미지 추가</button>
<button id="btn3">속성 삭제</button>
<br><hr><br>
<img src="./images/Chrysanthemum.jpg" width="150"/>
<img src="./images/Desert.jpg" width="150"/>
<img src="./images/Hydrangeas.jpg" width="150"/>
<img src="./images/Jellyfish.jpg" width="150"/>

</body>
</html>
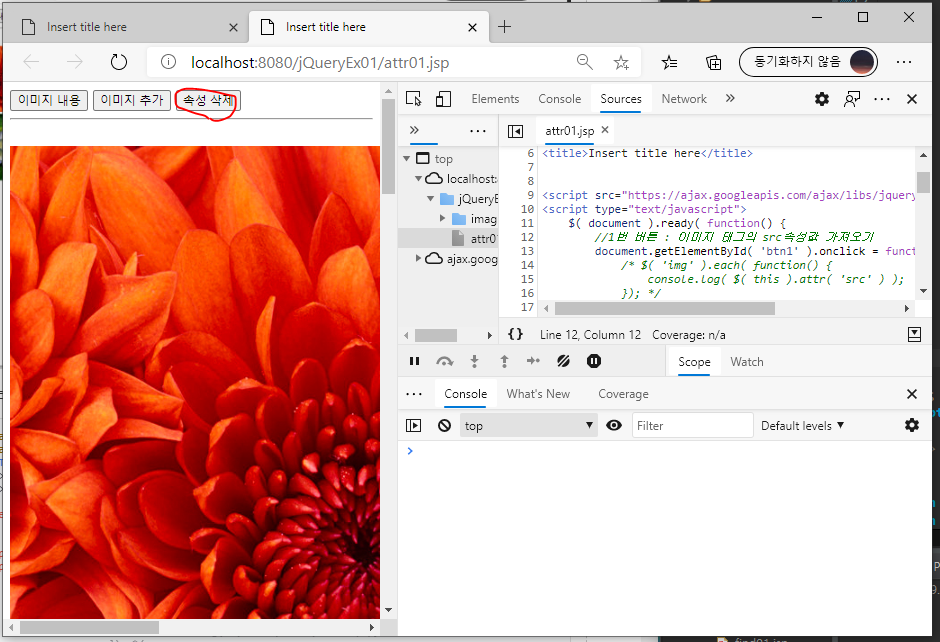
이번에는 이미지태그의 속성을 제거해보자.
<%@ page language="java" contentType="text/html; charset=UTF-8"
    pageEncoding="UTF-8"%>
<!DOCTYPE html>
<html>
<head>
<meta charset="UTF-8">
<title>Insert title here</title>


<script src="https://ajax.googleapis.com/ajax/libs/jquery/3.5.1/jquery.min.js"></script>
<script type="text/javascript">
	$( document ).ready( function() {
		//1번 버튼 : 이미지 태그의 src속성값 가져오기
		document.getElementById( 'btn1' ).onclick = function() {
			/* $( 'img' ).each( function() {
				console.log( $( this ).attr( 'src' ) );
			}); */

			$( 'img' ).attr( 'src', function( index, item ) {
				console.log( item );
				console.log( this );
			});
		}
		//2번 버튼 : 이미지 태그의 속성추가하기
		document.getElementById( 'btn2' ).onclick = function() {
			/* $( 'img' ).attr( 'height', 100 )
			$( 'img' ).attr( 'width', 100 ); */

			$( 'img' ).attr( 'width', function( index ) {
				return (index+1) * 100;
			});
		}
		//3번 버튼 : 이미지 태그의 속성제거하기
		document.getElementById( 'btn3' ).onclick = function() {
			$( 'img' ).removeAttr( 'width' );
		}
	});
</script>

</head>
<body>

<button id="btn1">이미지 내용</button>
<button id="btn2">이미지 추가</button>
<button id="btn3">속성 삭제</button>
<br><hr><br>
<img src="./images/Chrysanthemum.jpg" width="150"/>
<img src="./images/Desert.jpg" width="150"/>
<img src="./images/Hydrangeas.jpg" width="150"/>
<img src="./images/Jellyfish.jpg" width="150"/>

</body>
</html>
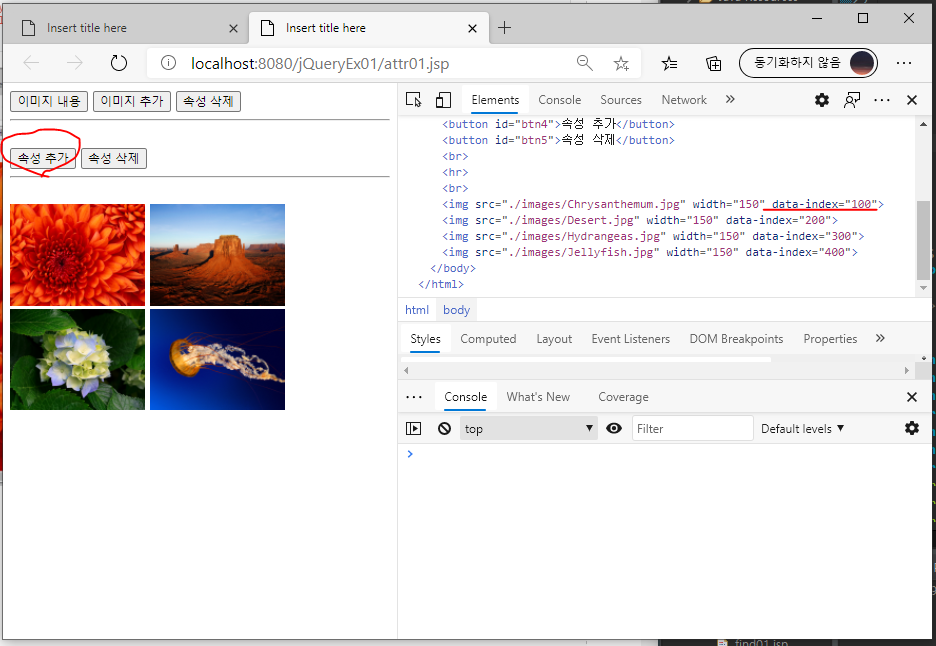
개발자가 html이나 css에서 쓰이지 않는 속성을 만들어서 추가할 수 있다.
<%@ page language="java" contentType="text/html; charset=UTF-8"
    pageEncoding="UTF-8"%>
<!DOCTYPE html>
<html>
<head>
<meta charset="UTF-8">
<title>Insert title here</title>


<script src="https://ajax.googleapis.com/ajax/libs/jquery/3.5.1/jquery.min.js"></script>
<script type="text/javascript">
	$( document ).ready( function() {
		//1번 버튼 : 이미지 태그의 src속성값 가져오기
		document.getElementById( 'btn1' ).onclick = function() {
			/* $( 'img' ).each( function() {
				console.log( $( this ).attr( 'src' ) );
			}); */

			$( 'img' ).attr( 'src', function( index, item ) {
				console.log( item );
				console.log( this );
			});
		}
		//2번 버튼 : 이미지 태그의 속성추가하기
		document.getElementById( 'btn2' ).onclick = function() {
			/* $( 'img' ).attr( 'height', 100 )
			$( 'img' ).attr( 'width', 100 ); */

			$( 'img' ).attr( 'width', function( index ) {
				return (index+1) * 100;
			});
		}
		//3번 버튼 : 이미지 태그의 속성제거하기
		document.getElementById( 'btn3' ).onclick = function() {
			$( 'img' ).removeAttr( 'width' );
		}
		//4번 버튼 : 임의의 속성 추가하기
		document.getElementById( 'btn4' ).onclick = function() {
			$( 'img' ).attr( 'data-index', function( index ) {
				return (index+1) * 100;
			})
		}
		//5번 버튼 : 임의의 속성 삭제하기
		document.getElementById( 'btn5' ).onclick = function() {
			$( 'img' ).removeAttr( 'data-index' );
		}
	});
</script>

</head>
<body>

<button id="btn1">이미지 내용</button>
<button id="btn2">이미지 추가</button>
<button id="btn3">속성 삭제</button>
<br><hr><br>
<button id="btn4">속성 추가</button>
<button id="btn5">속성 삭제</button>
<br><hr><br>
<img src="./images/Chrysanthemum.jpg" width="150"/>
<img src="./images/Desert.jpg" width="150"/>
<img src="./images/Hydrangeas.jpg" width="150"/>
<img src="./images/Jellyfish.jpg" width="150"/>

</body>
</html>
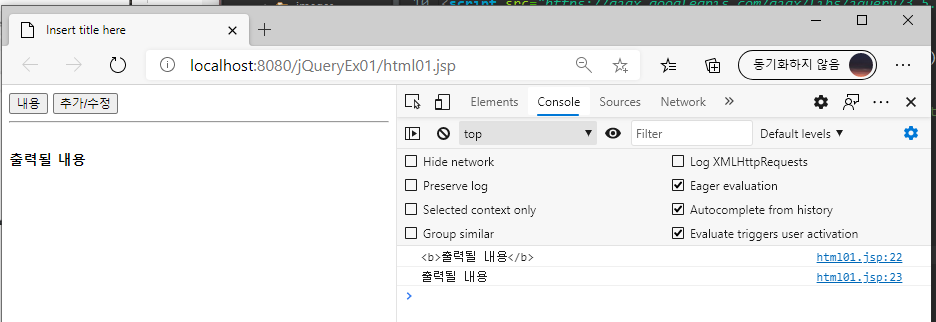
jQuery를 이용해서 HTML문서의 내용 가져오기
<%@ page language="java" contentType="text/html; charset=UTF-8"
    pageEncoding="UTF-8"%>
<!DOCTYPE html>
<html>
<head>
<meta charset="UTF-8">
<title>Insert title here</title>


<script src="https://ajax.googleapis.com/ajax/libs/jquery/3.5.1/jquery.min.js"></script>
<script type="text/javascript">
	$( document ).ready( function() {
		document.getElementById( 'btn1' ).onclick = function() {

			/* html문서의 내용을 가져오는 전통적인 방법 */
			/* const result = document.getElementById( 'result' );
			console.log( result.innerHTML );

			//콘텐트내용만 가져오기
			console.log( result.textContent ); */

			/* jQuery로 사용하기  */
			console.log( $( '#result' ).html() );
			console.log( $( '#result' ).text() );
		};
	});
</script>

</head>
<body>

<button id="btn1">내용</button>
<button id="btn2">추가/수정</button>
<br><hr><br>
<div id="result"><b>출력될 내용</b></div>

</body>
</html>
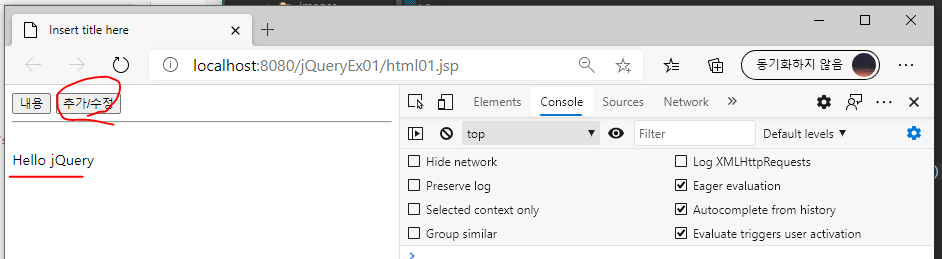
추가/수정 버튼의 기능도 만들어본다.
jQuery를 이용하면 html의 내용도 추가할 수 있다.
<%@ page language="java" contentType="text/html; charset=UTF-8"
    pageEncoding="UTF-8"%>
<!DOCTYPE html>
<html>
<head>
<meta charset="UTF-8">
<title>Insert title here</title>


<script src="https://ajax.googleapis.com/ajax/libs/jquery/3.5.1/jquery.min.js"></script>
<script type="text/javascript">
	$( document ).ready( function() {
		document.getElementById( 'btn1' ).onclick = function() {

			/* html문서의 내용을 가져오는 전통적인 방법 */
			/* const result = document.getElementById( 'result' );
			console.log( result.innerHTML );

			//콘텐트내용만 가져오기
			console.log( result.textContent ); */

			/* jQuery로 사용하기  */
			console.log( $( '#result' ).html() );
			console.log( $( '#result' ).text() );
		};

		document.getElementById( 'btn2' ).onclick = function() {
			$( '#result' ).html( "Hello jQuery" );
		};
	});
</script>

</head>
<body>

<button id="btn1">내용</button>
<button id="btn2">추가/수정</button>
<br><hr><br>
<div id="result"><b>출력될 내용</b></div>

</body>
</html>
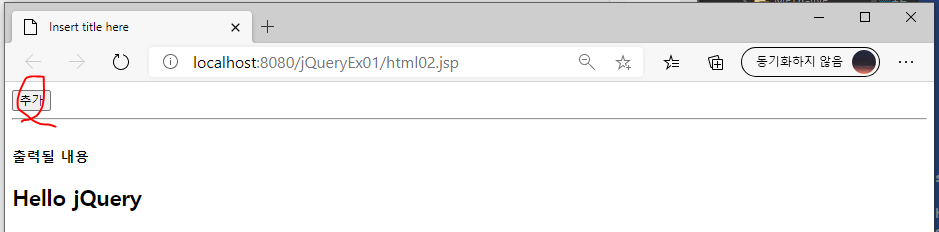
HTML 태그 새롭게 만들어서 추가하기
$( '<h2>Hello jQuery</h2>' );
appendTo(B): ~뒤에 붙인다. / pretendTo(B): ~앞에 붙이기
inserBefore(B): 뒤에 붙이기 / insertAfter(B): 앞에 붙이기
<%@ page language="java" contentType="text/html; charset=UTF-8"
    pageEncoding="UTF-8"%>
<!DOCTYPE html>
<html>
<head>
<meta charset="UTF-8">
<title>Insert title here</title>


<script src="https://ajax.googleapis.com/ajax/libs/jquery/3.5.1/jquery.min.js"></script>
<script type="text/javascript">
	$( document ).ready( function() {
		document.getElementById( 'btn1' ).onclick = function() {
			//html태그 생성
			// $( '<h2>Hello jQuery</h2>' );
			// appendTo(B): ~뒤에 붙인다. / pretendTo(B): ~앞에 붙이기
			// inserBefore(B): 뒤에 붙이기 / insertAfter(B): 앞에 붙이기
			$( '<h2>Hello jQuery</h2>' ).appendTo( 'div' );
		}

	});
</script>

</head>
<body>

<button id="btn1">추가</button>
<br><hr><br>
<div id="result"><b>출력될 내용</b></div>


</body>
</html>
<%@ page language="java" contentType="text/html; charset=UTF-8"
    pageEncoding="UTF-8"%>
<!DOCTYPE html>
<html>
<head>
<meta charset="UTF-8">
<title>Insert title here</title>


<script src="https://ajax.googleapis.com/ajax/libs/jquery/3.5.1/jquery.min.js"></script>
<script type="text/javascript">
	$( document ).ready( function() {
		document.getElementById( 'btn1' ).onclick = function() {
			//html태그 생성
			// $( '<h2>Hello jQuery</h2>' );
			// appendTo(B): ~뒤에 붙인다. / pretendTo(B): ~앞에 붙이기
			// inserBefore(B): 뒤에 붙이기 / insertAfter(B): 앞에 붙이기
			//$( '<h2>Hello jQuery</h2>' ).appendTo( 'div' );

			$( '<h2></h2>').html( 'Hello jQuery' ).appendTo( 'div' );
		}

	});
</script>

</head>
<body>

<button id="btn1">추가</button>
<br><hr><br>
<div id="result"><b>출력될 내용</b></div>


</body>
</html>
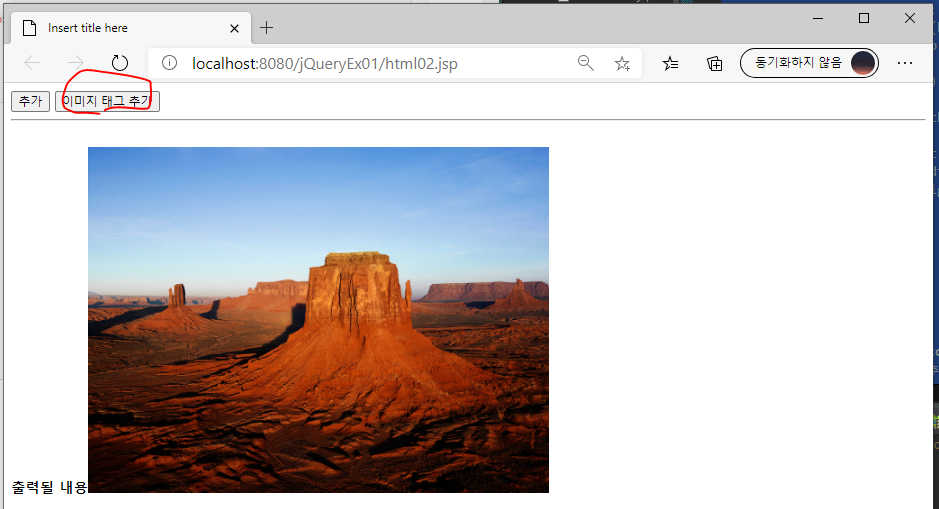
아래와 같이 html의 img 태그를 만들고 속성을 주고 div뒤에 붙일 수도 있다.
<%@ page language="java" contentType="text/html; charset=UTF-8"
    pageEncoding="UTF-8"%>
<!DOCTYPE html>
<html>
<head>
<meta charset="UTF-8">
<title>Insert title here</title>


<script src="https://ajax.googleapis.com/ajax/libs/jquery/3.5.1/jquery.min.js"></script>
<script type="text/javascript">
	$( document ).ready( function() {
		document.getElementById( 'btn1' ).onclick = function() {
			//html태그 생성
			// $( '<h2>Hello jQuery</h2>' );
			// appendTo(B): ~뒤에 붙인다. / pretendTo(B): ~앞에 붙이기
			// inserBefore(B): 뒤에 붙이기 / insertAfter(B): 앞에 붙이기
			//$( '<h2>Hello jQuery</h2>' ).appendTo( 'div' );

			$( '<h2></h2>').html( 'Hello jQuery' ).appendTo( 'div' );
		}
		document.getElementById( 'btn2' ).onclick = function() {
			$( '<img />' )
				.attr( 'src', './images/Desert.jpg' )
				.attr( 'width', '512' )
				.attr( 'height', '384' )
				.appendTo( 'div' );
		}
	});
</script>

</head>
<body>

<button id="btn1">추가</button>
<button id="btn2">이미지 태그 추가</button>
<br><hr><br>
<div id="result"><b>출력될 내용</b></div>


</body>
</html>
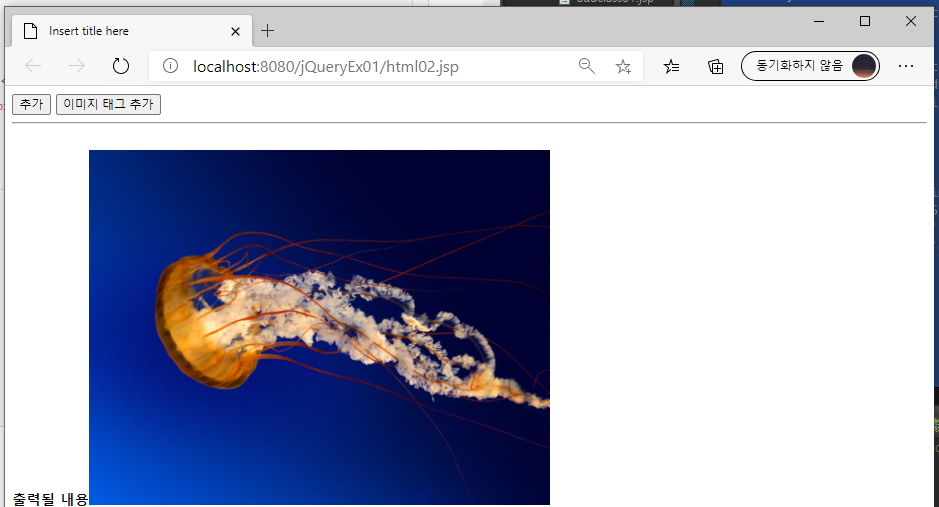
아래와 같이 작성할 수도 있다.
<%@ page language="java" contentType="text/html; charset=UTF-8"
    pageEncoding="UTF-8"%>
<!DOCTYPE html>
<html>
<head>
<meta charset="UTF-8">
<title>Insert title here</title>


<script src="https://ajax.googleapis.com/ajax/libs/jquery/3.5.1/jquery.min.js"></script>
<script type="text/javascript">
	$( document ).ready( function() {
		document.getElementById( 'btn1' ).onclick = function() {
			//html태그 생성
			// $( '<h2>Hello jQuery</h2>' );
			// appendTo(B): ~뒤에 붙인다. / pretendTo(B): ~앞에 붙이기
			// inserBefore(B): 뒤에 붙이기 / insertAfter(B): 앞에 붙이기
			//$( '<h2>Hello jQuery</h2>' ).appendTo( 'div' );

			$( '<h2></h2>').html( 'Hello jQuery' ).appendTo( 'div' );
		}
		document.getElementById( 'btn2' ).onclick = function() {
			/*
			$( '<img />' )
				.attr( 'src', './images/Desert.jpg' )
				.attr( 'width', '512' )
				.attr( 'height', '384' )
				.appendTo( 'div' );
			 */

			 $( '<img />', {
				'src': './images/Jellyfish.jpg',
				'width': '512',
				'height': '394'
			 }).appendTo( 'div' );
		}
	});
</script>

</head>
<body>

<button id="btn1">추가</button>
<button id="btn2">이미지 태그 추가</button>
<br><hr><br>
<div id="result"><b>출력될 내용</b></div>


</body>
</html>
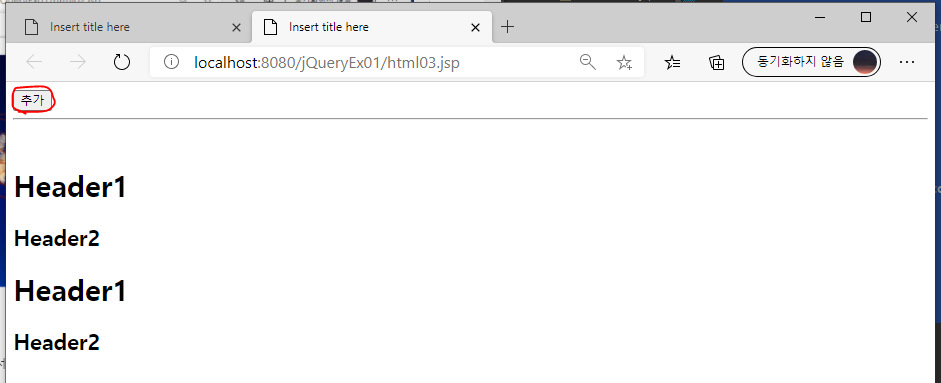
append() 사용하기
html태그를 변수화해서 append() 메서드 안에 써서 붙일 수 있다.
<%@ page language="java" contentType="text/html; charset=UTF-8"
    pageEncoding="UTF-8"%>
<!DOCTYPE html>
<html>
<head>
<meta charset="UTF-8">
<title>Insert title here</title>


<script src="https://ajax.googleapis.com/ajax/libs/jquery/3.5.1/jquery.min.js"></script>
<script type="text/javascript">
	$( document ).ready( function() {
		document.getElementById( 'btn1' ).onclick = function() {
			const h1 = '<h1>Header1</h1>';
			const h2 = '<h2>Header2</h2>';

			$( 'div' ).append( h1, h2, h1, h2 );
		};

	});
</script>

</head>
<body>

<button id="btn1">추가</button>
<br><hr><br>
<div id="result"></div>


</body>
</html>
애니메이션 효과 만들기
애니메이션효과에서 중요한 것은 시간설정이다.
setInterval() 메서드를 이용한다.
<%@ page language="java" contentType="text/html; charset=UTF-8"
    pageEncoding="UTF-8"%>
<!DOCTYPE html>
<html>
<head>
<meta charset="UTF-8">
<title>Insert title here</title>


<script src="https://ajax.googleapis.com/ajax/libs/jquery/3.5.1/jquery.min.js"></script>
<script type="text/javascript">
	$( document ).ready( function() {
		//2초마다 body태그뒤에 이미지태그를 붙인다.
		setInterval( function() {
			$( 'img' ).first().appendTo( 'body' )
		}, 2000);
	});
</script>

</head>
<body>

<img src="./images/Chrysanthemum.jpg" width="150"/>
<img src="./images/Desert.jpg" width="150"/>
<img src="./images/Hydrangeas.jpg" width="150"/>
<img src="./images/Jellyfish.jpg" width="150"/>

</body>
</html>
html태그 제거하기
remove() : 선택된 태그와 그 안에 내용 모두 삭제
empty() : 선택된 태그의 자식들만 삭제
<%@ page language="java" contentType="text/html; charset=UTF-8"
    pageEncoding="UTF-8"%>
<!DOCTYPE html>
<html>
<head>
<meta charset="UTF-8">
<title>Insert title here</title>


<script src="https://ajax.googleapis.com/ajax/libs/jquery/3.5.1/jquery.min.js"></script>
<script type="text/javascript">
	$( document ).ready( function() {
		document.getElementById( 'btn1' ).onclick = function() {
			$( 'div' ).remove();
		};

		document.getElementById( 'btn2' ).onclick = function() {
			$( 'div' ).empty();
		};
	});
</script>

</head>
<body>

<button id="btn1">제거1</button>
<button id="btn2">제거2</button>
<br><hr><br>
<div>
	<h2>header - 0</h2>
	<h2>header - 1</h2>
	<h2>header - 2</h2>
	<h2>header - 3</h2>
</div>

</body>
</html>
첫번째 <h2>태그만 지워보자.
<%@ page language="java" contentType="text/html; charset=UTF-8"
    pageEncoding="UTF-8"%>
<!DOCTYPE html>
<html>
<head>
<meta charset="UTF-8">
<title>Insert title here</title>


<script src="https://ajax.googleapis.com/ajax/libs/jquery/3.5.1/jquery.min.js"></script>
<script type="text/javascript">
	$( document ).ready( function() {
		document.getElementById( 'btn1' ).onclick = function() {
			$( 'div' ).remove();
		};

		document.getElementById( 'btn2' ).onclick = function() {
			$( 'div' ).empty();
		};

		document.getElementById( 'btn3' ).onclick = function() {
			$( 'h2' ).first().remove();
		};
	});
</script>

</head>
<body>

<button id="btn1">제거1</button>
<button id="btn2">제거2</button>
<button id="btn3">제거3</button>
<br><hr><br>
<div>
	<h2>header - 0</h2>
	<h2>header - 1</h2>
	<h2>header - 2</h2>
	<h2>header - 3</h2>
</div>

</body>
</html>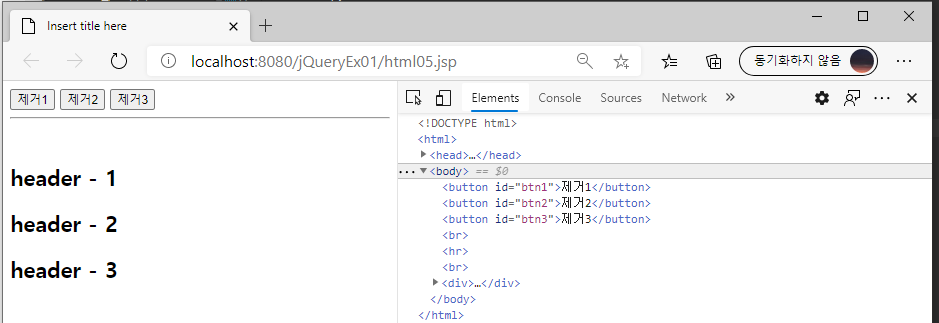
jQuery 로 버튼의 이벤트 생성하기
<%@ page language="java" contentType="text/html; charset=UTF-8"
    pageEncoding="UTF-8"%>
<!DOCTYPE html>
<html>
<head>
<meta charset="UTF-8">
<title>Insert title here</title>


<script src="https://ajax.googleapis.com/ajax/libs/jquery/3.5.1/jquery.min.js"></script>
<script type="text/javascript">
	$( document ).ready( function() {
		$( '#btn1' ).on( 'click', function() {
			console.log( 'btn 클릭 ' );
		});
	});
</script>

</head>
<body>

<button id="btn1">이벤트</button>

</body>
</html>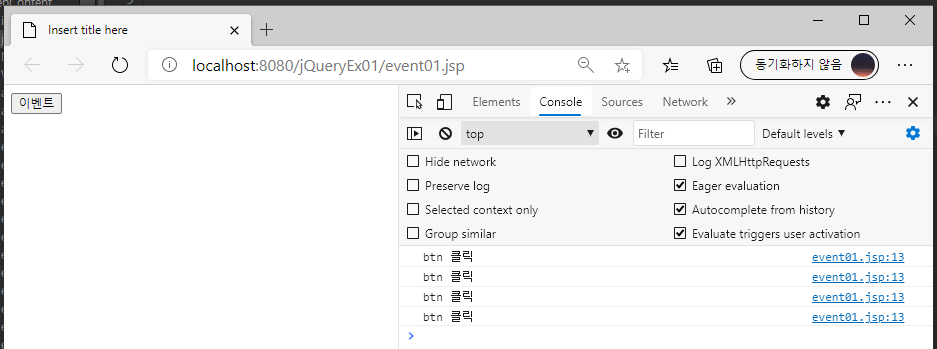
버튼태그 자체에다가 이벤트를 줄 수 있다.
<%@ page language="java" contentType="text/html; charset=UTF-8"
    pageEncoding="UTF-8"%>
<!DOCTYPE html>
<html>
<head>
<meta charset="UTF-8">
<title>Insert title here</title>


<script src="https://ajax.googleapis.com/ajax/libs/jquery/3.5.1/jquery.min.js"></script>
<script type="text/javascript">
	$( document ).ready( function() {
		/*
		$( '#btn1' ).on( 'click', function() {
			console.log( 'btn1 클릭 ' );
		});

		$( '#btn2' ).on( 'click', function() {
			console.log( 'btn2 클릭 ' );
		});
		 */

		 $( 'button' ).on( 'click', function() {
			console.log( $(this).text() );
			console.log( $(this).attr( 'id' ) );
		 });
	});
</script>

</head>
<body>

<button id="btn1">이벤트1</button>
<button id="btn2">이벤트2</button>

</body>
</html>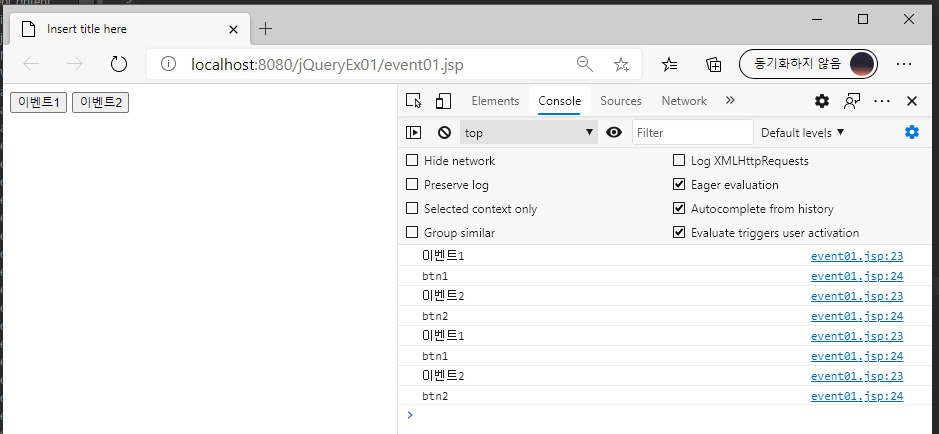
이때 이벤트 구문이 너무 길어서 줄여서 사용할 수 있다.
$( '#btn1' ).click( () => {
	console.log( 'btn1 클릭 ' );
});
마우스가 버튼에 올려지거나 다시 내려가면 발생하는 이벤트를 생성해보자.
header - 0에 마우스를 올리면 reverse 속성이 생겼다가 지워진다.
<%@ page language="java" contentType="text/html; charset=UTF-8"
    pageEncoding="UTF-8"%>
<!DOCTYPE html>
<html>
<head>
<meta charset="UTF-8">
<title>Insert title here</title>

<style type="text/css">
	.reverse { background-color: black; color: white }
</style>

<script src="https://ajax.googleapis.com/ajax/libs/jquery/3.5.1/jquery.min.js"></script>
<script type="text/javascript">
	$( document ).ready( function() {
		$( 'h2' ).on( 'mouseenter', function() {
			$( this ).addClass( 'reverse' );
		});
		$( 'h2' ).on( 'mouseleave', function() {
			$( this ).removeClass( 'reverse' );
		});
	});
</script>

</head>
<body>

<button id="btn1">이벤트1</button>
<button id="btn2">이벤트2</button>
<br>
<h2>Header - 0</h2>
<h2>Header - 0</h2>
<h2>Header - 0</h2>
<h2>Header - 0</h2>

</body>
</html>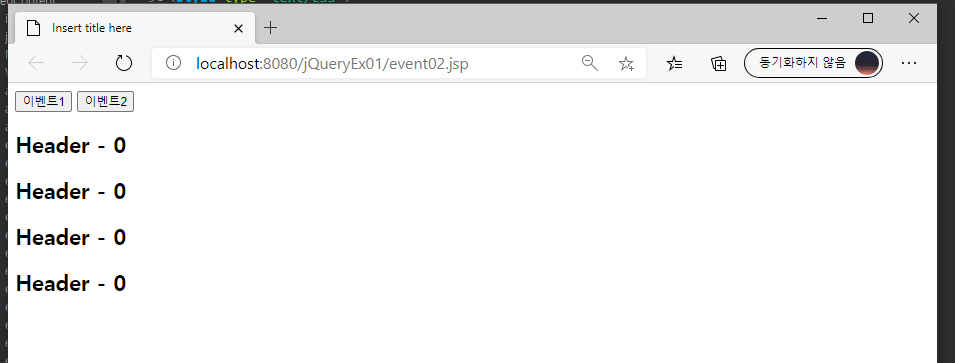
이벤트를 하나로 묶어서 사용해도 된다.
<%@ page language="java" contentType="text/html; charset=UTF-8"
    pageEncoding="UTF-8"%>
<!DOCTYPE html>
<html>
<head>
<meta charset="UTF-8">
<title>Insert title here</title>

<style type="text/css">
	.reverse { background-color: black; color: white }
</style>

<script src="https://ajax.googleapis.com/ajax/libs/jquery/3.5.1/jquery.min.js"></script>
<script type="text/javascript">
	$( document ).ready( function() {
		/*
		$( 'h2' ).on( 'mouseenter', function() {
			$( this ).addClass( 'reverse' );
		});
		$( 'h2' ).on( 'mouseleave', function() {
			$( this ).removeClass( 'reverse' );
		});
		 */

		 $( 'h2' ).on({
			mouseenter: function() {
				$( this ).addClass( 'reverse' );
			},
			mouseleave: function() {
				$( this ).removeClass( 'reverse' );
			}
		 });
	});
</script>

</head>
<body>

<button id="btn1">이벤트1</button>
<button id="btn2">이벤트2</button>
<br>
<h2>Header - 0</h2>
<h2>Header - 0</h2>
<h2>Header - 0</h2>
<h2>Header - 0</h2>

</body>
</html>
아래와 같이 hover를 이용해서 사용해도 된다.
hover는 마우스 오버했을 때 작동되는 이벤트이다.
<%@ page language="java" contentType="text/html; charset=UTF-8"
    pageEncoding="UTF-8"%>
<!DOCTYPE html>
<html>
<head>
<meta charset="UTF-8">
<title>Insert title here</title>

<style type="text/css">
	.reverse { background-color: black; color: white }
</style>

<script src="https://ajax.googleapis.com/ajax/libs/jquery/3.5.1/jquery.min.js"></script>
<script type="text/javascript">
	$( document ).ready( function() {
		/*
		$( 'h2' ).on( 'mouseenter', function() {
			$( this ).addClass( 'reverse' );
		});
		$( 'h2' ).on( 'mouseleave', function() {
			$( this ).removeClass( 'reverse' );
		});
		 */

		 $( 'h2' ).hover(
			function() {
				$(this).addClass('reverse');
			},
			function() {
				$(this).removeClass('reverse');
			}
		 )
	});
</script>

</head>
<body>

<button id="btn1">이벤트1</button>
<button id="btn2">이벤트2</button>
<br>
<h2>Header - 0</h2>
<h2>Header - 0</h2>
<h2>Header - 0</h2>
<h2>Header - 0</h2>

</body>
</html>
이벤트 연결 끊기
h2태그를 한번 클릭하면 console로 나오지만 한번더 클릭하면 더 이상 나오지 않는다.
<%@ page language="java" contentType="text/html; charset=UTF-8"
    pageEncoding="UTF-8"%>
<!DOCTYPE html>
<html>
<head>
<meta charset="UTF-8">
<title>Insert title here</title>

<style type="text/css">
	.reverse { background-color: black; color: white }
</style>

<script src="https://ajax.googleapis.com/ajax/libs/jquery/3.5.1/jquery.min.js"></script>
<script type="text/javascript">
	$( document ).ready( function() {
		$('h2').on('click', function() {
			console.log( 'click' );

			//한번클릭되면 이벤트 삭제
			$(this).off();
		})
	});
</script>

</head>
<body>

<h2>Header - 0</h2>
<h2>Header - 0</h2>
<h2>Header - 0</h2>
<h2>Header - 0</h2>

</body>
</html>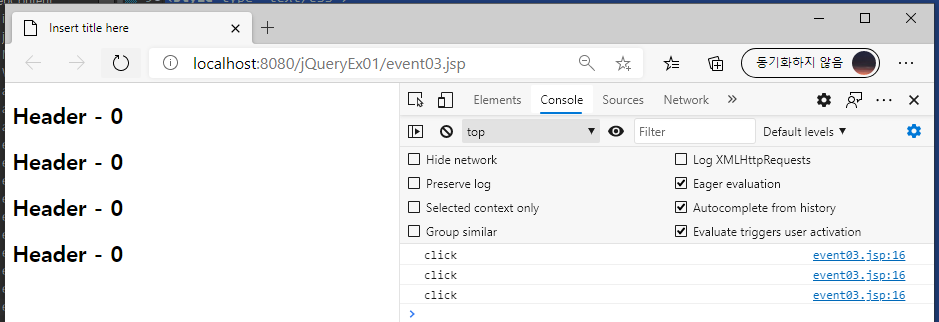
이를 만든 메서드를 사용해보자. one()을 사용한다.
$('h2').one('click', function() {
	console.log( 'click' );
})
이벤트가 발생한 위치 알아내기(좌표값)
이벤트 메서드의 객체의 내용과 좌표값
<%@ page language="java" contentType="text/html; charset=UTF-8"
    pageEncoding="UTF-8"%>
<!DOCTYPE html>
<html>
<head>
<meta charset="UTF-8">
<title>Insert title here</title>

<style type="text/css">
	.reverse { background-color: black; color: white }
</style>

<script src="https://ajax.googleapis.com/ajax/libs/jquery/3.5.1/jquery.min.js"></script>
<script type="text/javascript">
	$( document ).ready( function() {
		$('h2').on('click', function( e ) {
			console.log( 'click : ', e );
			console.log( 'click : ', e.pageX );
			console.log( 'click : ', e.pageY );
		})
	});
</script>

</head>
<body>

<h2>Header - 0</h2>
<h2>Header - 0</h2>
<h2>Header - 0</h2>
<h2>Header - 0</h2>

</body>
</html>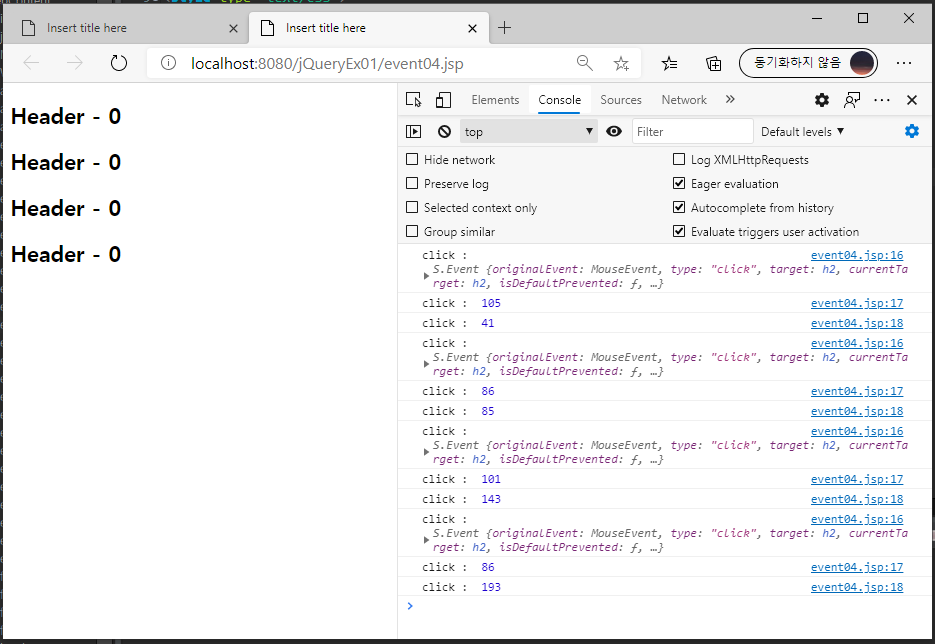
HTML에 간단한 그림그리기
<%@ page language="java" contentType="text/html; charset=UTF-8"
pageEncoding="UTF-8"%>
<!DOCTYPE html>
<html>
<head>
<meta charset="UTF-8">
<title>Insert title here</title>
<style type="text/css">
#canvas { border: 1px solid black; }
</style>
<script src="https://ajax.googleapis.com/ajax/libs/jquery/3.5.1/jquery.min.js"></script>
<script type="text/javascript">
$( document ).ready( function() {
/*
$( '#canvas' ).on( 'click', function( e ) {
console.log( 'clickX : ', e.pageX );
console.log( 'clickY : ', e.pageY );
})
*/
const canvas = document.getElementById('canvas');
const context = canvas.getContext( '2d' );
$('#canvas').on({
mousedown: function(e) {
const x = e.pageX;
const y = e.pageY;
//좌표를 이동시킴
context.beginPath();
context.moveTo( x, y );
},
mouseup: function(e) {
const x = e.pageX;
const y = e.pageY;
//선그리기
context.lineTo( x, y );
context.stroke(); // 실제 선을 긋는 메서드
}
})
});
</script>
</head>
<body>
<canvas id="canvas" width="700" height="400"></canvas>
</body>
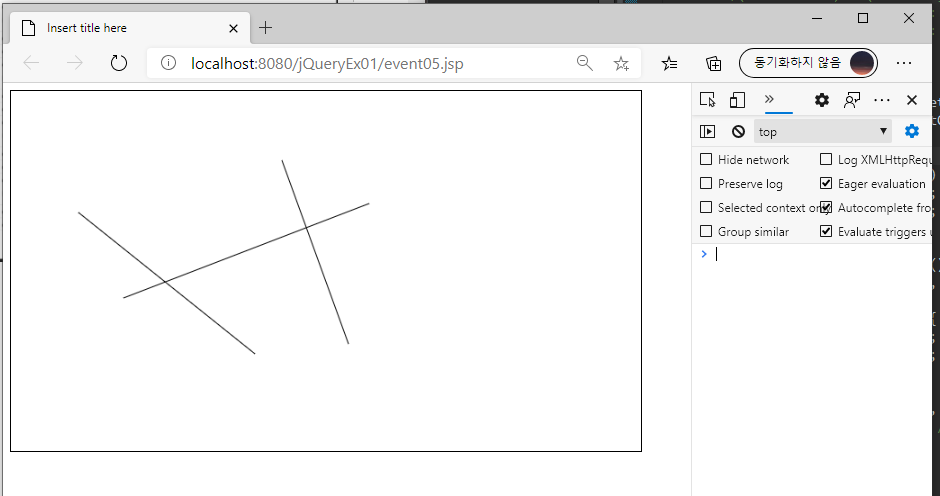
</html>마우스왼쪽 클릭한 상태에서 다른 곳으로 이동하면 선이 생긴다.
클릭하면 HTML문서 내용을 추가하는 이벤트 만들기
<%@ page language="java" contentType="text/html; charset=UTF-8"
    pageEncoding="UTF-8"%>
<!DOCTYPE html>
<html>
<head>
<meta charset="UTF-8">
<title>Insert title here</title>

<style type="text/css">
	#canvas { border: 1px solid black; }
</style>

<script src="https://ajax.googleapis.com/ajax/libs/jquery/3.5.1/jquery.min.js"></script>
<script type="text/javascript">
	$( document ).ready( function() {
		$( 'h2' ).on('click', function() {
			$(this).html( function( index, item ) {
				return item+ '*';
			})
		})

		//자동적으로 두번째 h2를 클릭되도록하기
		setInterval( () => {
			$('h2').last().trigger( 'click' );
		}, 1000 );
	});
</script>

</head>
<body>

<h2>start:</h2>
<h2>start:</h2>

</body>
</html>
이벤트 버블링 방지하기
<%@ page language="java" contentType="text/html; charset=UTF-8"
    pageEncoding="UTF-8"%>
<!DOCTYPE html>
<html>
<head>
<meta charset="UTF-8">
<title>Insert title here</title>

<style type="text/css">
	* { border: 1px solid orange; text-align:center; padding: 15px;}
</style>

<script src="https://ajax.googleapis.com/ajax/libs/jquery/3.5.1/jquery.min.js"></script>
<script type="text/javascript">
	$( document ).ready( function() {
		$('#h').on('click', function( e ) {
			console.log( 'h' );
		})

		$('#p').on('click', function( e ) {
			console.log( 'p' );
			//이벤트 버블링 방지
			if( e.stopPropagation ) {
				e.stopPropagation();
			}
		})
	});
</script>

</head>
<body>

<div onclick="console.log( 'div' )">
	<div onclick="console.log( 'inner-div' )">
		<h1 id="h">
			<p id="p">Hello jQuery</p>
		</h1>
	</div>
</div>

</body>
</html>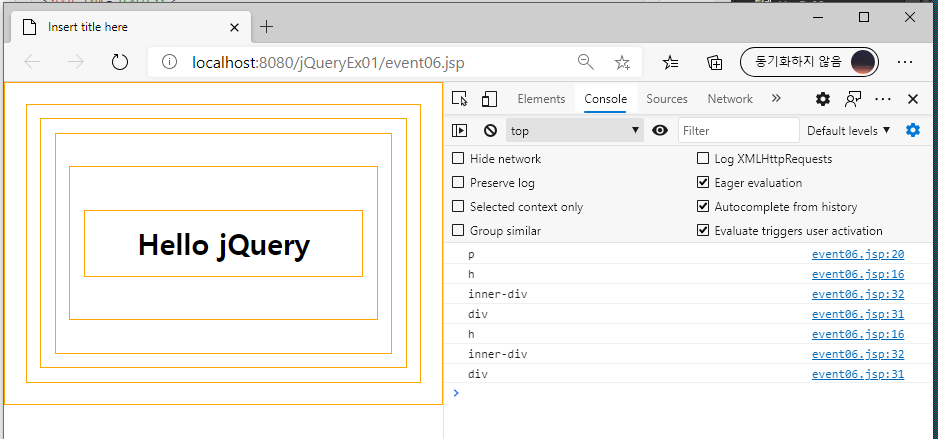
실습) 우편번호 검색기를 jQuery를 사용해서 만들어보기(데이터는 xml데이터를 가져온다.)
-실행결과
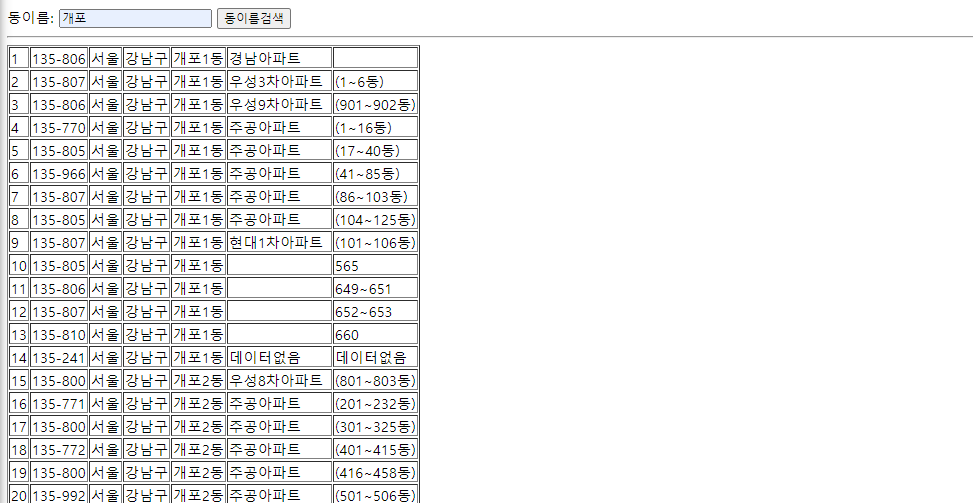
-zipcode.jsp
<%@ page language="java" contentType="text/xml; charset=UTF-8"
    pageEncoding="UTF-8"%>

<%
	request.setCharacterEncoding( "utf-8" );
	String strDong = request.getParameter("strDong");
	//String strDong = "개포";

%>

<%@ page import="javax.naming.NamingException"%>
<%@ page import="javax.naming.Context" %>
<%@ page import="javax.naming.InitialContext" %>
<%@ page import="javax.sql.DataSource" %>

<%@page import="java.sql.Connection"%>
<%@ page import="java.sql.ResultSet" %>
<%@ page import="java.sql.PreparedStatement" %>
<%@ page import="java.sql.SQLException" %>

<%
	Connection conn = null;
	PreparedStatement pstmt = null;
	ResultSet rs = null;

	StringBuffer result = new StringBuffer();

	try {
	Context initCtx = new InitialContext();
	Context envCtx = (Context)initCtx.lookup("java:comp/env");
	DataSource dataSource = (DataSource)envCtx.lookup("jdbc/mariadb2");

	conn = dataSource.getConnection();

	String sql = "select zipcode, sido, gugun, dong, ri, bunji, seq from zipcode where dong like ?";
	pstmt = conn.prepareStatement(sql);
	pstmt.setString( 1, strDong + "%" );
	rs = pstmt.executeQuery();

	result.append( "<result>" );
	while ( rs.next() ) {
		result.append( "<address>" );
		result.append( "	<seq>" + rs.getString( "seq" ) + "</seq>" );
		result.append( "	<zipcode>" + rs.getString( "zipcode" ) + "</zipcode>" );
		result.append( "	<sido>" + rs.getString( "sido" ) + "</sido>" );
		result.append( "	<gugun>" + rs.getString( "gugun" ) + "</gugun>" );
		result.append( "	<dong>" + rs.getString( "dong" ) + "</dong>" );
		result.append( "	<ri>" + rs.getString( "ri" ) + "</ri>" );
		result.append( "	<bunji>" + rs.getString( "bunji" ) + "</bunji>" );
		result.append( "</address>" );
	}
	result.append( "</result>" );

	} catch (NamingException e) {
		System.out.println( "[Error] : " + e.getMessage() );
	} catch (SQLException e) {
		System.out.println( "[Error] : " + e.getMessage() );
	} finally {
		if ( rs != null ) rs.close();
		if ( pstmt != null ) pstmt.close();
		if ( conn != null ) conn.close();
	}

	out.println( result );
%>
-zipcodeEx03.jsp
<%@ page language="java" contentType="text/html; charset=UTF-8"
    pageEncoding="UTF-8"%>
<%
	request.setCharacterEncoding("utf-8");
%>
<!DOCTYPE html>
<html>
<head>
<meta charset="UTF-8">
<title>Insert title here</title>

<script src="https://ajax.googleapis.com/ajax/libs/jquery/3.5.1/jquery.min.js"></script>
<script type="text/javascript">
	$( document ).ready( function() {
		$('#btn').on( 'click', () => {
			const strDong = $( '#dong' ).val();

			const request = new XMLHttpRequest();
			request.onreadystatechange = () => {
				if ( request.readyState == 4 ) {
					if ( request.status == 200 ) {
						const data = request.responseXML;

						let result = '<table border="1">';
						$( data ).find('address').each( function() {
							result += '<tr>';
							result += '	<td>' + $(this).find('seq').html() + '</td>'
							result += '	<td>' + $(this).find('zipcode').html() + '</td>'
							result += '	<td>' + $(this).find('sido').html() + '</td>'
							result += '	<td>' + $(this).find('gugun').html() + '</td>'
							result += '	<td>' + $(this).find('dong').html() + '</td>'
							result += '	<td>' + $(this).find('ri').html() + '</td>'
							result += '	<td>' + $(this).find('bunji').html() + '</td>'
							result += '</tr>';
						})
						result += '</table>';

						$( '#result' ).html( result );

					} else {
						alert('에러 페이지입니다.');
					}
				}
			}
			request.open( 'GET', './data/zipcode.jsp?strDong='+strDong, true );
			request.send();
		})
	});
</script>

</head>
<body>

<form>
동이름: <input type="text" id="dong" />
<input type="button" id="btn" value="동이름검색" />

<br><hr>
<div id="result"></div>

</form>

</body>
</html>


