
지구정복
[JavaScript-jQuery] 1/12 | XMLHttpRequest(우편번호 검색기, crossdomain해결하고 데이터가져오기), jQuery(기본사용 및 태그셀렉터) 본문
[JavaScript-jQuery] 1/12 | XMLHttpRequest(우편번호 검색기, crossdomain해결하고 데이터가져오기), jQuery(기본사용 및 태그셀렉터)
eeaarrtthh 2021. 1. 12. 17:16복습 및 배울내용
요청과 응답의 시간차(깜빡임, 모래시계)
web 1.0 - 동기식 처리
web 2.0 - 비동기식 처리
ajax(Asynchronous Javascript & XML)
	1. 요청방법
		document.getElementById( '버튼아이디' ).onclick = function() {
			const request = new XMLHttpRequest();
			request.onreadystatechange = function () {
				if ( request.readyState == 4 ) {
					if ( request.status == 200 ) {
						//정상응답처리
					} else {
						//페이지오류
					}
				} else {
					//처리중
				}
			}
			request.open( '방식', 'URL', true );
			request.send();
		}

	2. 데이터 만드는법(csv, xml, json)
		csv - out.println
		xml - out.println			- 반드시 검사해야한다.
		json - api로 출력하는 것이 낫다		- 반드시 검사해야한다.
1. XMLHttpRequest(이어서)
실습) 우편번호검색기(xml데이터로 만들고 가져오기)
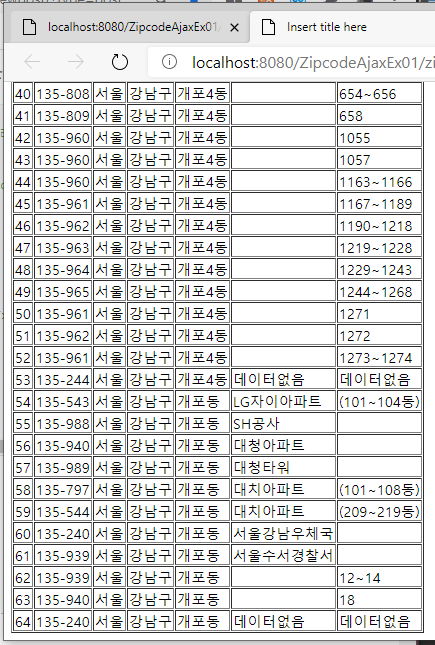
-zipcode.jsp (xml만드는 jsp)
<%@ page language="java" contentType="text/xml; charset=UTF-8"
    pageEncoding="UTF-8"%>

<%
	request.setCharacterEncoding( "utf-8" );
	String strDong = request.getParameter("strDong");

%>

<%@ page import="javax.naming.NamingException"%>
<%@ page import="javax.naming.Context" %>
<%@ page import="javax.naming.InitialContext" %>
<%@ page import="javax.sql.DataSource" %>

<%@page import="java.sql.Connection"%>
<%@ page import="java.sql.ResultSet" %>
<%@ page import="java.sql.PreparedStatement" %>
<%@ page import="java.sql.SQLException" %>

<%
	Connection conn = null;
	PreparedStatement pstmt = null;
	ResultSet rs = null;

	StringBuffer result = new StringBuffer();

	try {
	Context initCtx = new InitialContext();
	Context envCtx = (Context)initCtx.lookup("java:comp/env");
	DataSource dataSource = (DataSource)envCtx.lookup("jdbc/mariadb2");

	conn = dataSource.getConnection();

	String sql = "select zipcode, sido, gugun, dong, ri, bunji, seq from zipcode where dong like ?";
	pstmt = conn.prepareStatement(sql);
	pstmt.setString( 1, strDong + "%" );
	rs = pstmt.executeQuery();

	result.append( "<result>" );
	while ( rs.next() ) {
		result.append( "<address>" );
		result.append( "	<seq>" + rs.getString( "seq" ) + "</seq>" );
		result.append( "	<zipcode>" + rs.getString( "zipcode" ) + "</zipcode>" );
		result.append( "	<sido>" + rs.getString( "sido" ) + "</sido>" );
		result.append( "	<gugun>" + rs.getString( "gugun" ) + "</gugun>" );
		result.append( "	<dong>" + rs.getString( "dong" ) + "</dong>" );
		result.append( "	<ri>" + rs.getString( "ri" ) + "</ri>" );
		result.append( "	<bunji>" + rs.getString( "bunji" ) + "</bunji>" );
		result.append( "</address>" );
	}
	result.append( "</result>" );

	} catch (NamingException e) {
		System.out.println( "[Error] : " + e.getMessage() );
	} catch (SQLException e) {
		System.out.println( "[Error] : " + e.getMessage() );
	} finally {
		if ( rs != null ) rs.close();
		if ( pstmt != null ) pstmt.close();
		if ( conn != null ) conn.close();
	}

	out.println( result );
%>
-zipcodeEx01.jsp (xml가져와서 html문서에서 보여주기)
<%@ page language="java" contentType="text/html; charset=UTF-8"
    pageEncoding="UTF-8"%>
<%
	request.setCharacterEncoding("utf-8");
%>
<!DOCTYPE html>
<html>
<head>
<meta charset="UTF-8">
<title>Insert title here</title>


<script type="text/javascript">
window.onload = () => {
	document.getElementById('btn').onclick = () => {
		const strDong = document.getElementById( 'dong' ).value.trim();

		const request = new XMLHttpRequest();
		request.onreadystatechange = () => {
			if ( request.readyState == 4 ) {
				if ( request.status == 200 ) {
					const data = request.responseXML;


					const seqs = data.getElementsByTagName( 'seq' );
					const zipcodes = data.getElementsByTagName( 'zipcode' );
					const sidos = data.getElementsByTagName( 'sido' );
					const guguns = data.getElementsByTagName( 'gugun' );
					const dongs = data.getElementsByTagName( 'dong' );
					const ris = data.getElementsByTagName( 'ri' );
					const bunjis = data.getElementsByTagName( 'bunji' );

					console.log( ris );


					let result = '<table border="1">';
					for ( let i=0; i<seqs.length; i++ ) {
						let seqValue = seqs[i].childNodes[0].nodeValue;
						let zipcodeValue = zipcodes[i].childNodes[0].nodeValue;
						let sidoValue = sidos[i].childNodes[0].nodeValue;
						let gugunValue = guguns[i].childNodes[0].nodeValue;
						let dongValue = dongs[i].childNodes[0].nodeValue;
						let riValue = ris[i].textContent;
						let bunjiValue = bunjis[i].textContent;


						result += '<tr>';
						result += '	<td>' + seqValue + '</td>';
						result += '	<td>' + zipcodeValue + '</td>';
						result += '	<td>' + sidoValue + '</td>';
						result += '	<td>' + gugunValue + '</td>';
						result += '	<td>' + dongValue + '</td>';
						result += '	<td>' + riValue + '</td>';
						result += '	<td>' + bunjiValue + '</td>';
						result += '<tr>';
					}
					result += '</table>';

					document.getElementById('result').innerHTML = result;

				} else {
					alert('에러 페이지입니다.');
				}
			}
		}
		request.open( 'GET', './data/zipcode.jsp?strDong='+strDong, true );
		request.send();
	}
}
</script>
</head>
<body>

<form>
동이름: <input type="text" id="dong" />
<input type="button" id="btn" value="동이름검색" />

<br><hr>
<div id="result"></div>

</form>

</body>
</html>
실습) 우편번호검색기(json데이터로 만들고 가져오기)
-json.jsp (json 파일 만드는 jsp)
<%@ page language="java" contentType="text/json; charset=UTF-8"
    pageEncoding="UTF-8"%>
<%
	request.setCharacterEncoding( "utf-8" );
	String strDong = request.getParameter("strDong");
	//String strDong = "개포";
%>
<%@ page import="javax.naming.NamingException"%>
<%@ page import="javax.naming.Context" %>
<%@ page import="javax.naming.InitialContext" %>
<%@ page import="javax.sql.DataSource" %>

<%@page import="java.sql.Connection"%>
<%@ page import="java.sql.ResultSet" %>
<%@ page import="java.sql.PreparedStatement" %>
<%@ page import="java.sql.SQLException" %>

<%@ page import="org.json.simple.JSONArray" %>
<%@ page import="org.json.simple.JSONObject" %>

<%
	Connection conn = null;
	PreparedStatement pstmt = null;
	ResultSet rs = null;

	JSONArray jsonArray = new JSONArray();

	try {
		Context initCtx = new InitialContext();
		Context envCtx = (Context)initCtx.lookup("java:comp/env");
		DataSource dataSource = (DataSource)envCtx.lookup("jdbc/mariadb2");

		conn = dataSource.getConnection();

		String sql = "select zipcode, sido, gugun, dong, ri, bunji, seq from zipcode where dong like ?";
		pstmt = conn.prepareStatement(sql);
		pstmt.setString( 1, strDong + "%" );
		rs = pstmt.executeQuery();

		while ( rs.next() ) {
			JSONObject obj = new JSONObject();
			obj.put( "seq", rs.getString( "seq" ) );
			obj.put( "zipcode", rs.getString( "zipcode" ) );
			obj.put( "sido", rs.getString( "sido" ) );
			obj.put( "gugun", rs.getString( "gugun" ) );
			obj.put( "dong", rs.getString( "dong" ) );
			obj.put( "ri", rs.getString( "ri" ) );
			obj.put( "bunji", rs.getString( "bunji" ) );

			jsonArray.add( obj );
		}

	} catch(NamingException e) {
		System.out.println( "[에러] : " + e.getMessage() );
	} catch(SQLException e) {
		System.out.println( "[에러] : " + e.getMessage() );
	} finally {
		if ( rs != null ) rs.close();
		if ( pstmt != null ) pstmt.close();
		if ( conn != null ) conn.close();
	}

	out.println( jsonArray );
%>
-zipcodeEx02.jsp (json데이터 가져와서 html문서에 출력)
<%@ page language="java" contentType="text/html; charset=UTF-8"
    pageEncoding="UTF-8"%>
<!DOCTYPE html>
<html>
<head>
<meta charset="UTF-8">
<title>Insert title here</title>

<script type="text/javascript">
window.onload = () => {
	document.getElementById('btn').onclick = () => {
		const strDong = document.getElementById( 'dong' ).value.trim();

		const request = new XMLHttpRequest();
		request.onreadystatechange = () => {
			if ( request.readyState == 4 ) {
				if ( request.status == 200 ) {
					const data = JSON.parse( request.responseText );

					let result = '<table border="1">';
					for ( let i=0; i<data.length; i++ ) {
						result += '<tr>';
						result += ' <td>' + data[i].seq + '</td>';
						result += ' <td>' + data[i].zipcode + '</td>';
						result += ' <td>' + data[i].sido + '</td>';
						result += ' <td>' + data[i].gugun + '</td>';
						result += ' <td>' + data[i].dong + '</td>';
						result += ' <td>' + data[i].ri + '</td>';
						result += ' <td>' + data[i].bunji + '</td>';
						result += '</tr>';
					}
					result += '</table>';

					document.getElementById('result').innerHTML = result;

				} else {
					alert('에러 페이지입니다.');
				}
			}
		}
		request.open( 'GET', './data/json.jsp?strDong='+strDong, true );
		request.send();
	}
}
</script>

</head>
<body>


<form>
동이름: <input type="text" id="dong" />
<input type="button" id="btn" value="동이름검색" />

<br><hr>
<div id="result"></div>

</form>

</body>
</html>
ㅇCrossDomain 해결하고 데이터 가져오기
먼저 기상청 홈페이지에서 데이터를 가져와보자.
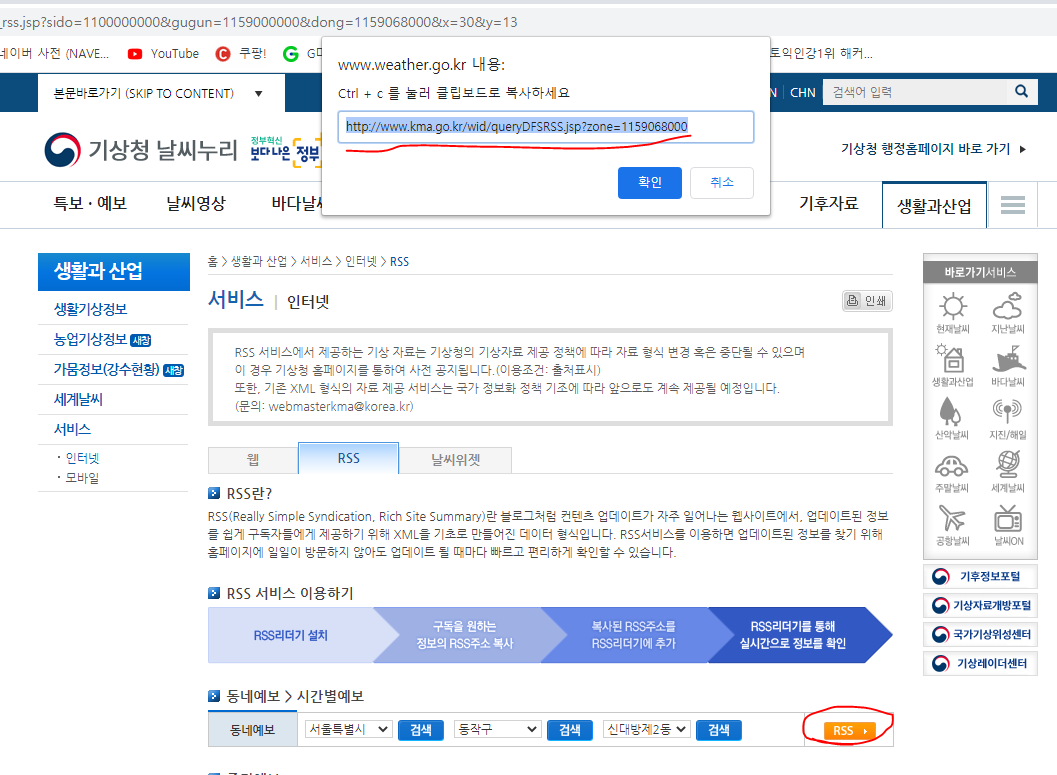
RSS > 인터넷 > 서비스 > 생활과 산업 > 날씨 > 기상청
홈 > 생활과 산업 > 서비스 > 인터넷 > RSS |날씨|생활과 산업|서비스|인터넷|RSS
www.weather.go.kr
그리고 아래와 같이 코딩하고 실행해보자.
-weather01.jsp
<%@ page language="java" contentType="text/html; charset=UTF-8"
    pageEncoding="UTF-8"%>
<!DOCTYPE html>
<html>
<head>
<meta charset="UTF-8">
<title>Insert title here</title>

<script type="text/javascript">
window.onload = () => {
	document.getElementById('btn').onclick = () => {
		const strDong = document.getElementById( 'dong' ).value.trim();

		const request = new XMLHttpRequest();
		request.onreadystatechange = () => {
			if ( request.readyState == 4 ) {
				if ( request.status == 200 ) {
					const data = JSON.parse( request.responseText );

					console.log( data );

				} else {
					alert('에러 페이지입니다.');
				}
			}
		}
		//crossdomain - 허용안함
		//데이터와 요청은 같은 IP여야 한다.
		request.open( 'GET', 'http://www.kma.go.kr/wid/queryDFSRSS.jsp?zone=1159068000', true );
		request.send();
	}
}
</script>

</head>
<body>


<form>
동이름: <input type="text" id="dong" />
<input type="button" id="btn" value="동이름검색" />

<br><hr>
<div id="result"></div>

</form>

</body>
</html>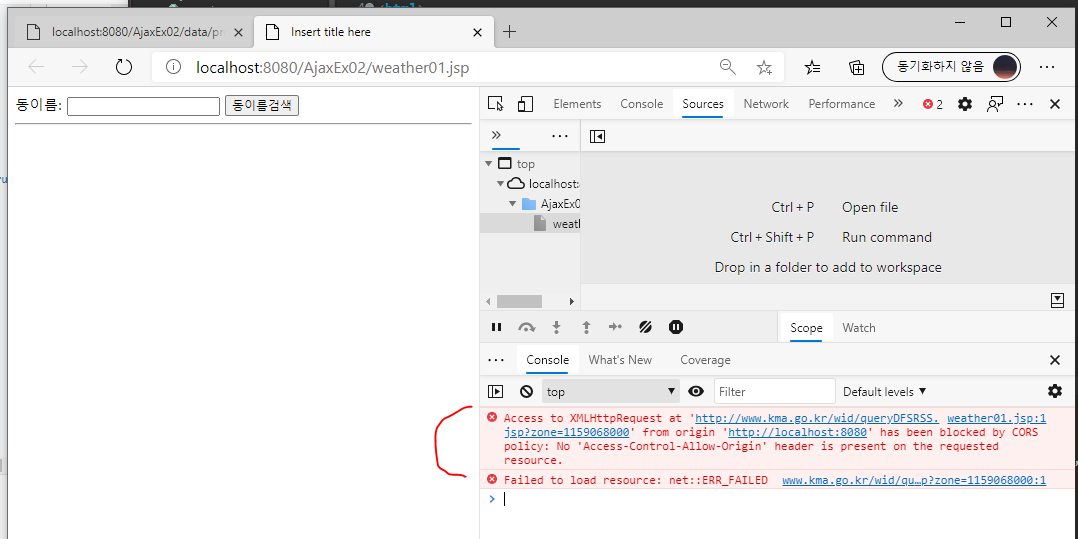
현재 크로스 도메인이 되어서 데이터 요청이 되지 않는다. 즉, 데이터의 요청은 같은 IP이어야 가능하다.
하지만 이를 JSTL을 이용해서 해결할 수 있다.
다이나믹웹프로젝트 생성 - 웹콘텐츠의 웹인포의 lib - jstl라이브러리(jstl.jar, standard.jar)추가 - 웹콘텐츠에 data 폴더 생성 - data폴더 안에 proxy.jsp 생성
그리고 기상청 홈페이지에서 아래 url을 복사한다.
-proxy.jsp
<%@ page language="java" contentType="text/xml; charset=UTF-8"
    pageEncoding="UTF-8" trimDirectiveWhitespaces="true" %>
<%@ taglib prefix="c" uri="http://java.sun.com/jsp/jstl/core" %>

<c:import var="data" url="https://www.kma.go.kr/wid/queryDFSRSS.jsp?zone=1159068000" />
${ data }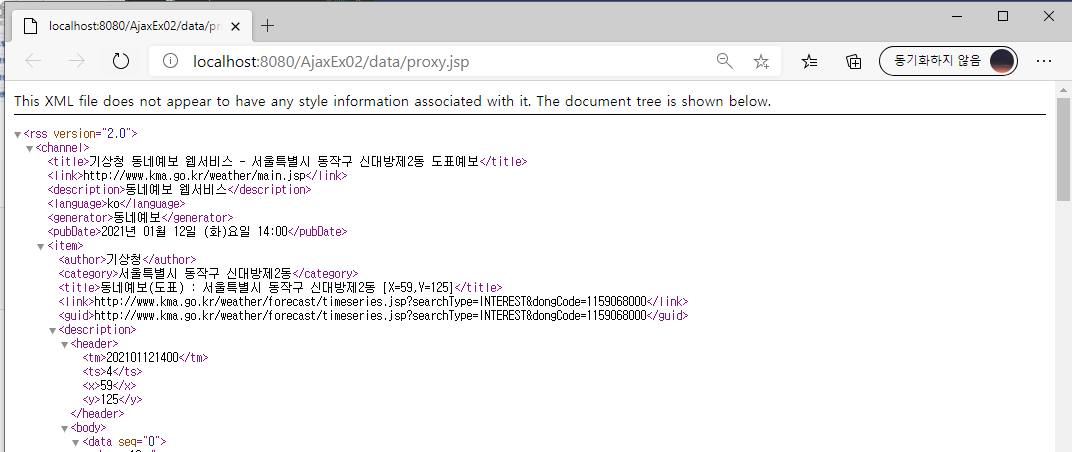
-weather01.jsp
<%@ page language="java" contentType="text/html; charset=UTF-8"
    pageEncoding="UTF-8"%>
<!DOCTYPE html>
<html>
<head>
<meta charset="UTF-8">
<title>Insert title here</title>

<script type="text/javascript">
window.onload = () => {
	document.getElementById('btn').onclick = () => {
		const strDong = document.getElementById( 'dong' ).value.trim();

		const request = new XMLHttpRequest();
		request.onreadystatechange = () => {
			if ( request.readyState == 4 ) {
				if ( request.status == 200 ) {
					const data = request.responseText;

					console.log( data );

				} else {
					alert('에러 페이지입니다.');
				}
			}
		}
		//crossdomain - 허용안함
		//데이터와 요청은 같은 IP여야 한다.
		//request.open( 'GET', 'http://www.kma.go.kr/wid/queryDFSRSS.jsp?zone=1159068000', true );
		request.open( 'GET', './data/proxy.jsp', true );
		request.send();
	}
}
</script>

</head>
<body>


<form>
동이름: <input type="text" id="dong" />
<input type="button" id="btn" value="동이름검색" />

<br><hr>
<div id="result"></div>

</form>

</body>
</html>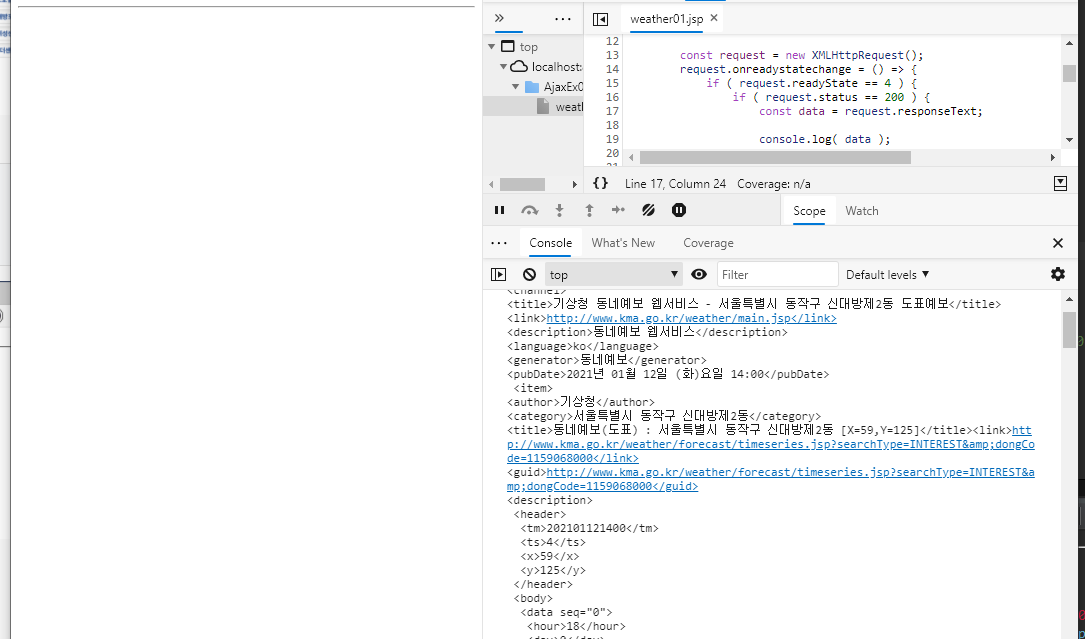
weather01.jsp의 ajax에서 proxy.jsp에 데이터를 요청하면 접근하려는 데이터(xml, csv, json등)를 proxy.jsp 안에 있는 jstl코드를 통해서 가져올 수 있다.
2. jQuery
ECMAScript
-> html 연동된 표현
=> DOM을 ECMAScript로 DOM을 구현하면 불편한 점이 있어서 라이브러리를 사용
=> 이를 쉽게 만들기 위해 프레임워크 사용
jQuery를 사용
jQuery란 자바스크립트를 좀 더 쉽게 사용하려고 만들어졌다. 웹사이트 제작할 때 자주 사용되는 기능들을
쉽게 사용될 수 있도록 모아놓은 자바스크립트 라이브러리이다.
DOM형식의 자바스크립트 코드는 복잡하고 길지만 jQuery는 더 직관적이고 짧고 단순하다.
참고사이트
jQuery
What is jQuery? jQuery is a fast, small, and feature-rich JavaScript library. It makes things like HTML document traversal and manipulation, event handling, animation, and Ajax much simpler with an easy-to-use API that works across a multitude of browsers.
jquery.com
라이브러리 다운로드는 아래와 같이 위에 두개의 파일을 마우스오른쪽버튼 - 다른 이름으로 링크저장을 누른다.
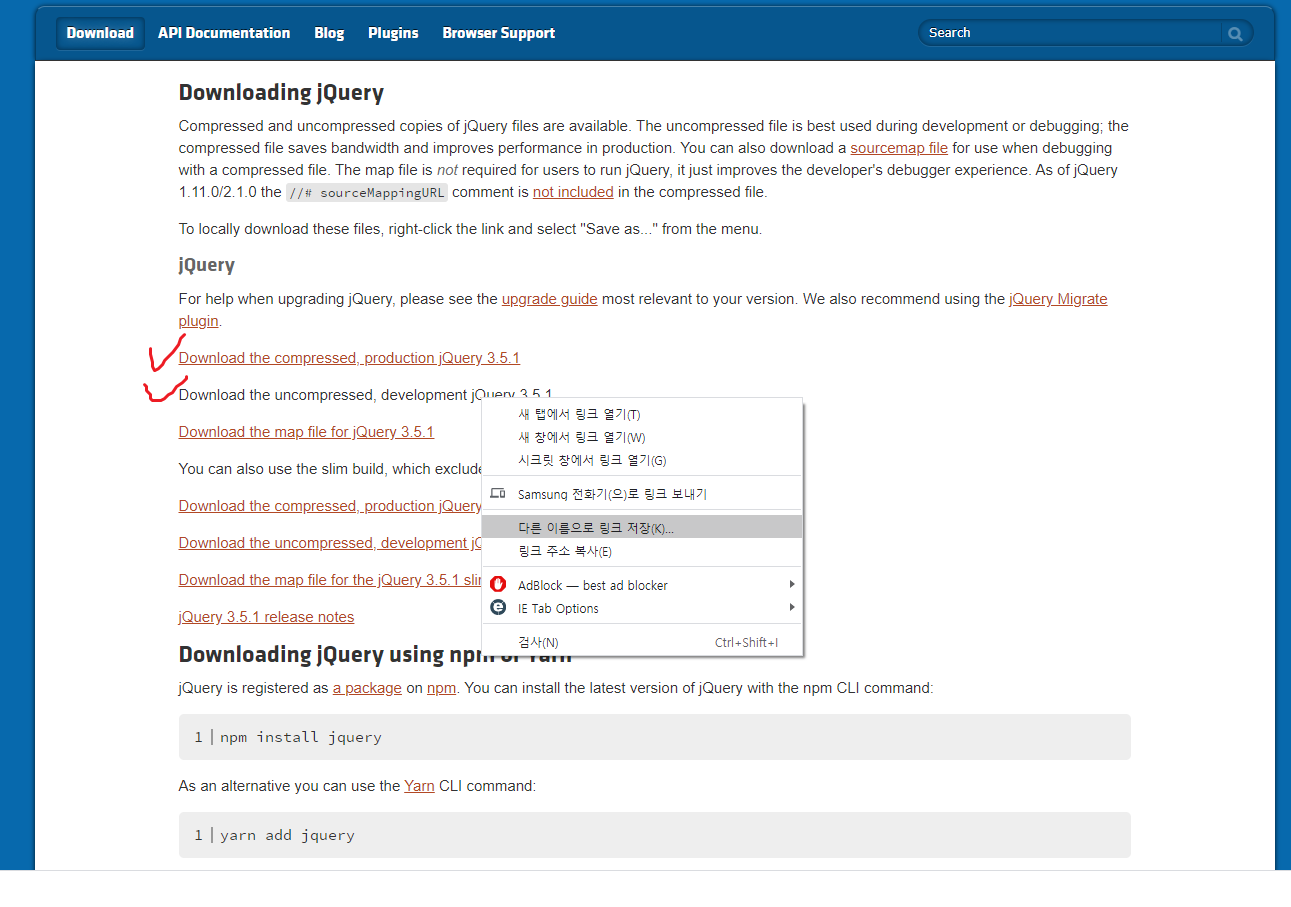
다운로드된 파일을 메모장으로 열어보면 공백이 없는데 이를 zipping이라고 한다. zipping은 네트워크 부하 감소를 위해서 불필요한 공백을 제거하는 것을 의미한다.
또한 파일명에 ~min.js로 사용하는데 min이 붙어있으면 소스를 볼 수 있다.
ㅇjQuery 사용하기
이제 jQuery를 사용해보자.
새로운 다이나믹웹프로젝트 생성 - 웹콘텐츠에 js란 폴더 생성 - js폴더 안에 위에서 다운받은 2개의 js파일 집어넣기
-ex01.jsp
<%@ page language="java" contentType="text/html; charset=UTF-8"
    pageEncoding="UTF-8"%>
<!DOCTYPE html>
<html>
<head>
<meta charset="UTF-8">
<title>Insert title here</title>

<!-- 라이브러리 불러오기  달러표시를 사용할 수 있음-->
<script type="text/javascript" src="./js/jquery-3.5.1.js"></script>

<script type="text/javascript">
	//자바스크립트안에 $가 있으면 jQuery이다.
	//$( document ).ready()는 window.onload와 같은 뜻이다.
	$( document ).ready( function() {
		alert( 'Hello jQuery' );
	})
</script>

</head>
<body>

</body>
</html>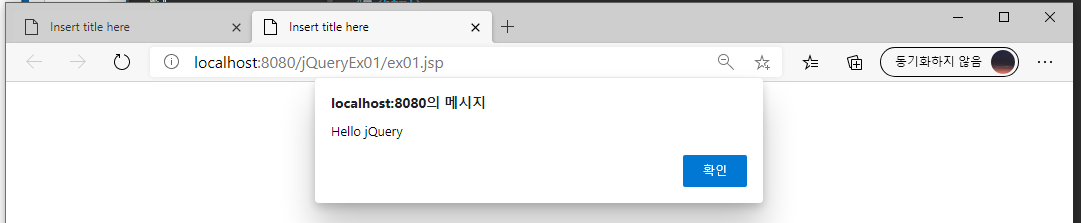
이번에는 공개된 라이브러리르 가져와서 사용해보자.
이를 CDN(Content Delivery Network)라고 하고 이를 이용하면 버전관리를 안해도되고 그저 가져와서 사용하기만 하면된다.
아까 jQuery 다운로드 페이지에서 아래로 내리면 다음과 같은 화면이 나오는데
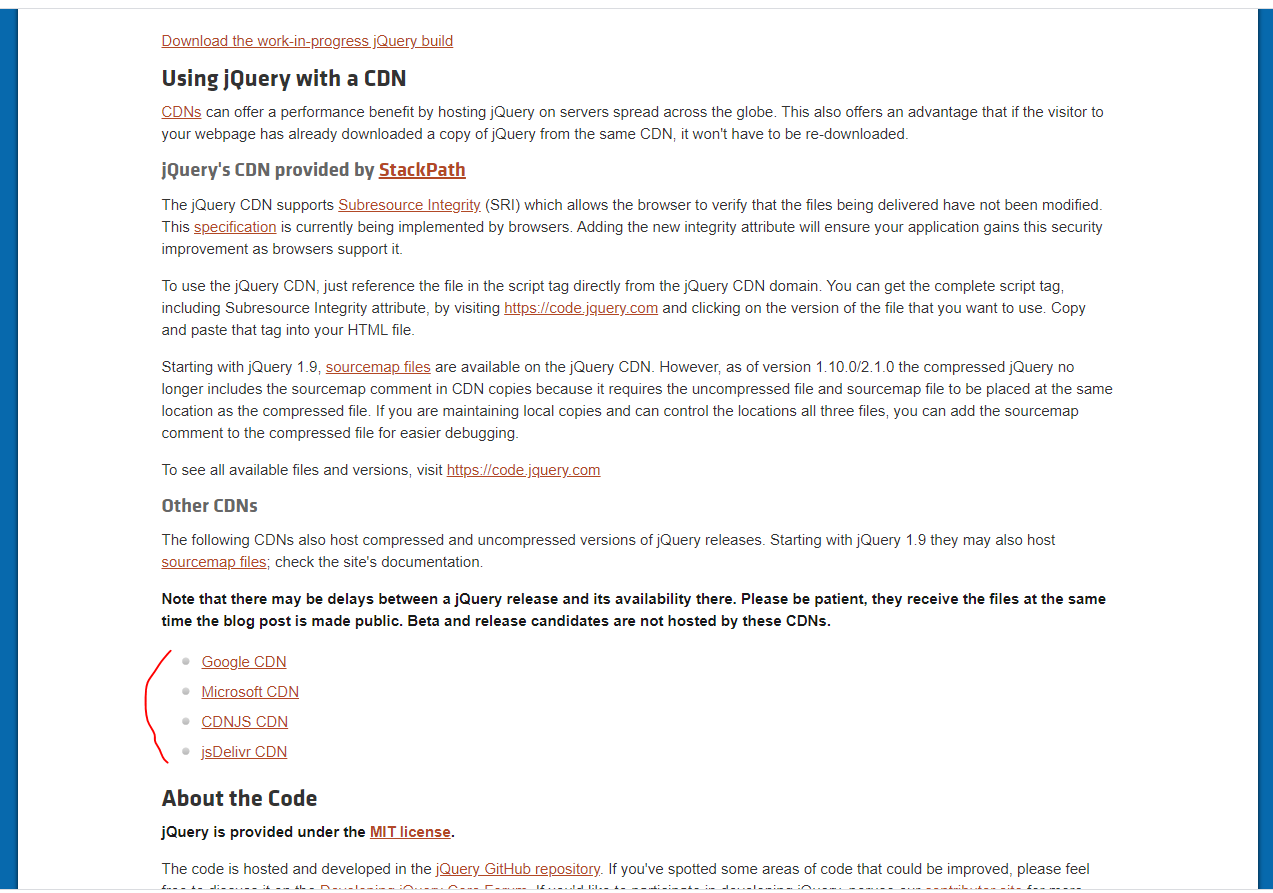
여기서 구글에 들어가서 아래처럼 복사해서 사용해보자.
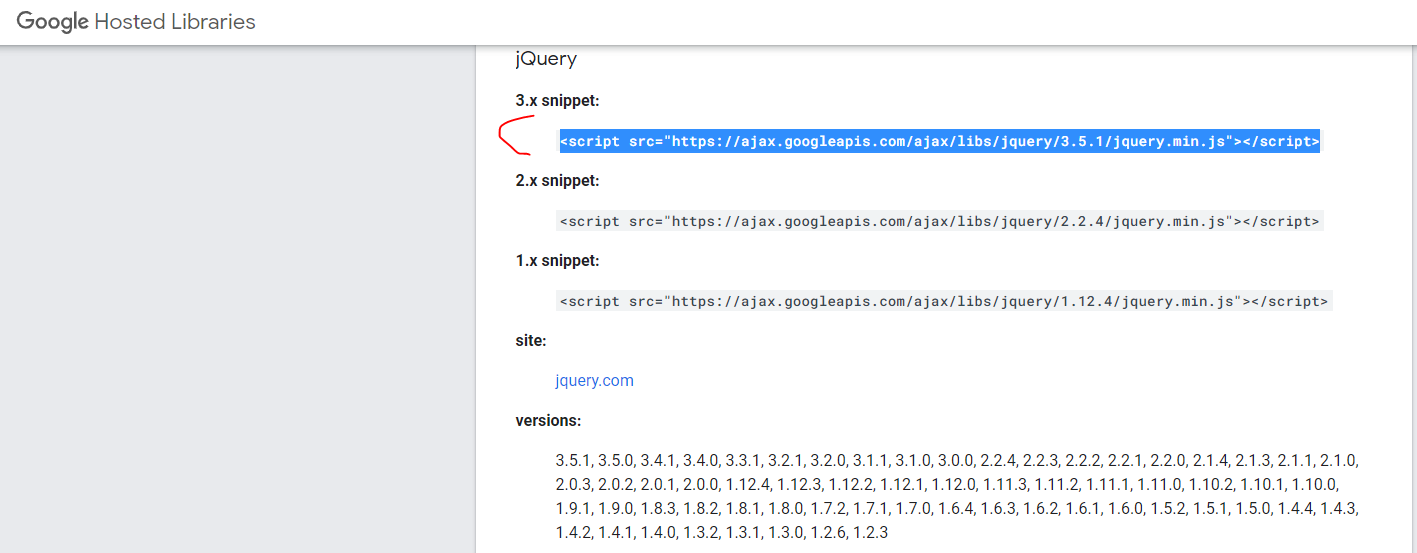
-ex01.jsp
<%@ page language="java" contentType="text/html; charset=UTF-8"
    pageEncoding="UTF-8"%>
<!DOCTYPE html>
<html>
<head>
<meta charset="UTF-8">
<title>Insert title here</title>

<!-- 라이브러리 불러오기  달러표시를 사용할 수 있음-->
<!-- <script type="text/javascript" src="./js/jquery-3.5.1.js"></script> -->
<!-- <script type="text/javascript" src="./js/jquery-3.5.1.min.js"></script> -->
<script src="https://ajax.googleapis.com/ajax/libs/jquery/3.5.1/jquery.min.js"></script>

<script type="text/javascript">
	//자바스크립트안에 $가 있으면 jQuery이다.
	//$( document ).ready()는 window.onload와 같은 뜻이다.
	$( document ).ready( function() {
		alert( 'Hello jQuery' );
	})
</script>

</head>
<body>

</body>
</html>
잘 사용되는 것을 알 수 있다.
이번에는 태그선택기를 사용해보자.
$( 'css셀렉터')를 적어주면 된다.
-ex02.jsp
<%@ page language="java" contentType="text/html; charset=UTF-8"
    pageEncoding="UTF-8"%>
<!DOCTYPE html>
<html>
<head>
<meta charset="UTF-8">
<title>Insert title here</title>

<!-- 라이브러리 불러오기  달러표시를 사용할 수 있음-->
<!-- <script type="text/javascript" src="./js/jquery-3.5.1.js"></script> -->
<!-- <script type="text/javascript" src="./js/jquery-3.5.1.min.js"></script> -->
<script src="https://ajax.googleapis.com/ajax/libs/jquery/3.5.1/jquery.min.js"></script>

<script type="text/javascript">
	//$( CSS 셀렉터 ) - 이와같이 사용하면 html태그를 선택할 수 있다.
	//$( '*' ) - 모든 html 태그를 의미
	//$( '*' ).메서드 - 기능
	//$( '*' ).css( 'color', 'red' ) - 모든 태그에 css color속성에 red를 준다.
	$( document ).ready( function() {
		$( '*' ).css('color', 'red');

		//객체형식으로 색깔지정하기
		$('*').css({
			'color': 'red'
		});
	})
</script>

</head>
<body>

</body>
</html>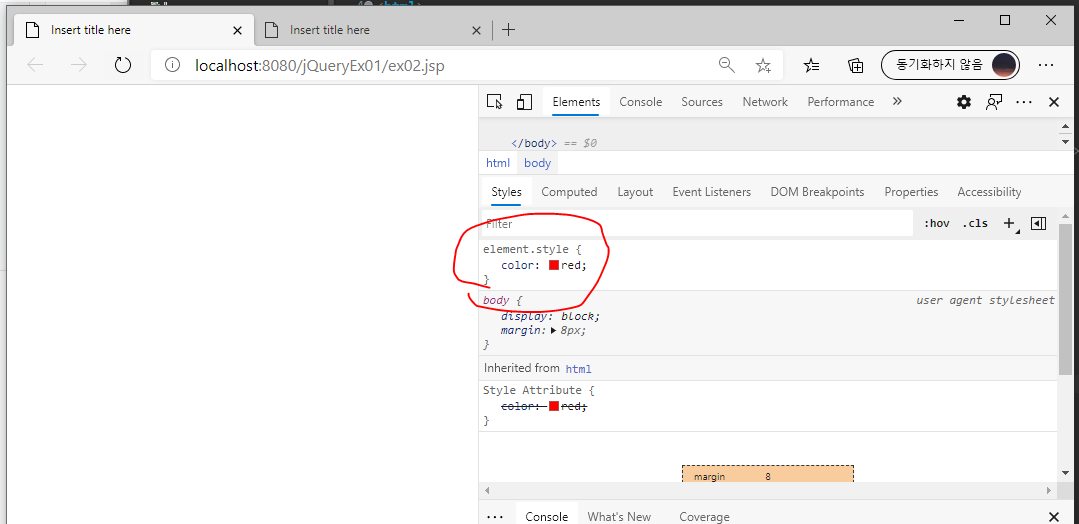
이번에는 태그셀렉터 중에 id, tag, class를 사용해보자.
<%@ page language="java" contentType="text/html; charset=UTF-8"
    pageEncoding="UTF-8"%>
<!DOCTYPE html>
<html>
<head>
<meta charset="UTF-8">
<title>Insert title here</title>

<script src="https://ajax.googleapis.com/ajax/libs/jquery/3.5.1/jquery.min.js"></script>

<script type="text/javascript">
	//$( tag/id/class ).css('color', 'red')
	$( document ).ready( function() {
		$( 'body' ).css( 'backgroundColor', 'red' );
	})
</script>

</head>
<body>

</body>
</html>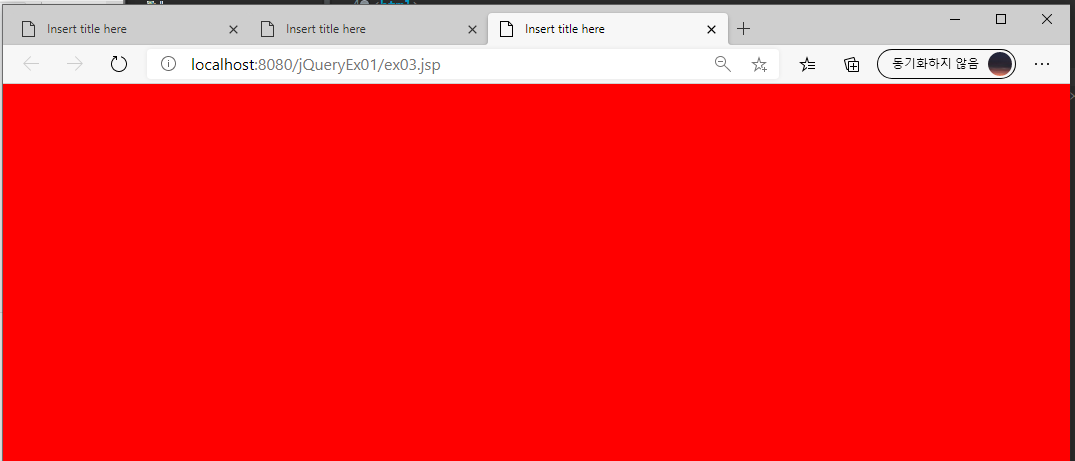
더 이해하기 쉽게 나눠서 사용해보자.
<%@ page language="java" contentType="text/html; charset=UTF-8"
    pageEncoding="UTF-8"%>
<!DOCTYPE html>
<html>
<head>
<meta charset="UTF-8">
<title>Insert title here</title>

<script src="https://ajax.googleapis.com/ajax/libs/jquery/3.5.1/jquery.min.js"></script>

<script type="text/javascript">
	//$( tag/id/class ).css('color', 'red')
	$( document ).ready( function() {
		$( 'body' ).css( 'backgroundColor', 'yellow' );
		$( 'h1' ).css( 'color', 'green' );
	})
</script>

</head>
<body>

<h1>Hello jQuery 1</h1>
<h2>Hello jQuery 2</h2>
<h1>Hello jQuery 3</h1>
<h2>Hello jQuery 4</h2>

</body>
</html>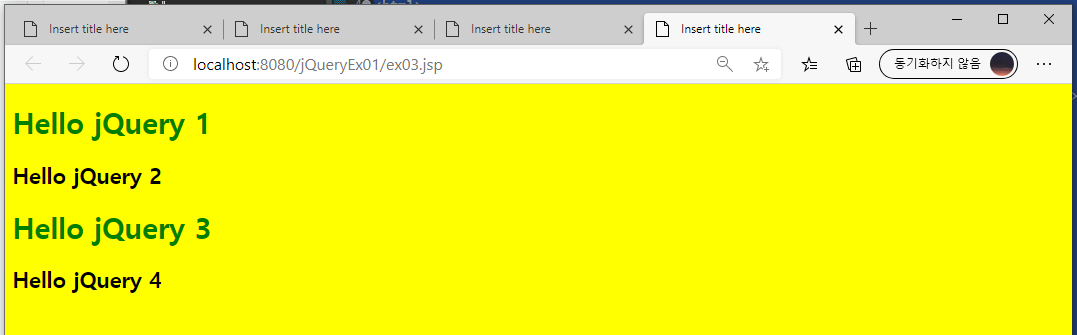
변수를 사용해서 css를 적용할 수 있다.
<%@ page language="java" contentType="text/html; charset=UTF-8"
    pageEncoding="UTF-8"%>
<!DOCTYPE html>
<html>
<head>
<meta charset="UTF-8">
<title>Insert title here</title>

<script src="https://ajax.googleapis.com/ajax/libs/jquery/3.5.1/jquery.min.js"></script>

<script type="text/javascript">
	//$( tag/id/class ).css('color', 'red')
	$( document ).ready( function() {
		$( 'body' ).css( 'backgroundColor', 'yellow' );
		$( 'h1' ).css( 'color', 'green' );

		//변수를 사용해서 css적용시키기
		const sel = 'h2';
		$( sel ).css('color', 'blue');
	})
</script>

</head>
<body>

<h1>Hello jQuery 1</h1>
<h2>Hello jQuery 2</h2>
<h1>Hello jQuery 3</h1>
<h2>Hello jQuery 4</h2>

</body>
</html>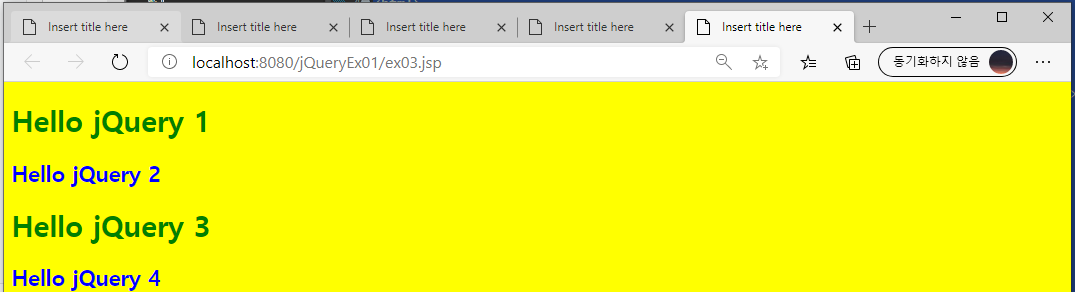
id값을 이용해서 태그에 속성을 설정할 수 있다. 두번째 제목에만 초록색을 입혀보자.
<%@ page language="java" contentType="text/html; charset=UTF-8"
    pageEncoding="UTF-8"%>
<!DOCTYPE html>
<html>
<head>
<meta charset="UTF-8">
<title>Insert title here</title>

<script src="https://ajax.googleapis.com/ajax/libs/jquery/3.5.1/jquery.min.js"></script>

<script type="text/javascript">
	//$( tag/id/class ).css('color', 'red')
	$( document ).ready( function() {
		$( 'body' ).css( 'backgroundColor', 'yellow' );
		$('#h2').css( 'color', 'green');
	})
</script>

</head>
<body>

<h1 id="h1">Hello jQuery 1</h1>
<h2 id="h2">Hello jQuery 2</h2>
<h1 id="h3">Hello jQuery 3</h1>
<h2 id="h4">Hello jQuery 4</h2>

</body>
</html>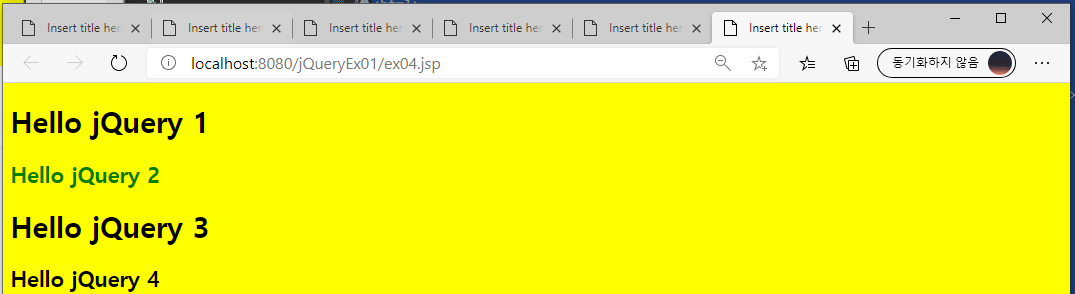
이번에는 클래스태그를 선택해서 사용해보자.
<%@ page language="java" contentType="text/html; charset=UTF-8"
    pageEncoding="UTF-8"%>
<!DOCTYPE html>
<html>
<head>
<meta charset="UTF-8">
<title>Insert title here</title>

<script src="https://ajax.googleapis.com/ajax/libs/jquery/3.5.1/jquery.min.js"></script>

<script type="text/javascript">
	//$( tag/class/class ).css('color', 'red')
	$( document ).ready( function() {
		$( 'body' ).css( 'backgroundColor', 'yellow' );
		$('.c1').css( 'color', 'green');
	})
</script>

</head>
<body>

<h1 class="c1">Hello jQuery 1</h1>
<h2 class="c1">Hello jQuery 2</h2>
<h1 class="c2">Hello jQuery 3</h1>
<h2 class="c2">Hello jQuery 4</h2>

</body>
</html>
아래와 같은 형식도 가능하다.
h2에서 h1인 클래스만 적용
<%@ page language="java" contentType="text/html; charset=UTF-8"
    pageEncoding="UTF-8"%>
<!DOCTYPE html>
<html>
<head>
<meta charset="UTF-8">
<title>Insert title here</title>

<script src="https://ajax.googleapis.com/ajax/libs/jquery/3.5.1/jquery.min.js"></script>

<script type="text/javascript">
	//$( tag/class/class ).css('color', 'red')
	$( document ).ready( function() {
		$( 'body' ).css( 'backgroundColor', 'yellow' );
		$('h2.c1').css( 'color', 'green');
	})
</script>

</head>
<body>

<h1 class="c1">Hello jQuery 1</h1>
<h2 class="c1">Hello jQuery 2</h2>
<h1 class="c2">Hello jQuery 3</h1>
<h2 class="c2">Hello jQuery 4</h2>

</body>
</html>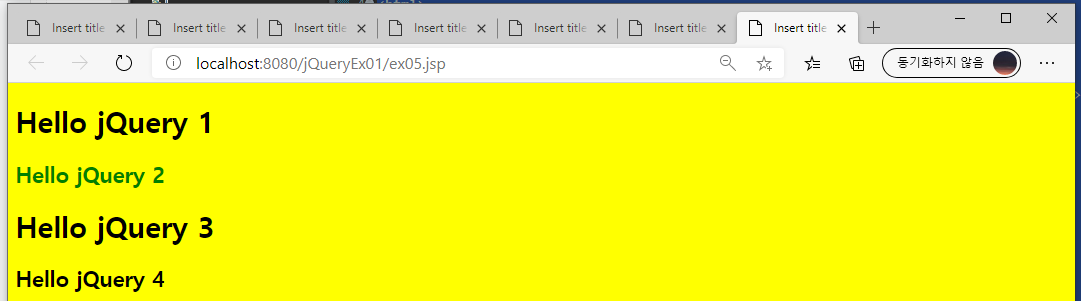
두 개에 클래스가 쓰여진 태그를 선택할 수도 있다.
<%@ page language="java" contentType="text/html; charset=UTF-8"
    pageEncoding="UTF-8"%>
<!DOCTYPE html>
<html>
<head>
<meta charset="UTF-8">
<title>Insert title here</title>

<script src="https://ajax.googleapis.com/ajax/libs/jquery/3.5.1/jquery.min.js"></script>

<script type="text/javascript">
	//$( tag/class/class ).css('color', 'red')
	$( document ).ready( function() {
		$( 'body' ).css( 'backgroundColor', 'yellow' );
		$('.c2.c3').css( 'color', 'blue');
	})
</script>

</head>
<body>

<h1 class="c1">Hello jQuery 1</h1>
<h2 class="c1">Hello jQuery 2</h2>
<h1 class="c2">Hello jQuery 3</h1>
<h2 class="c2 c3">Hello jQuery 4</h2>

</body>
</html>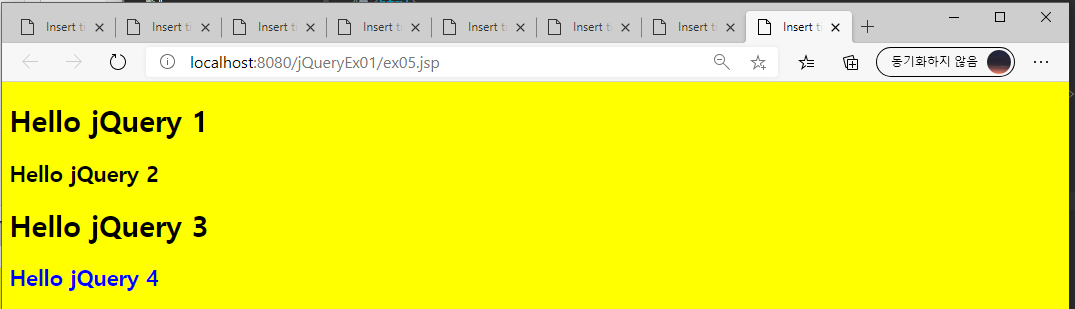
이번에는 자손과 후손을 사용해보자.
•child selector (>)
<%@ page language="java" contentType="text/html; charset=UTF-8"
    pageEncoding="UTF-8"%>
<!DOCTYPE html>
<html>
<head>
<meta charset="UTF-8">
<title>Insert title here</title>

<script src="https://ajax.googleapis.com/ajax/libs/jquery/3.5.1/jquery.min.js"></script>

<script type="text/javascript">
	$( document ).ready( function() {
		$( 'div>*' ).css('color', 'red');
	})
</script>

</head>
<body>

<div>
	<ul>
		<li>사과</li>
		<li>수박</li>
		<li>딸기</li>
	</ul>
	<ul>
		<li>사과</li>
		<li>수박</li>
		<li>딸기</li>
	</ul>
</div>

</body>
</html>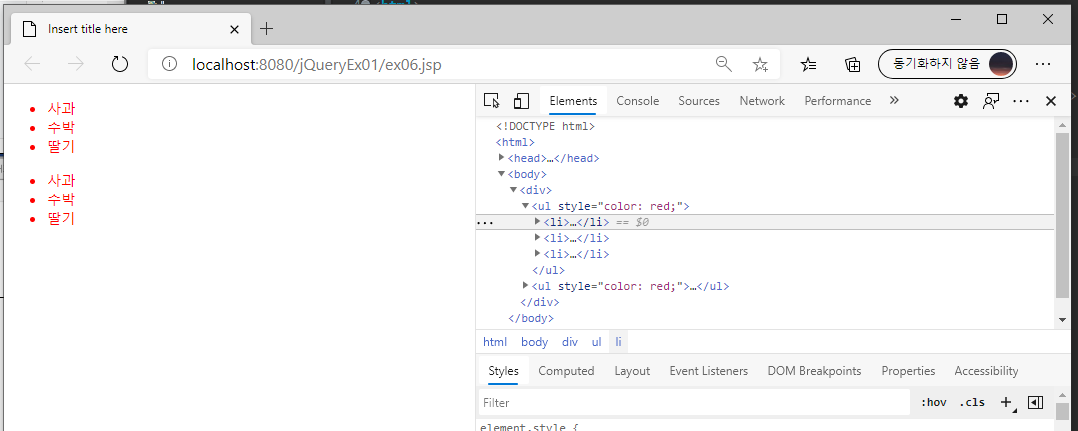
•descendant selector (space)
<%@ page language="java" contentType="text/html; charset=UTF-8"
    pageEncoding="UTF-8"%>
<!DOCTYPE html>
<html>
<head>
<meta charset="UTF-8">
<title>Insert title here</title>

<script src="https://ajax.googleapis.com/ajax/libs/jquery/3.5.1/jquery.min.js"></script>

<script type="text/javascript">
	$( document ).ready( function() {
		$( 'div *' ).css('color', 'red');
	})
</script>

</head>
<body>

<div>
	<ul>
		<li>사과</li>
		<li>수박</li>
		<li>딸기</li>
	</ul>
	<ul>
		<li>사과</li>
		<li>수박</li>
		<li>딸기</li>
	</ul>
</div>

</body>
</html>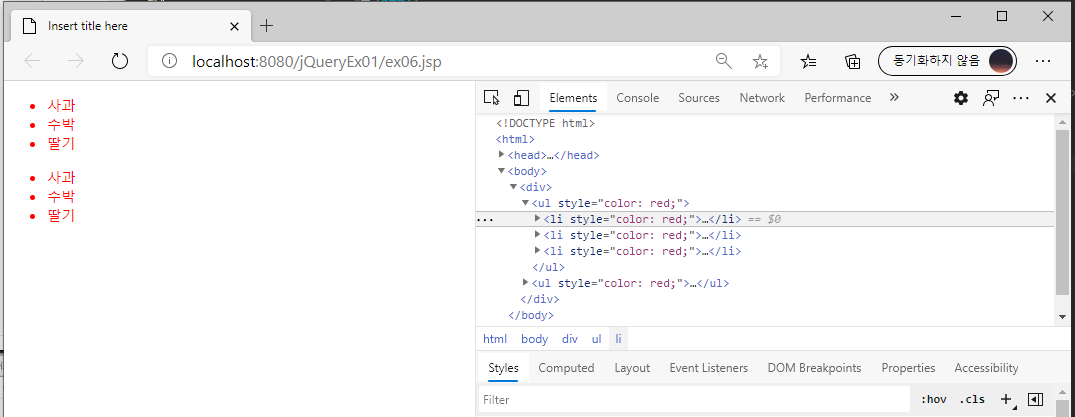
•adjacent sibling selector (+)
•general sibling selector (~)
이번에는 속성을 선택해보자
요소[속성=값] 또는 요소[속성 != 값]을 가지는 속성을 선택할 수 있다.
만약 input type이 text이면 배경색을 빨강색으로 바꿔보자.
<%@ page language="java" contentType="text/html; charset=UTF-8"
    pageEncoding="UTF-8"%>
<!DOCTYPE html>
<html>
<head>
<meta charset="UTF-8">
<title>Insert title here</title>

<script src="https://ajax.googleapis.com/ajax/libs/jquery/3.5.1/jquery.min.js"></script>

<script type="text/javascript">
	$( document ).ready( function() {
		$('input[type="text"]').css('background-color', 'red');
	})
</script>

</head>
<body>

<input type="text"/><br>
<input type="password"/><br>

</body>
</html>
하지만 위와같이 작성하면 코드가 길어지므로 아래와 같이 짧게 줄일 수 있다.
$( 'input'[type^="pa"]').css('background-color', 'blue');
<%@ page language="java" contentType="text/html; charset=UTF-8"
    pageEncoding="UTF-8"%>
<!DOCTYPE html>
<html>
<head>
<meta charset="UTF-8">
<title>Insert title here</title>

<script src="https://ajax.googleapis.com/ajax/libs/jquery/3.5.1/jquery.min.js"></script>

<script type="text/javascript">
	$( document ).ready( function() {
		$('input[type="text"]').css('background-color', 'red');
		$('input[type^="pa"]').css('background-color', 'blue');
	})
</script>

</head>
<body>

<input type="text"/><br>
<input type="password"/><br>

</body>
</html>
이번에는 입력양식을 선택해보자.
$( 'input:text' )
<%@ page language="java" contentType="text/html; charset=UTF-8"
    pageEncoding="UTF-8"%>
<!DOCTYPE html>
<html>
<head>
<meta charset="UTF-8">
<title>Insert title here</title>

<script src="https://ajax.googleapis.com/ajax/libs/jquery/3.5.1/jquery.min.js"></script>

<script type="text/javascript">
	$( document ).ready( function() {
		$('input:text').css('background-color', 'red');
	})
</script>

</head>
<body>

<input type="text"/><br>
<input type="password"/><br>

</body>
</html>
태그가 나오는 순서에 따라서 태그를 선택할 수 있다.
<%@ page language="java" contentType="text/html; charset=UTF-8"
    pageEncoding="UTF-8"%>
<!DOCTYPE html>
<html>
<head>
<meta charset="UTF-8">
<title>Insert title here</title>

<script src="https://ajax.googleapis.com/ajax/libs/jquery/3.5.1/jquery.min.js"></script>

<script type="text/javascript">
	$( document ).ready( function() {
		//순서
		$( 'table' ).css( 'width', '800' );

		//짝수와 홀수
		$( 'tr:odd' ).css( 'background-color', '#f9f9f9' );
		$( 'tr:even' ).css( 'background-color', '#9f9f9f' );

		//맨처음
		$( 'tr:first' ).css({
			'background-color': '#00000',
			'color': '#ffffff'
		});
	});
</script>

</head>
<body>

<table>
<tr>
	<th>이름</th>
	<th>혈액형</th>
	<th>지역</th>
</tr>
<tr>
	<td>강민수</td>
	<td>AB</td>
	<td>송파구</td>
</tr>
<tr>
	<td>강민수</td>
	<td>AB</td>
	<td>송파구</td>
</tr>
<tr>
	<td>강민수</td>
	<td>AB</td>
	<td>송파구</td>
</tr>
<tr>
	<td>강민수</td>
	<td>AB</td>
	<td>송파구</td>
</tr>
<tr>
	<td>강민수</td>
	<td>AB</td>
	<td>송파구</td>
</tr>
<tr>
	<td>강민수</td>
	<td>AB</td>
	<td>송파구</td>
</tr>
</table>

</body>
</html>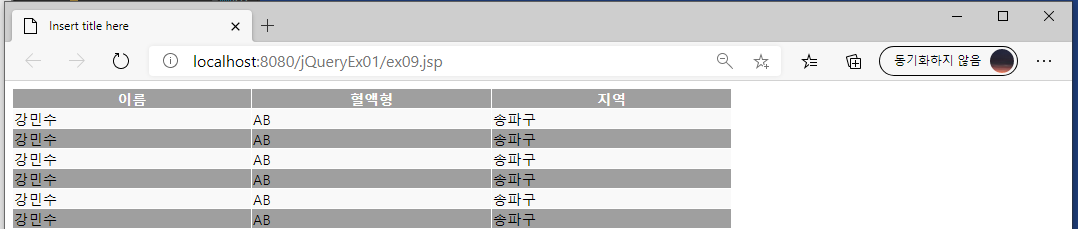
이번에는 함수를 선택해보자.
<%@ page language="java" contentType="text/html; charset=UTF-8"
    pageEncoding="UTF-8"%>
<!DOCTYPE html>
<html>
<head>
<meta charset="UTF-8">
<title>Insert title here</title>

<script src="https://ajax.googleapis.com/ajax/libs/jquery/3.5.1/jquery.min.js"></script>

<script type="text/javascript">
	$( document ).ready( function() {
		//함수
		$( 'table' ).css( 'width', '800' );

		$( 'tr:nth-child(2n)' ).css( 'background-color', '#f9f9f9' );
		$( 'tr:nth-child(2n+1)' ).css( 'background-color', '#9f9f9f' );

		$( 'tr:eq(0)' ).css({
			'background-color': '#00000',
			'color':'#ffffff'
		});

		$( 'td:nth-child(3n)' ).css( 'color', 'red' );
		$( 'td:nth-child(3n+1)' ).css( 'color', 'blue' );
		$( 'td:nth-child(3n+2)' ).css( 'color', 'green' );
	});
</script>

</head>
<body>

<table>
<tr>
	<th>이름</th>
	<th>혈액형</th>
	<th>지역</th>
</tr>
<tr>
	<td>강민수</td>
	<td>AB</td>
	<td>송파구</td>
</tr>
<tr>
	<td>강민수</td>
	<td>AB</td>
	<td>송파구</td>
</tr>
<tr>
	<td>강민수</td>
	<td>AB</td>
	<td>송파구</td>
</tr>
<tr>
	<td>강민수</td>
	<td>AB</td>
	<td>송파구</td>
</tr>
<tr>
	<td>강민수</td>
	<td>AB</td>
	<td>송파구</td>
</tr>
<tr>
	<td>강민수</td>
	<td>AB</td>
	<td>송파구</td>
</tr>
</table>

</body>
</html>
이번에는 배열을 사용해본다.
<%@ page language="java" contentType="text/html; charset=UTF-8"
    pageEncoding="UTF-8"%>
<!DOCTYPE html>
<html>
<head>
<meta charset="UTF-8">
<title>Insert title here</title>

<script src="https://ajax.googleapis.com/ajax/libs/jquery/3.5.1/jquery.min.js"></script>

<script type="text/javascript">
	$( document ).ready( function() {
		//jQuery에서 사용할 수 있는 배열조작
		const array = [
			{ name: 'daum', link: 'https://www.daum.net' },
			{ name: 'naver', link: 'https://www.naver.com' },
			{ name: 'google', link: 'https://www.google.com' }
		];

		for( let i=0; i<array.length; i++ ) {
			console.log( array[i].name, array[i].link );
		}

		for( let i in array ) {
			console.log( array[i].name, array[i].link );
		}

		//array forEach
		array.forEach( (item) => {
			console.log( item.name, item.link );
		});

		//jQuery 기법
		$.each( array, ( index, item ) => {
			console.log( item.name, item.link );
		});
	});
</script>

</head>
<body>


</body>
</html>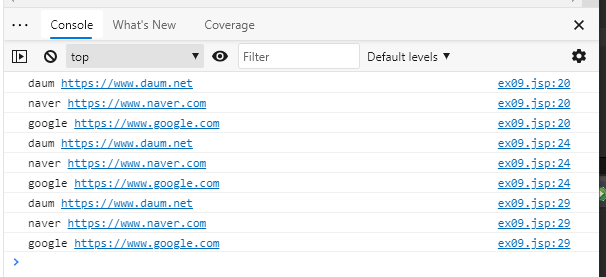
링크 출력해보기
<%@ page language="java" contentType="text/html; charset=UTF-8"
    pageEncoding="UTF-8"%>
<!DOCTYPE html>
<html>
<head>
<meta charset="UTF-8">
<title>Insert title here</title>

<script src="https://ajax.googleapis.com/ajax/libs/jquery/3.5.1/jquery.min.js"></script>

<script type="text/javascript">
	$( document ).ready( function() {
		//jQuery에서 사용할 수 있는 배열조작
		const array = [
			{ name: 'daum', link: 'https://www.daum.net' },
			{ name: 'naver', link: 'https://www.naver.com' },
			{ name: 'google', link: 'https://www.google.com' }
		];

		let output = '';
		$.each( array, ( index, item ) => {
			output += '<a href="'+ item.link +'">';
			output += '<h3>' + item.name + '</h3>';
			output += '</a><br>'
		});

		document.body.innerHTML = output;
	});
</script>

</head>
<body>


</body>
</html>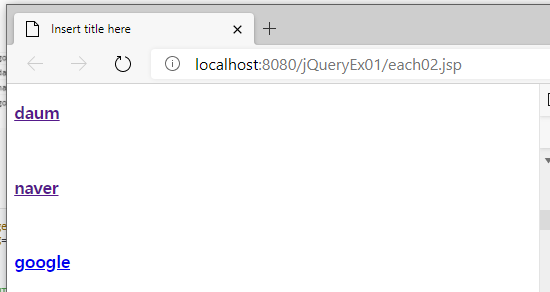
객체 사용하기
<%@ page language="java" contentType="text/html; charset=UTF-8"
    pageEncoding="UTF-8"%>
<!DOCTYPE html>
<html>
<head>
<meta charset="UTF-8">
<title>Insert title here</title>

<script src="https://ajax.googleapis.com/ajax/libs/jquery/3.5.1/jquery.min.js"></script>

<script type="text/javascript">
	$( document ).ready( function() {
		const object = { name:'daum', link: 'https://www.daum.net' }

		$.each( object, ( key, item ) => {
			console.log( key, item );
		});
	});
</script>

</head>
<body>


</body>
</html>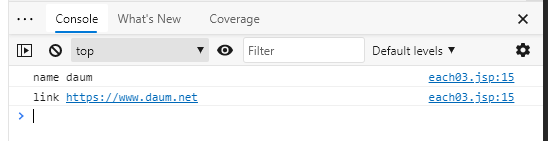
html문서쪽에서 여러개의 데이터가 있으면 아래와 같이 작성하면 데이터를 나눠서 가져올 수 있다.
<%@ page language="java" contentType="text/html; charset=UTF-8"
    pageEncoding="UTF-8"%>
<!DOCTYPE html>
<html>
<head>
<meta charset="UTF-8">
<title>Insert title here</title>

<script src="https://ajax.googleapis.com/ajax/libs/jquery/3.5.1/jquery.min.js"></script>

<script type="text/javascript">
	$( document ).ready( function() {
		$( 'h2' ).each( function( index, item ) {
			console.log( item.innerHTML );
		});
	});
</script>

</head>
<body>

<h2>item - 0</h2>
<h2>item - 1</h2>
<h2>item - 2</h2>
<h2>item - 3</h2>

</body>
</html>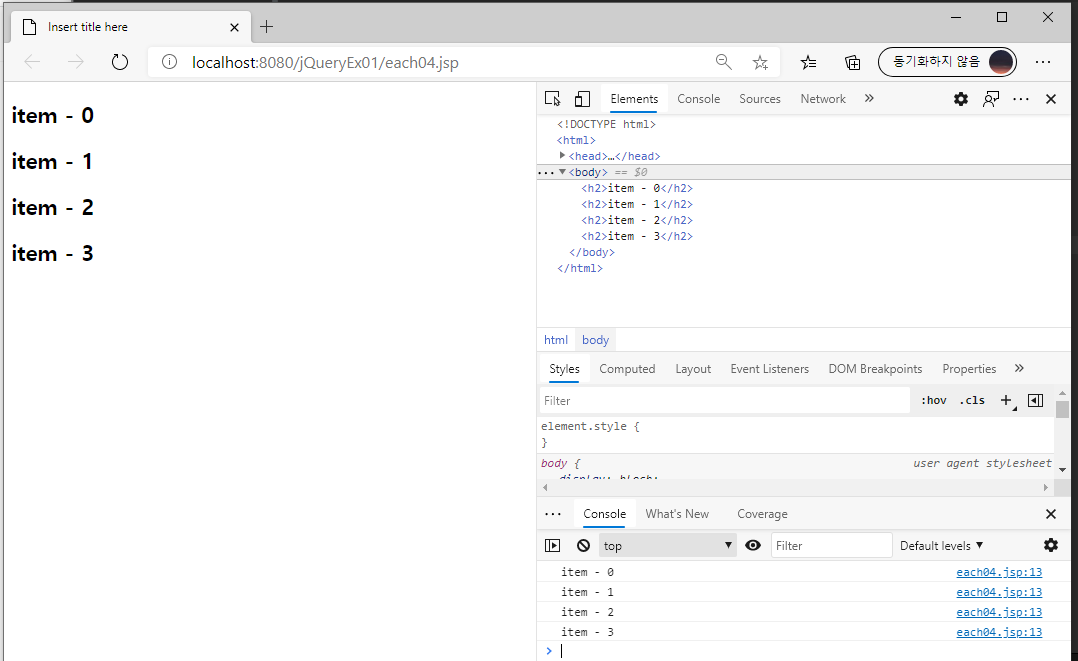
this 자기참조를 통해서 가져올 수 도 있다.
console.log( this.innerHTML );
[출처]
KIC캠퍼스


